If you are using Elementor for a long time, you must have faced some common Elementor site errors. But how can you solve them if you really don’t know the solution? Here in this blog, we are going to address 5 common Elementor site errors & the solutions with step by step guide.
5 Common Elementor Site Errors & How To Solve Those Easily
Get ready to know details about these common Elementor site errors below. You will get to know why these errors occur and how you can easily solve them by following some simple instructions and getting rid of these common errors right away. Take a look. 👇
Problem 1: Elementor Stuck on Loading Screen Error
You can design any type of website easily with Elementor without coding, and, commonly, Elementor is stuck on loading screen errors. This will create a disturbance that you have to hold for a long time to load your desired page. So let’s find out why it actually happened:
➤Most commonly it happens because of your Elementor site memory issues or can say if you are not updated to the latest PHP version. So you have to be up-to-date with the Php updates and check the Elementor memory size.
➤Another way it can happen for some particular third-party plugin installation which will cause a plugin conflict issue. Because you must have used many plugins to smoothen your workflow, and sometimes it doesn’t cope with the Elementor site environment and create this problem. This is why you have to acknowledge first whether there is any plugin conflict issue or not from your WordPress dashboard.
Solutions For Stuck on Loading Screen Error in Elementor
Here we will describe the ultimate simple step-by-step solutions for these two problems. Let’s follow the guide and get rid of these problems right away.
Solution: Increase PHP Memory Limit
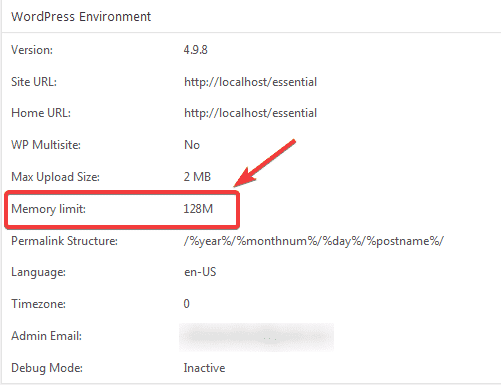
It’s recommended by Elementor to use PHP latest version 7.0 to have a great user experience without any issues, and memory size needs to extend to 128M for not to have this stuck on loading screen error.
So to solve this issue, first, you have to check it and then resolve this problem by navigating to the WordPress dashboard wp-admin -> Elementor -> System Info.
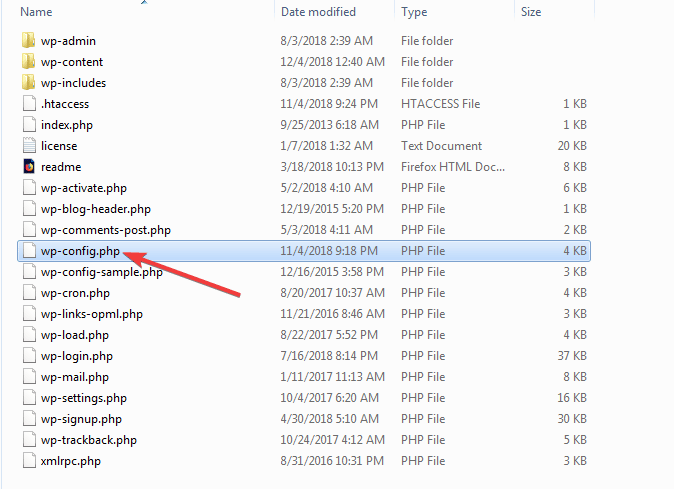
Step 1: Find The wp-config.php File
You have to modify the wp-config.php which is located in your WordPress directory. You can get access through your cPanel File Manager or FTP server.
Step 2: Open Up wp-config.php File
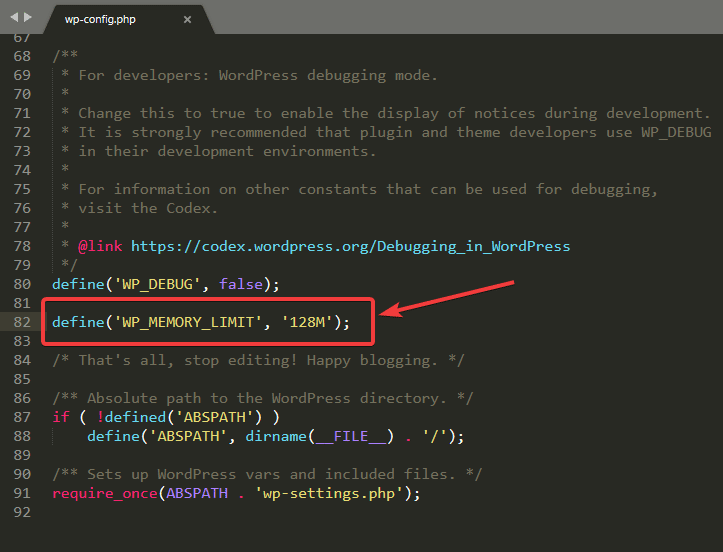
Here, you need to click and open the wp-config.php file, and look for the line that consists of “/* That’s all, stop editing! Happy blogging. */” You just have to add the code above this line that is shown in the image below to solve this problem immediately.
Step 3: Check The Changes
As you have made all the changes on the wp-config.php file memory limit, now it’s time to check it back on wp-admin -> Elementor -> System Info to see if the changes are shown there or not.
That’s it! You have just solved this problem within a few minutes by doing the following steps.
Problem 2: Plugin Conflict Solution
These issues occur for some particular plugins that are not compatible with WordPress or Elementor site environments. All you have to do is to deactivate all of your third-party plugins from the WordPress Plugins section and activate them one by one to see when the problem occurs. In this manual way, you can check and solve this problem immediately.
Tip: Check out this complete blog on “How To Resolve Elementor Stuck on Loading Screen Error” and get a step-by-step solution.
Problem 2: “The Content Area Was Not Found in Your Page” Error
If you are using Elementor, in some cases you can face the problem that stated “The Content Area Was Not Found in Your Page” error. That will create an inconvenient situation and make you stuck where you have started your work.
Let’s find out why this even happened in the first place::
➤Firstly, If you are using any custom page templates on your Elementor site, you may face this issue. Because some themes don’t support ‘the_content‘ function on their custom templates. For this reason, you can face this problem.
➤Secondly, If you ever try to edit the dynamic pages of a site like Home Page, Blog Page, or others, it’s also true for WooCommerce based Shop & Product pages. This is all because each of these doesn’t support this ‘the_content’ function. You can’t add this function to any of these related things.
➤Thirdly, the plugin conflict issue is another one common for this content area not found in your page issue. For some third-party plugins, it may happen. You have to manually check & solve this immediately as we earlier mentioned.
Instant Solutions If You Ever Faced This Issue
You can instantly solve this issue “The Content Area Was Not Found in Your Page” error in Elementor just by adding this ‘the_content’ function on your custom page templates. Take a look at all the solutions:
Method 1: Add ‘the_content’ Function On Your Template File
First, you have to navigate to WordPress Dashboard -> Appearance -> Editor. Then under the Theme, you will find the location of your current theme that you are using.
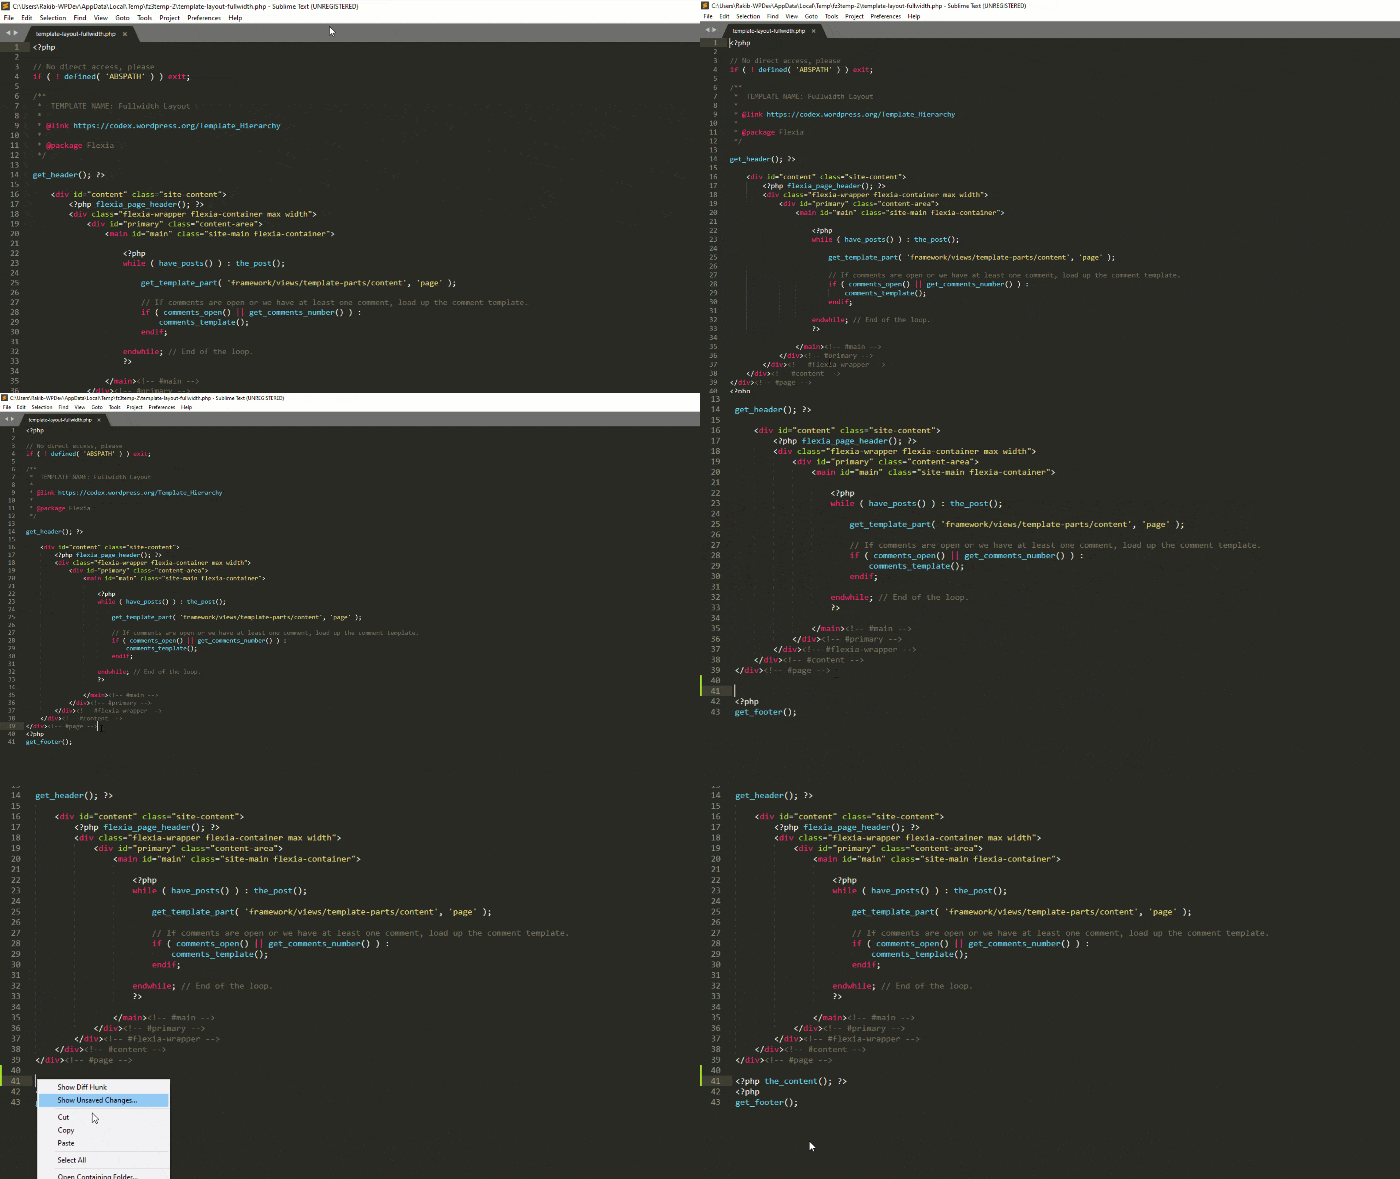
Just copy and paste this code that has been shown below and update it after adding. Afterward, go back to your Elementor Editor where you have found this issue, it will no longer be there. Simple!
Alternative Way For Method 1:
Another way of solving this problem, if you don’t want to make the changes from your WordPress site. You have to modify the theme file from your FTP Server.
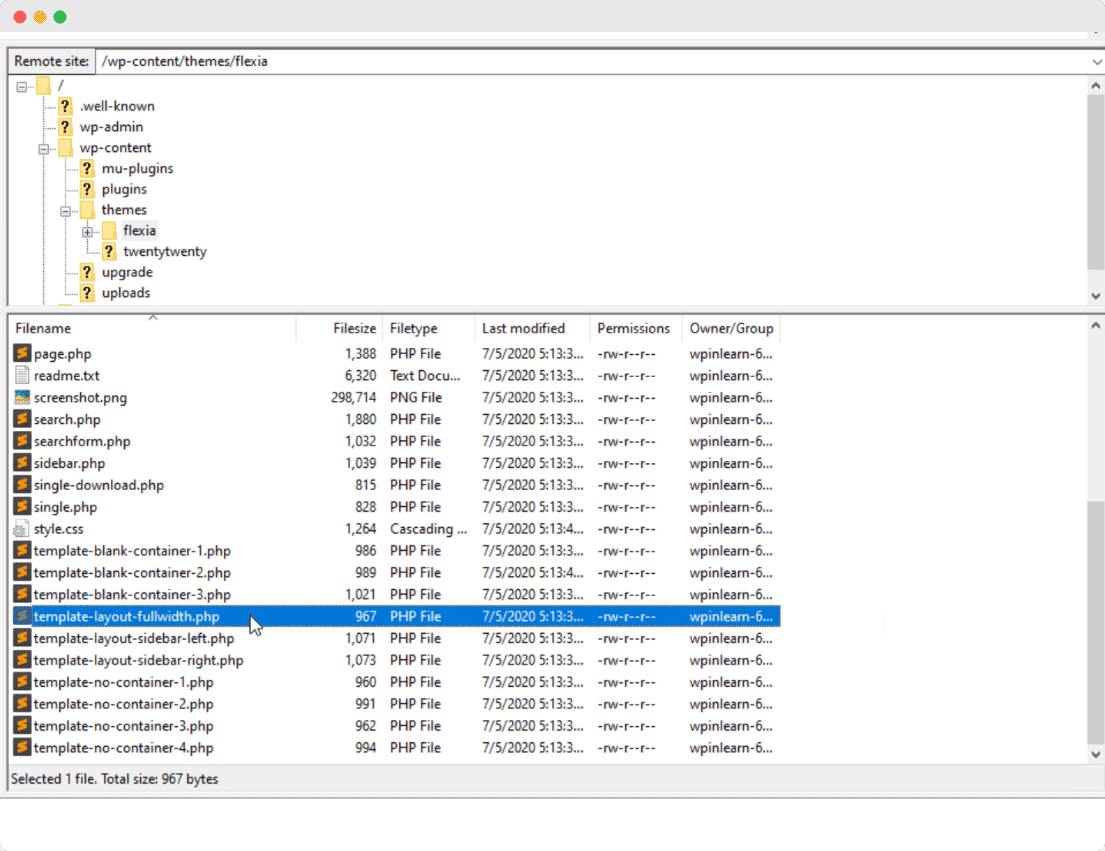 For that, you just have to navigate to wp-content -> themes and open up the template file as this has shown in the above image. Simply paste this <?php the_content(); ?> there. That’s it! If you check, this issue will no longer be available on your Elementor site.
Method 2: Change The Permalinks
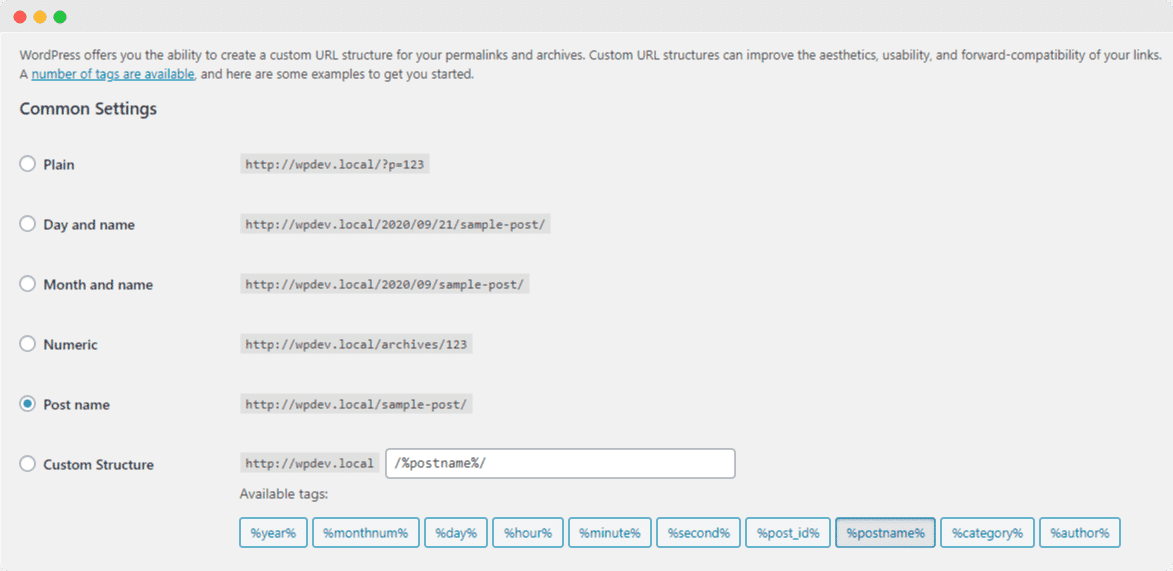
In some cases, changing the permalinks can resolve this content area without finding an error in Elementor. To solve this, go to the WordPress Dashboard -> Settings -> Permalinks. All you need to do is just reset your permalinks from there. Suppose you have used the same name for slug for each category. You need to rename it and save the changes.
Tip: For more details, check out this detailed blog here that is written particularly in this issue.
Problem 3: “The Preview Could Not Be Loaded” Error in Elementor
If you ever have found this error in your Elementor site this will happen because your PHP memory limit is not extended to 128M. You have to increase the Php memory size that we have mentioned before. Also, you can read this blog on “The Preview Could Not Be Loaded Error in Elementor” and make the changes.
Problem 4: “The Uploaded File Exceeds the upload_max_filesize” Error
This is one of the most hyped issues “The Uploaded File Exceeds the upload_max_filesize” error in Elementor that is faced and discussed in such popular communities like Reddit, Stackoverflow, and others. Let’s get to know the reasons behind this:
➤If you try to upload a larger image file with a high-resolution one, you can get this error.
➤You can even have this problem when uploading a plugin or theme whose file size is larger than it accepts.
Let’s Find Out The Solution
You can solve this problem in two ways, and let’s get the step-by-step solution below to solve this upload file that exceeds the error in Elementor. Take a look:
Method 1: Update This php.ini File
You can change your php.ini file to fix this particular file size exceeding the error in Elementor. For a solution, you have to navigate to the wp-admin folder. But it sometimes differs because of having different hosting service providers. So you have to find this php.ini file, open it, and search for this code: “upload_max_filesize”.
Next, all you have to do is to replace the section by using the following code:
upload_max_filesize = 256M
Afterward, you can just have to go ahead and refresh your website page to check further. Now just try to upload your desired file, and hopefully, it will be successfully uploaded. This is how easily you can get rid of this issue instantly.
Method 2: Modify The “.htaccess” File
If the first trick doesn’t work, you can follow this second tactic to fix this maximum file size issue in Elementor. It’s your hosting service provider who allows you to make changes on your site PHP Settings by using the .htaccess file. All you need to do is to increase the maximum file upload size from here.
To do this, you have to log in to your cPanel or get access to your FTP server. Assuming you have successfully completed all the previous steps. Now just go ahead and look for the .htaccess file that is located on the WordPress directory. Open it up and include all the following codes at the bottom of the file:
php_value upload_max_filesize 256M
php_value post_max_size 64M
php_value memory_limit 400M
php_value max_execution_time 180
php_value max_input_time 180
Tip: We have a detailed blog here for Fix Maximum File Size Error In Elementor. Make sure to read it and be more advanced
Problem 5: The 500 Error Occur While Using Elementor
If you get this issue, this is all because of your server, and you have to fix it by checking the error logs of your server to get the acknowledgment of this error. In two ways you can solve this issue one is by fixing your memory size limit, another is checking if any plugin is conflicting or not. As these two issues are mentioned above with step-by-step guidelines, there is nothing to worry about.
Tips: Check out this Top WordPress Site Maintenance blog in detail to secure your WordPress site from any harm.
If you want to read more blogs, go to this blog page and don’t forget to join our Facebook Community, and subscribe to our YouTube Channel. This is all! We have tried to enlighten you with 5 common Elemetor site errors that are faced by Elementor site users with the perfect solutions. Hope this blog will be helpful for you.
More Related Blogs:
- Solve WordPress Locked Out Error
- Fix HTTP Error Uploading Image In WordPress
- Troubleshoot the 502 Bad Gateway Error in WordPress
- Enable WP Debug Log to Check for Errors In WordPress
- Fix the Establishing Database Connection Error in WordPress




![[New Extension] How to Show Vertical Text on Elementor Websites?](https://essential-addons.com/wp-content/uploads/2025/11/Essential-Addons-New-Extension-Vertical-Text-Orientation-1024x576.jpg)


