For any web designer, coming up with new creative layouts can be exciting and thrilling. And with the new Elementor Flexbox Container, you now have more freedom and flexibility to design stunning, responsive layouts on your WordPress website. Dive in to learn more.
Elementor Flexbox Container: A New Way To Create Beautiful Layouts In WordPress
Elementor Flexbox Container is a whole new layout system that makes it easier for web creators to fit several different items in one responsive section. This feature will give you more flexibility to design attractive, one-of-a-kind websites with just a few clicks.
This new layout system will soon replace the existing layout structure in Elementor, so if you want to make yourself familiar with it, now’s your chance! Below, we have listed some of the things you can do with Elementor Flexbox Container.
Easily Optimize Layouts And Widgets Throughout Your Website
Optimizing your website layout is essential for creating any high-converting web design. After all, you want to create a web design that attracts and engages site visitors, and at the same time is performing at peak levels too.

Elementor Flexbox Container can help you in this regard, in the sense that you will be able to easily decide the alignment, direction, and placement of different items within a container, without needing to add extra columns or sections.
Discover New, Flexible & Complex Nesting Capabilities In Elementor
One of the biggest advantages of using Elementor Flexbox Container is that you can discover new, creative ways to nest multiple items together, and thus create complex designs with greater flexibility and freedom.
Create Stunning Responsive Web Pages With Flexbox Containers

Ensuring mobile responsiveness for your webpage is essential if you don’t want to lose traffic to your website. With Flexbox Container, you can experiment with different layouts and change the placement as well as order of widgets as needed on different devices. This way, you can make sure your web page is perfectly optimized for reading on devices such as smartphones or tablets.
Instantly Link Entire Container Wrappers With Just A Few Clicks
When you are thinking about a creative website design idea, not only should you consider the aesthetics of your website, but you also need to focus on the functionality. That’s where the Elementor Flexbox Container can come in handy. For instance, you can choose to hyperlink an entire container with a few clicks to improve the usability of your website.
Now that you have some ideas about all the advantages of using Elementor Flexbox Container, let’s get started with the tutorial.
Note: As of now, the Elementor Flexbox Container is still in Alpha stage and is available under the ‘Elementor Experiments’ option, a feature that allows you to explore upcoming new Elementor features that are in development.
How To Use The Elementor Flexbox Container In WordPress?
In this section, we are going to give you the step-by-step walkthrough for using Elementor Flexbox Container on your WordPress website. Do note that as the feature is still in development, a few things may change down the road in the final release.
Step 1: Activate Flexbox Container In Elementor Experiments
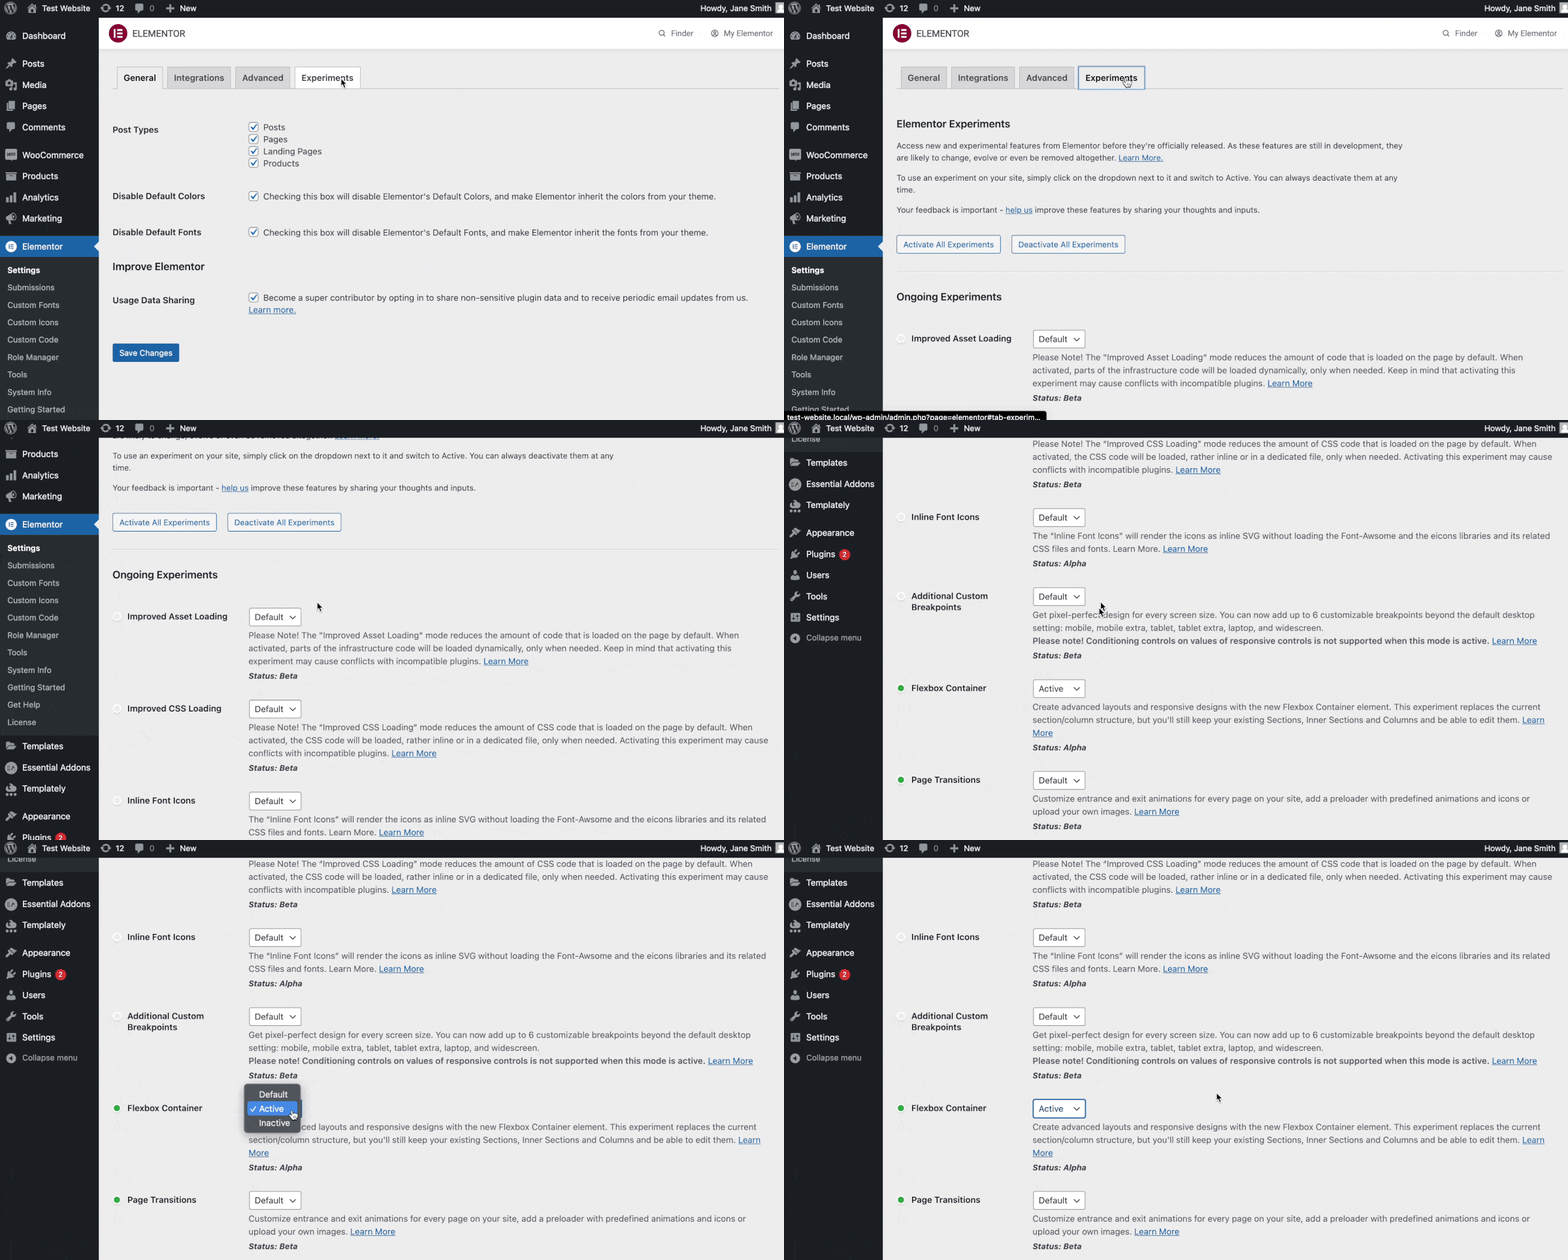
Before you can get started, you have to make sure that you have activated the Flexbox Container feature in Elementor Experiments. Head over to your WordPress dashboard and go to Elementor→ Settings. Click on the ‘Experiments’ tab and scroll down to the ‘Flexbox Container’ option under the ‘Ongoing Experiments’ section.
Here, simply make sure that the status of the ‘Flexbox Container’ is ‘Active’ as shown below.
Step 2: Drag And Drop The Container Widget On Your Page
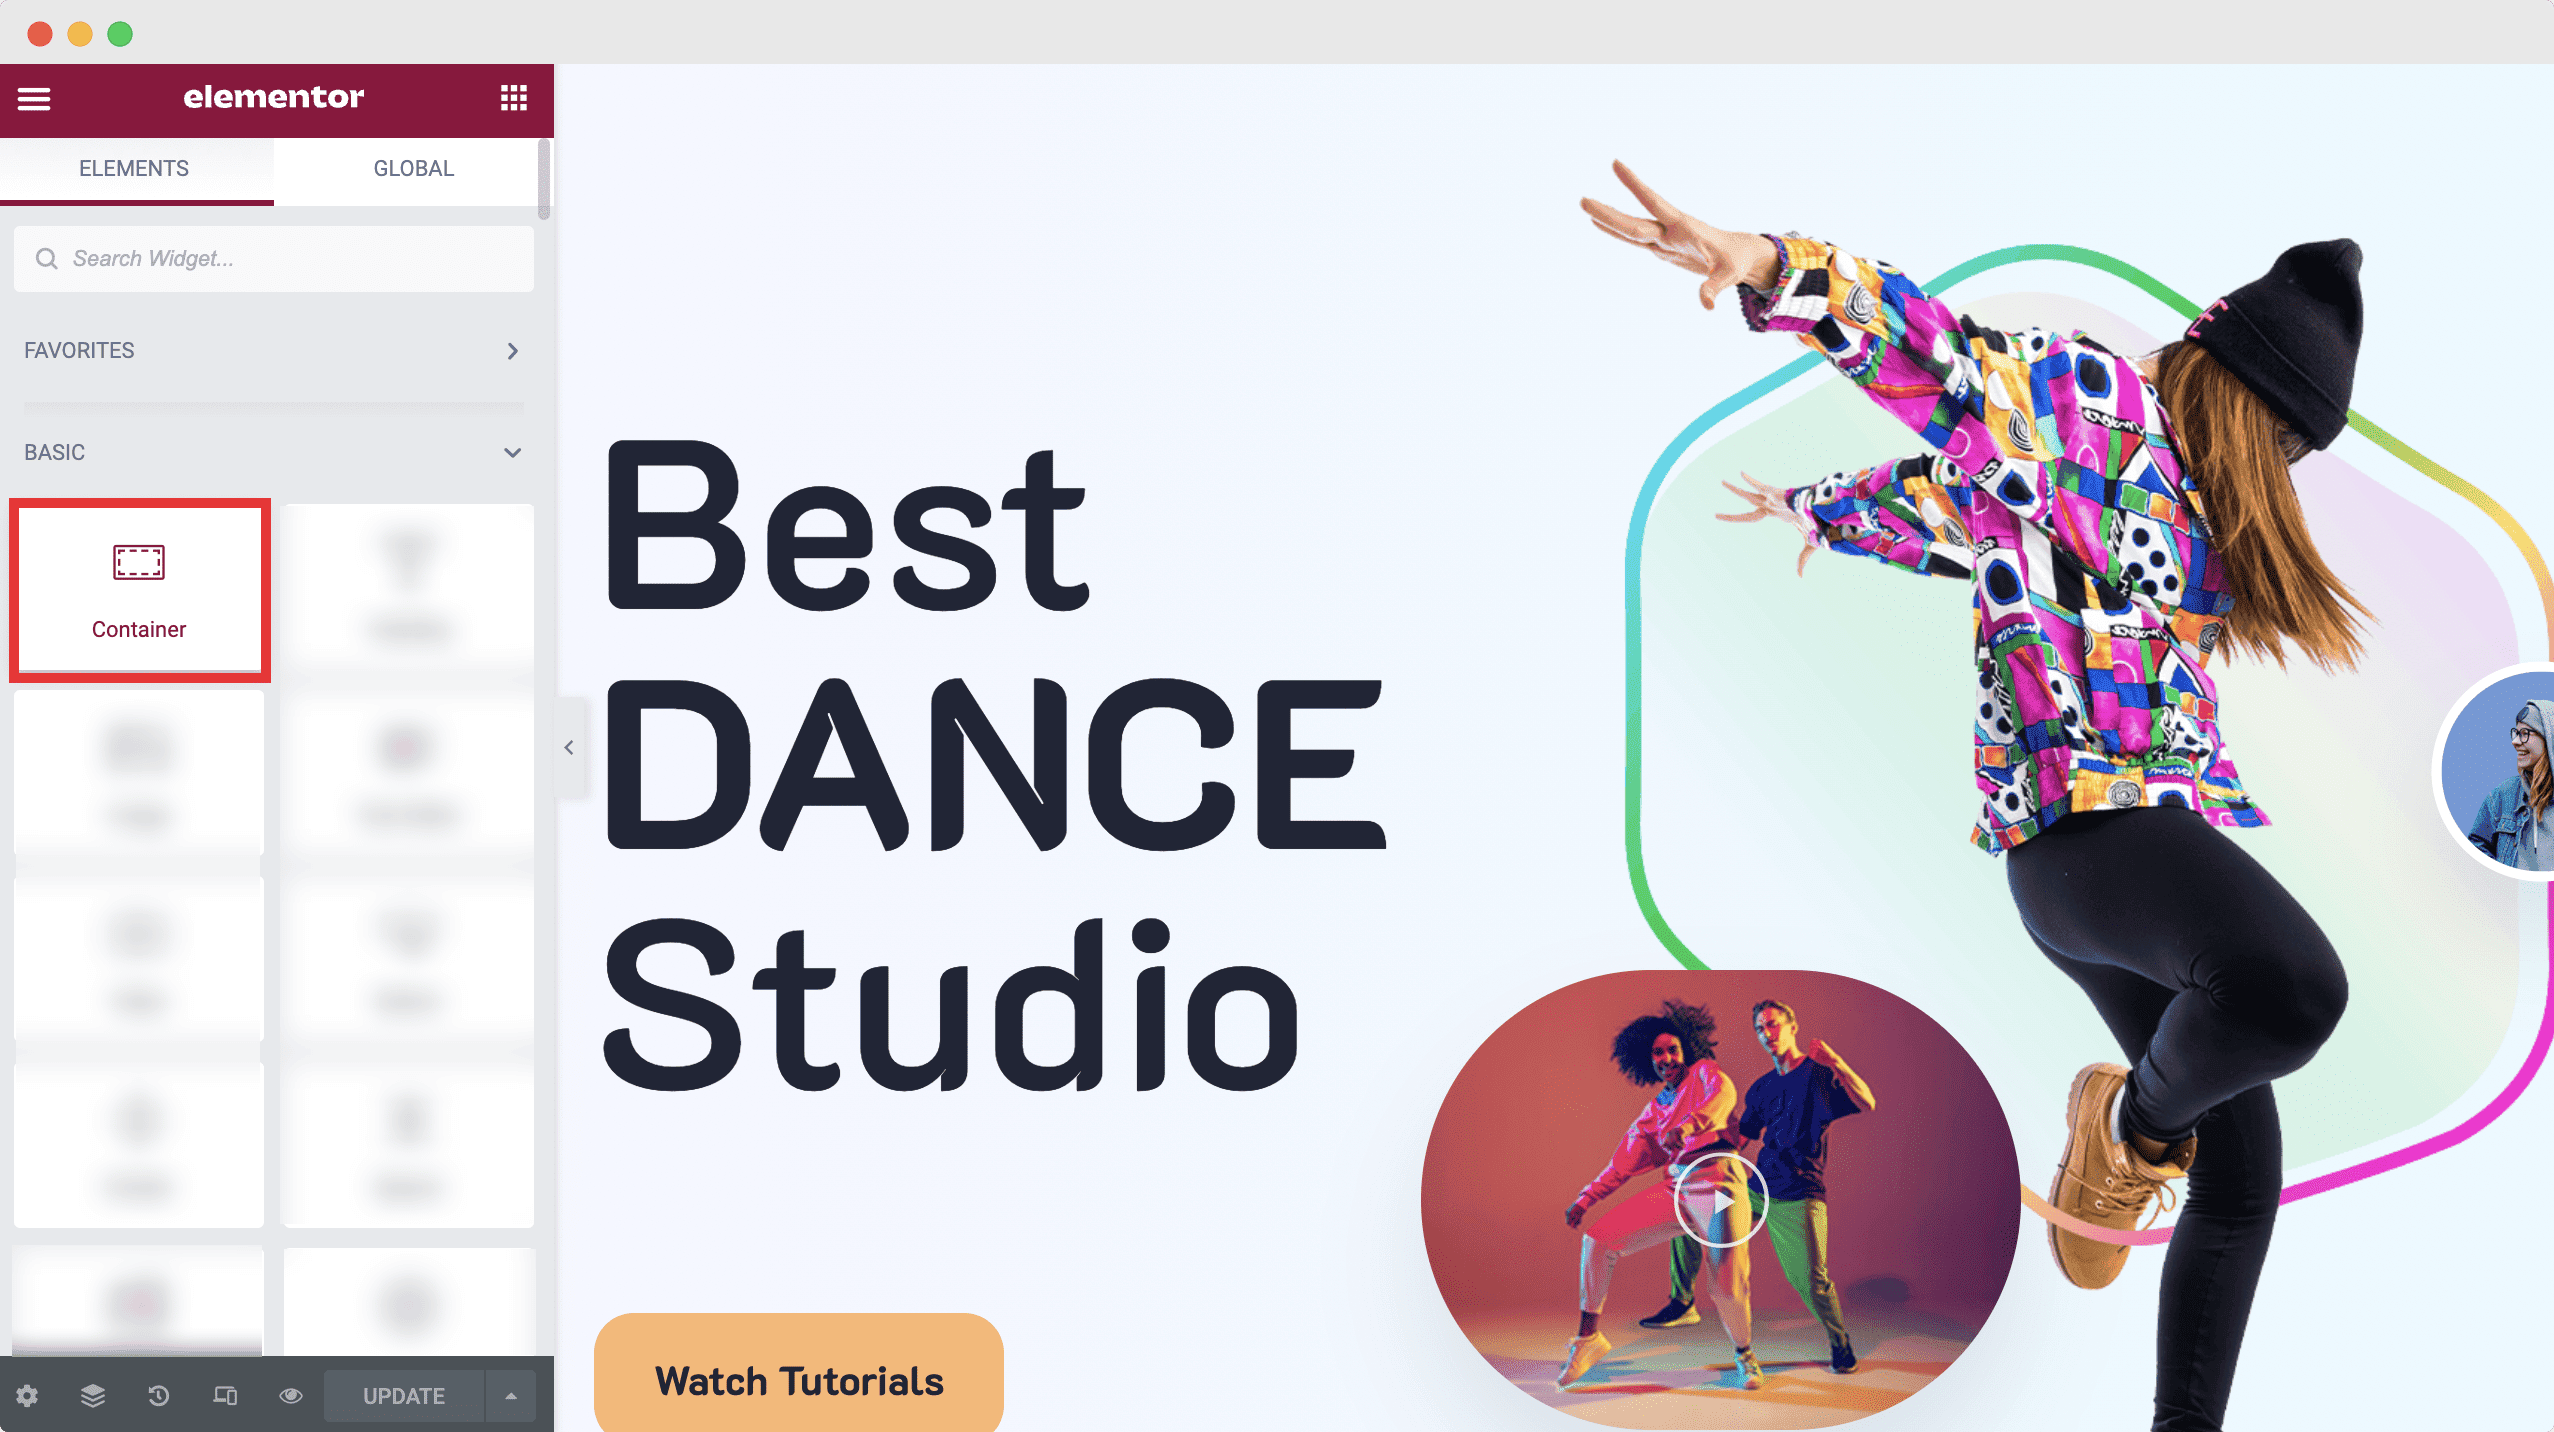
Next, go to any page on your website and click on the ‘Edit With Elementor’ button at the top. This will open up the Elementor Editor. Now all you have to do is look for the ‘Container’ element in the search panel and drag and drop it anywhere on your page.
Step 3: Play With The Settings To Create Amazing Layouts
Now it’s time for you to adjust your Container to come up with new layouts. For example, you can switch between ‘Boxed’ and ‘Full Width’ for your Container, and adjust the width and height as you need.
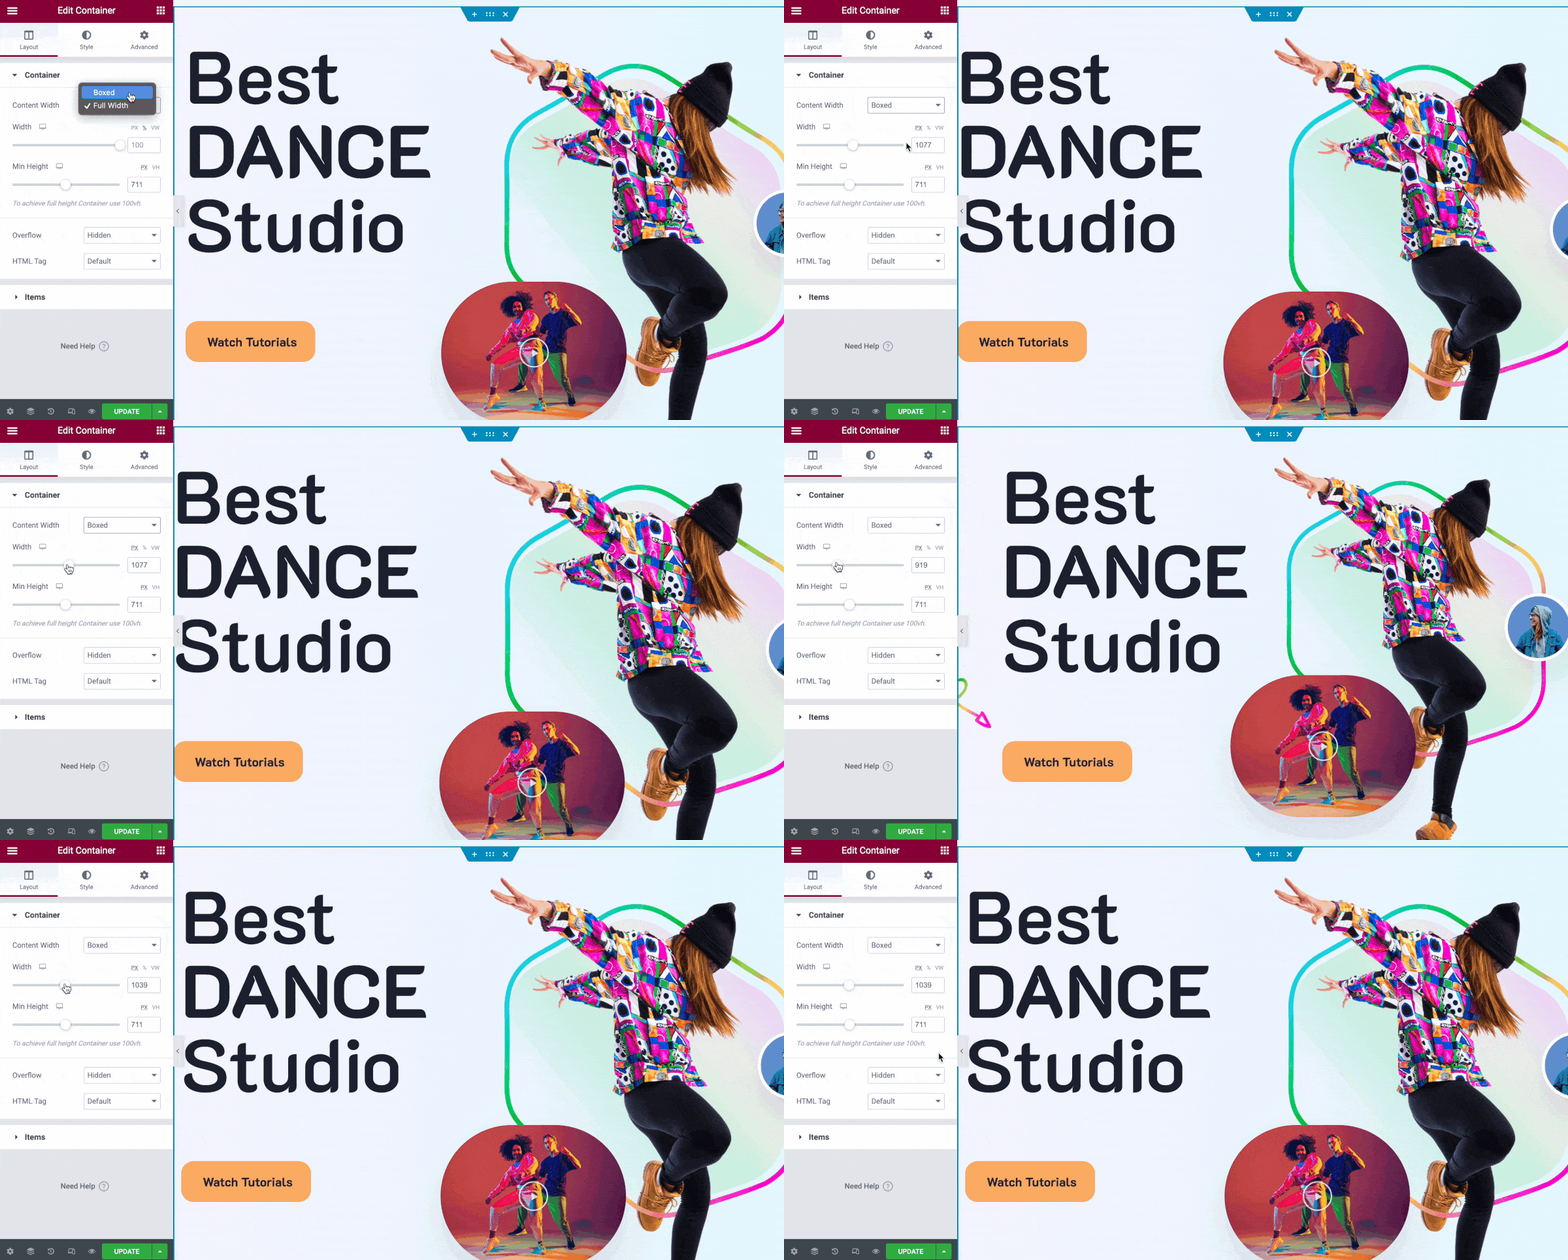
That’s not all, by clicking on the ‘Items’ option of the Container element, you will be able to change the placement and alignment of your items. You can also change the gap between the elements inside the Container widget, and decide if all the items should be forced inside a wrapper or not.
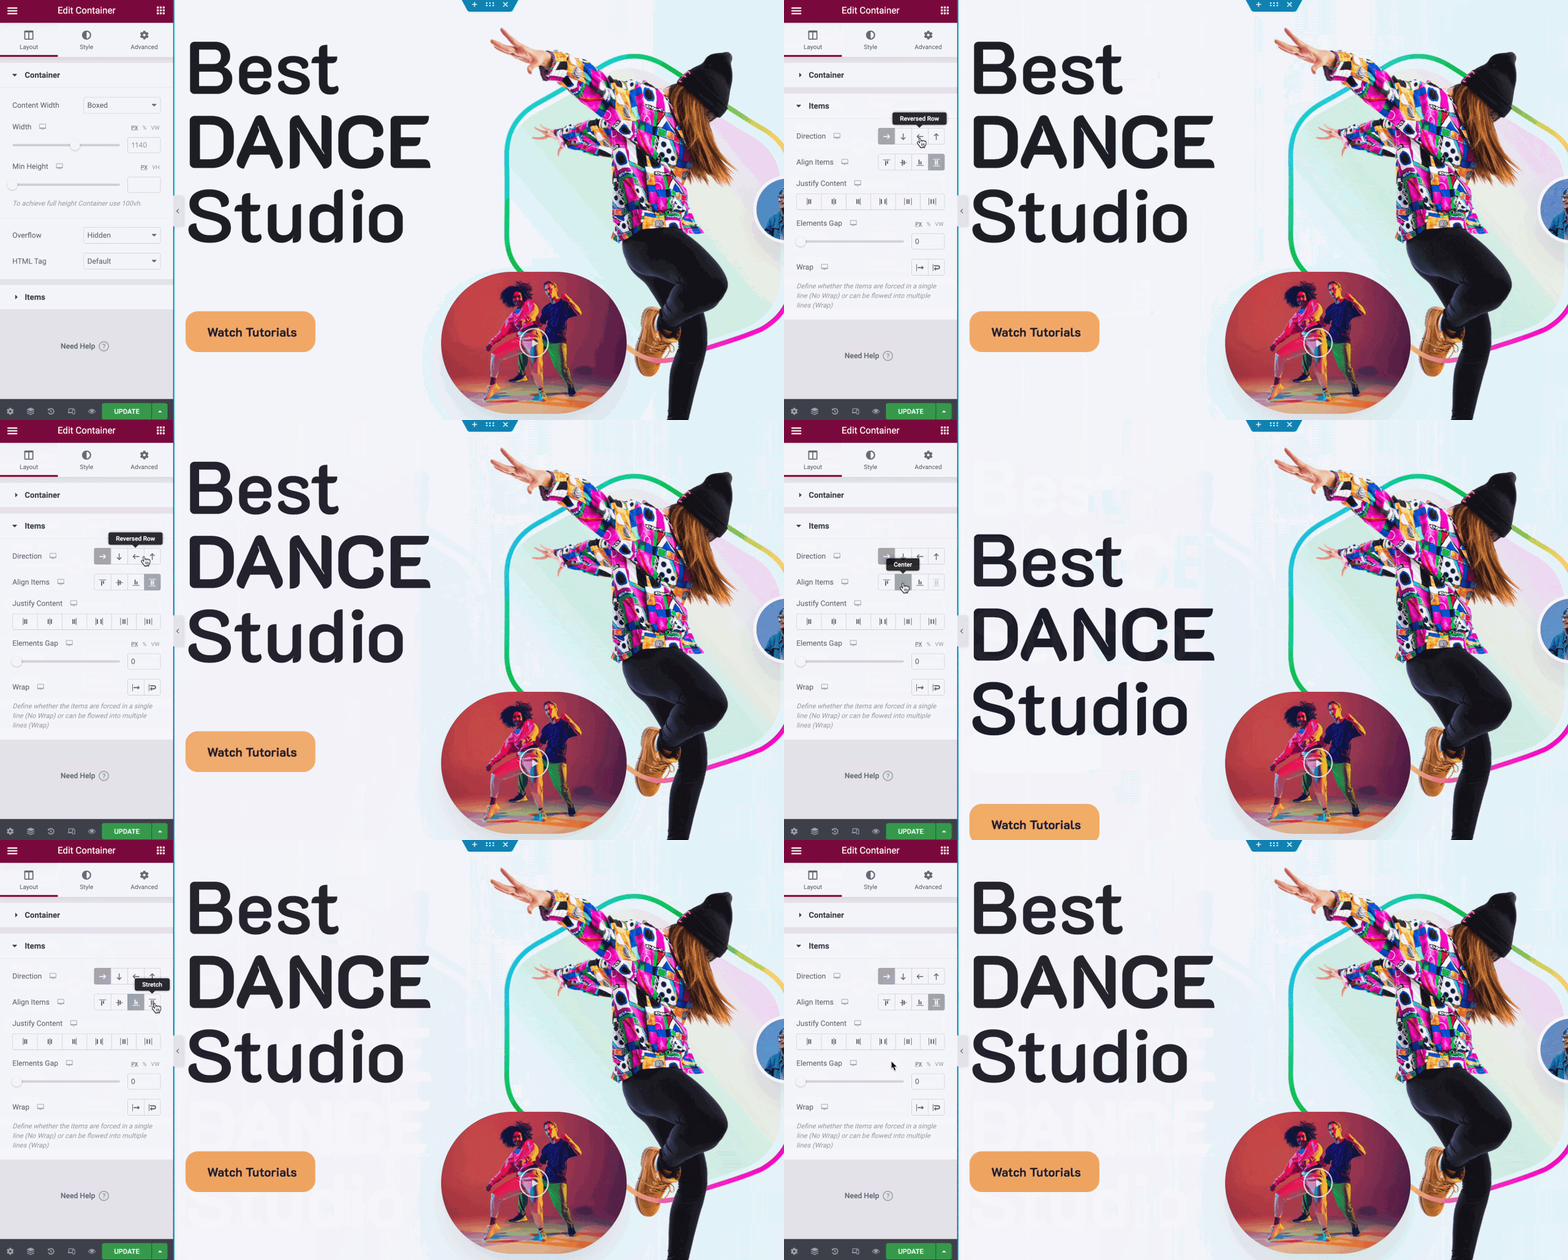
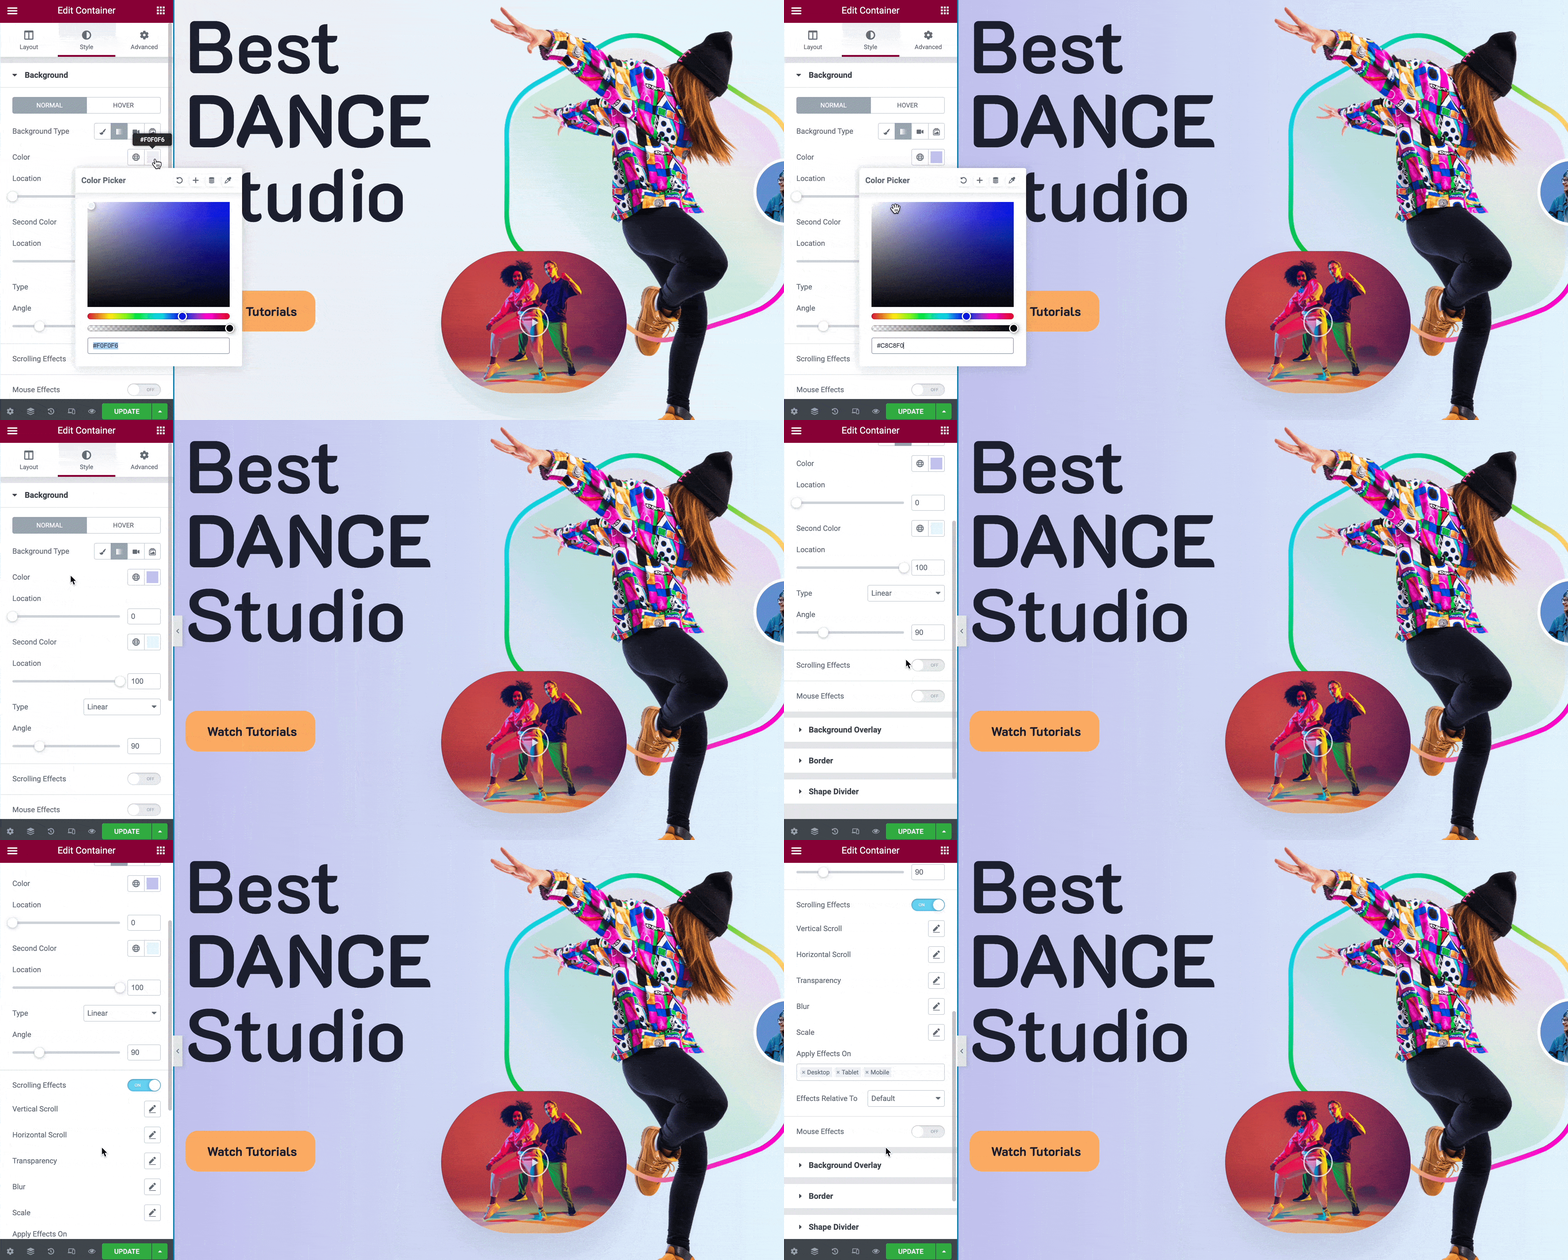
You can also change the background colors of the entire Container element wrapper, and style it to match the aesthetics of your website.
Head over to the ‘Styles’ tab in Elementor while having the Container element selected, and then change the background color, overlay, borders, shape dividers and more. You can also choose to enable scrolling and motion effects, and choose whether to display the scroll effects on specific devices as well.
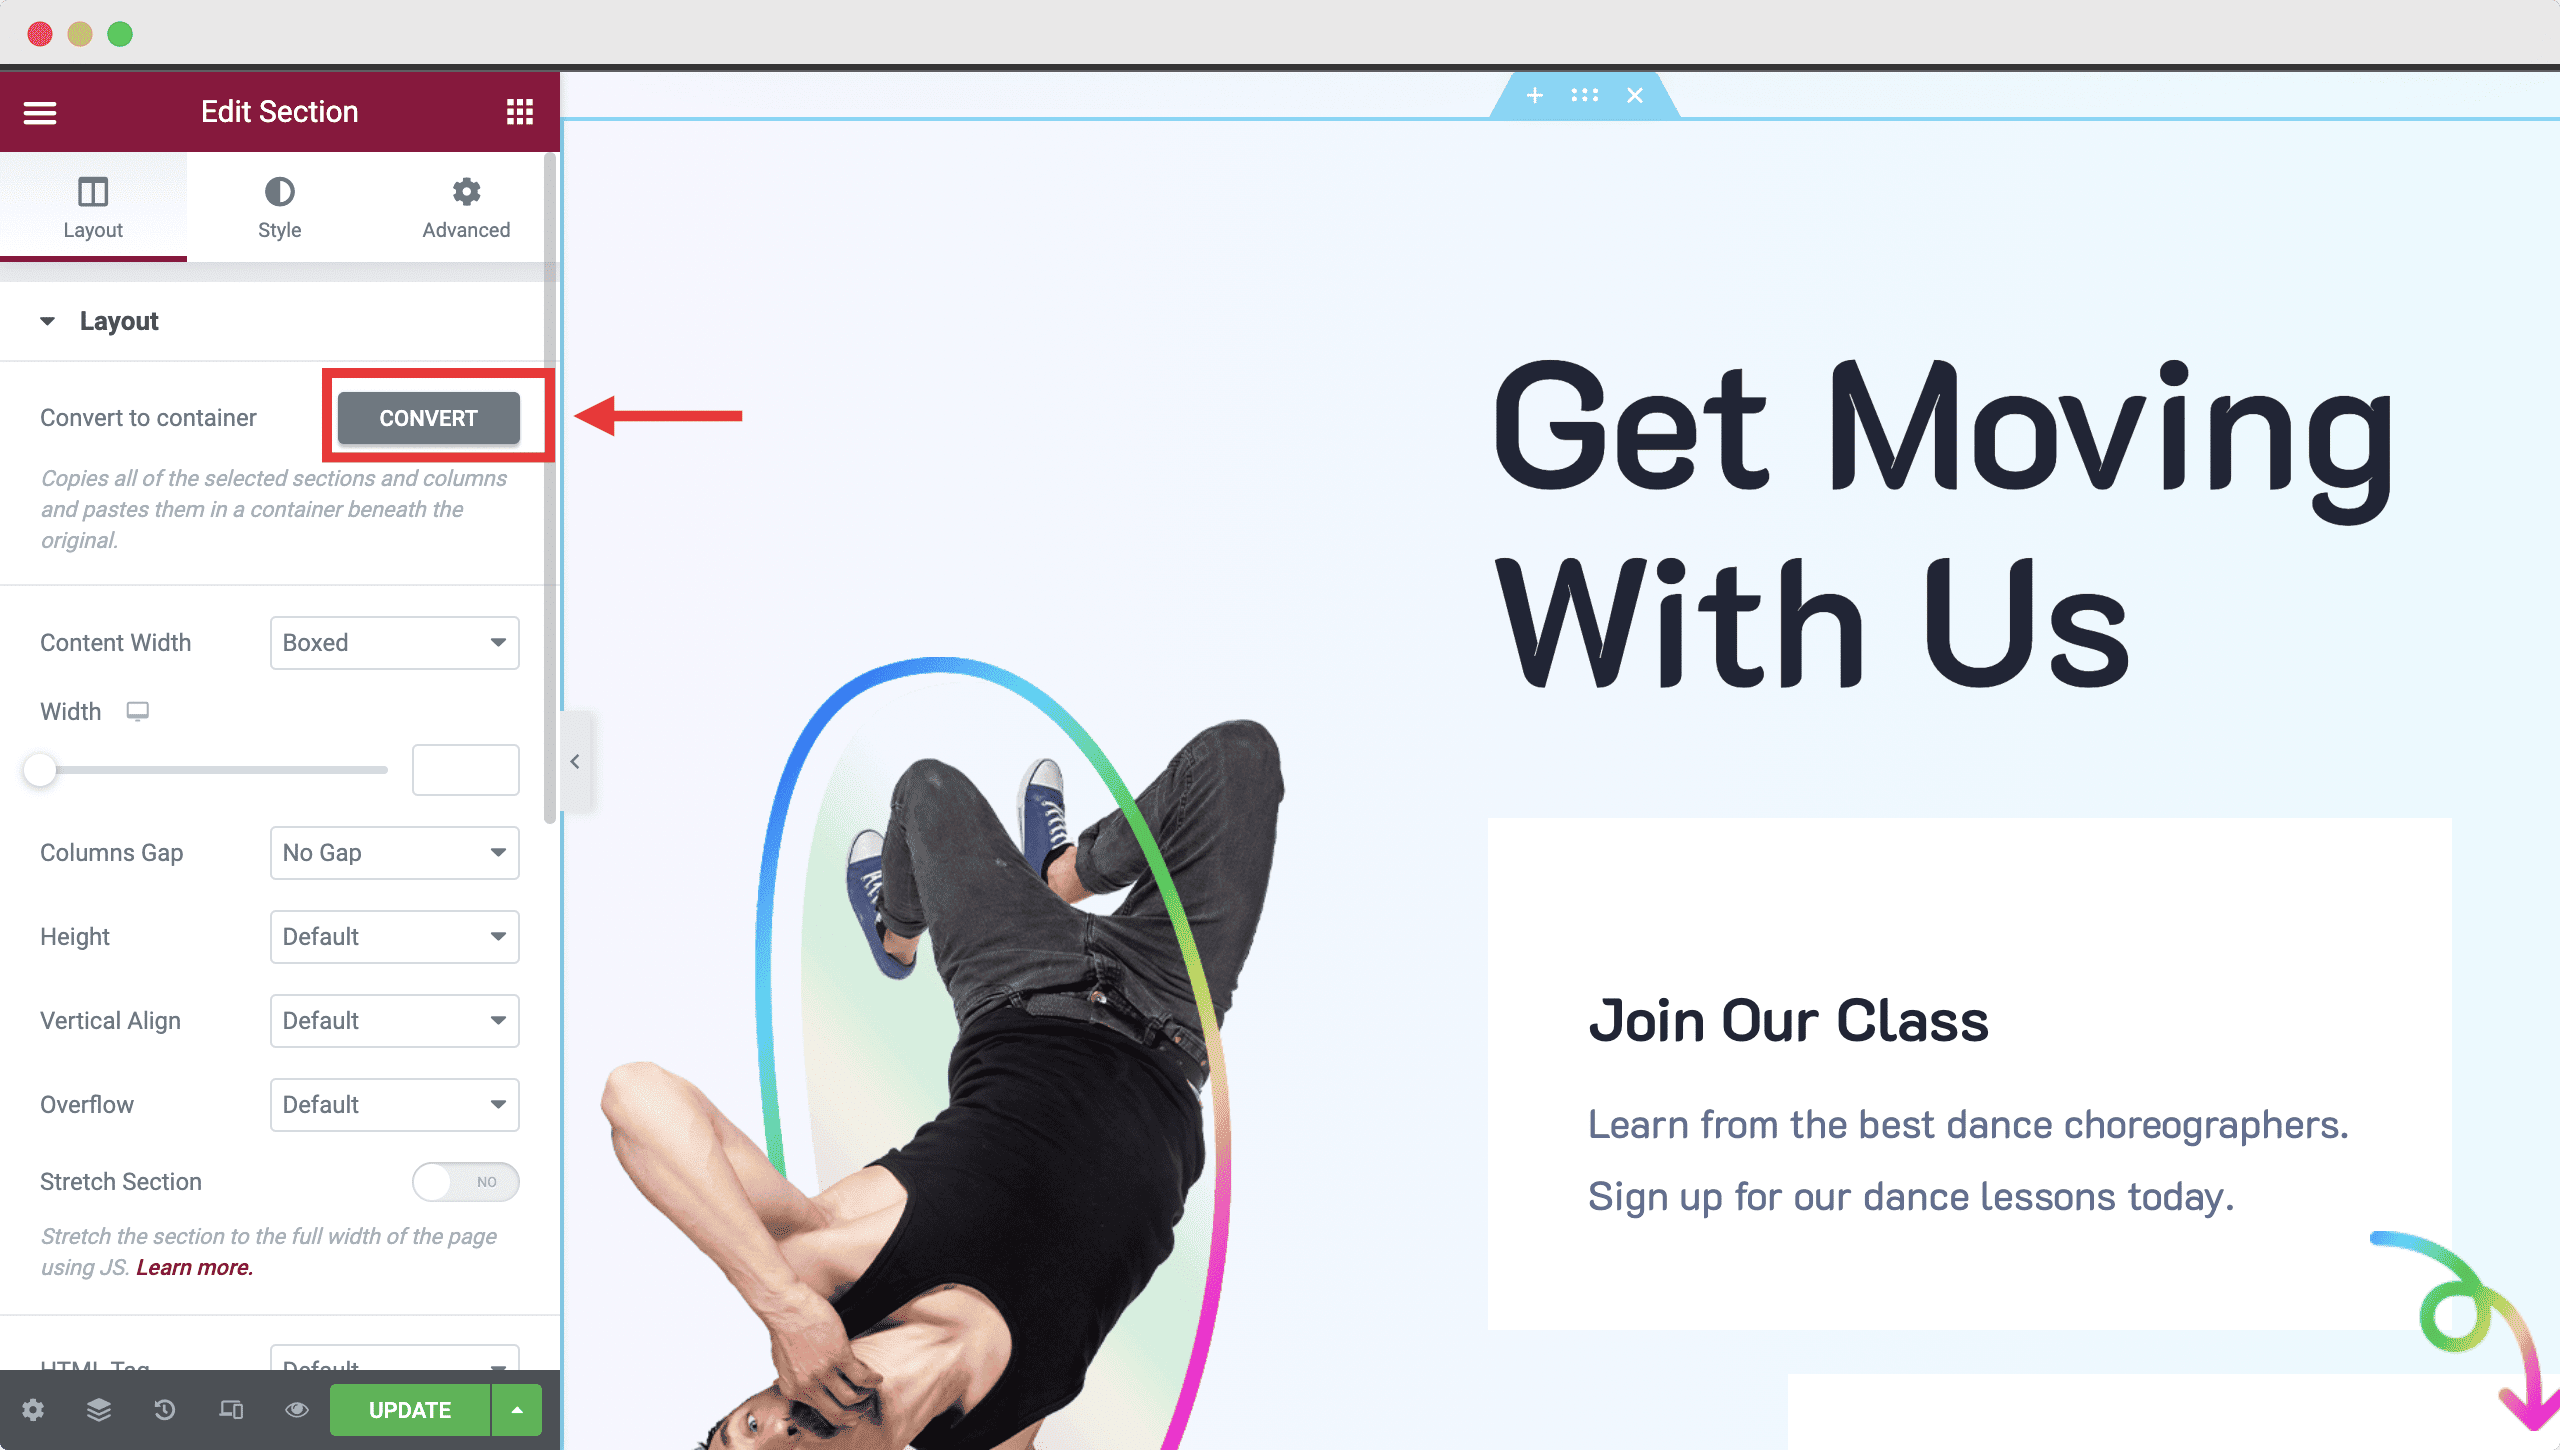
If you have already created a web page with the previous and soon to be replaced layout structure, don’t worry. You can automatically convert those sections with the new Container element as well. Simply select the section you want to change, and hit the ‘Convert’ buttons as shown below.
Play around with the options and don’t be afraid to tweak every setting to find out new ways to style your Container in Elementor. For more detailed instructions, make sure to check out Elementor’s documentation here.
Try It Yourself: Experiment With Elementor Flexbox Containers Today
Excited to give Elementor Flexbox Containers a try? Take this new feature for a spin by enabling the option in Elementor Experiments today, and discover new ways to design stunning web pages without any coding.
For more fun tutorials, news and updates, make sure to subscribe to our blog or join our friendly community of Elementor enthusiasts.


![[New Extension] How to Show Vertical Text on Elementor Websites?](https://essential-addons.com/wp-content/uploads/2025/11/Essential-Addons-New-Extension-Vertical-Text-Orientation-1024x576.jpg)


