Unleash the power of Elementor Hosting as you delve into the art of creating a WordPress Staging Site in this comprehensive guide, harnessing the optimized performance and features tailored for Elementor Website builder enthusiasts. Here, we’ll walk you through the process of creating your very own WordPress Staging Site, all while leveraging the capabilities of Elementor Hosting to streamline your website development and design tasks.

Whether you’re a seasoned pro seeking a more efficient workflow or a newcomer looking to dive into website building, you’re about to unlock the full potential of your online projects.
The Perks Of Elementor Hosting That Are Necessary
Elementor Hosting is a specialized hosting service that has been tailored to perfectly complement the Elementor website builder, a popular and user-friendly WordPress plugin. It goes beyond traditional web hosting by offering a range of features and optimization facilities specifically designed to enhance the performance and user experience of websites built with Elementor.
Seamless Integration With Elementor
Elementor Hosting is designed from the ground up to seamlessly integrate with the Elementor website builder. This integration ensures that Elementor’s features and functionalities work flawlessly within the hosting environment. It eliminates compatibility issues, streamlining the website creation process.

Source: Elementor
Lightning-Fast Performance
One of the standout features of Elementor Hosting is its focus on speed and performance optimization. These hosting services employ advanced server configurations, content delivery networks (CDNs), and other optimization techniques to ensure that websites load quickly and efficiently. This not only enhances the user experience but also improves search engine rankings.
Enhanced Security Measures
Security is paramount in today’s digital landscape. Elementor Hosting often comes equipped with robust security features, including firewalls, malware scanning, and automated security updates. This proactive approach helps protect websites from potential threats, giving website owners and administrators peace of mind.
Scalability And Flexibility
Elementor Hosting plans are typically scalable to accommodate the evolving needs of websites. Whether you’re running a small blog, a growing online store, or a large corporate site, Elementor Hosting can be tailored to your specific requirements. This scalability ensures that your website can handle increased traffic and resource demands as it grows.
User-Friendly Control Panel
For users who may not be tech-savvy, Elementor Hosting often provides an intuitive control panel. This user-friendly interface simplifies essential tasks such as domain management, backups, and database administration, making it accessible to a broader audience.

Easy Guide To Create WordPress Staging Site With Elementor Hosting
Elementor Hosting provides a range of features for website development. Staging functionality is available starting from the ‘Business‘ plan and above, while ‘Grow‘ and ‘Scale‘ plans offer website cloning capabilities. Staging allows you to work on another layer of your current website, whereas cloning creates an entirely separate duplicate of your website within the live environment.
Step 1: Start A WordPress Staging Site From The Dashboard
Establishing a staging site might appear daunting, but with Elementor Hosting, the process is simplified and user-friendly. Here’s a step-by-step guide:
- Access your My Elementor dashboard.
- Find the card of the website you wish to replicate and click on ‘Manage this website.’ Scroll down to the ‘Staging Environment‘ section.
- Choose ‘Create Staging.’
- Confirm your intention to create a staging site and click ‘Create Staging.’
- Your live site will be duplicated into your staging site.
- The staging site’s details will be appended to the ‘Staging Environment‘ section.
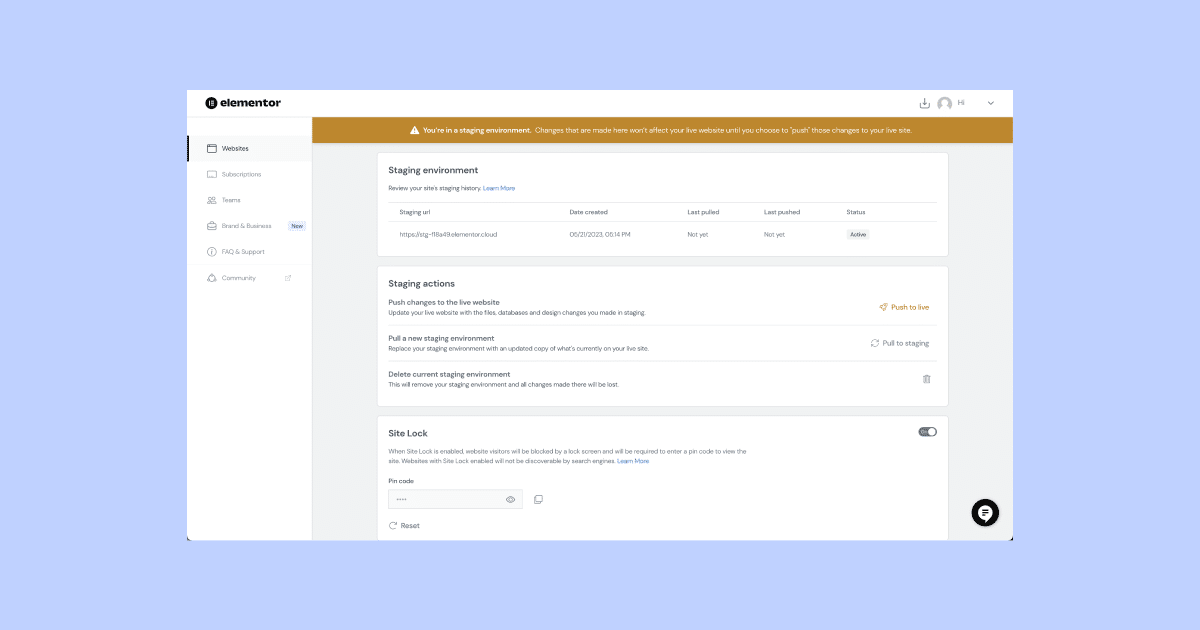
Once you’re in, you’ll notice a prominent golden bar at the top, indicating that you are now in the staging environment. Fantastic! You can now enter your staging site and begin testing new designs and features with ease!

Source: Elementor
Step 2: Deploy Changes To The Live Domain
Hosting your website with Elementor grants you the advantage of swiftly accessing new features and a host of other enhancements. Now that we’ve successfully created our staging site, let’s dive in and start implementing our changes:
- Navigate to your My Elementor dashboard.
- Identify the card representing the website you wish to duplicate.
- Click on “Manage this website.”

Source: Elementor
- Scroll down to the “Staging Environment” section.
- Choose “Manage Staging” from the options available in the “Staging Environment” section.
- Once selected, a gold bar will appear at the top of the screen, indicating that you are now in the staging environment.
- Click on “Open Staging WP Dashboard.”
You will be directed to the dashboard of your staging site, granting you the ability to edit and create pages and posts, add or update plugins, and perform any other tasks you typically do on your website. Additionally, you can test the changes you’ve implemented using the unique link provided for your staging site.
Proceed to the staging dashboard and select the “Push to Live” option. Once approved, your live website will be seamlessly updated with the latest changes.
Step 3: Migrate Settings Staging To Live
Another alternative is the “Pull” function, which operates in the opposite direction—bringing changes from the live site into the staging environment. There are times when immediate updates are essential, such as correcting a headline or link. This is where the “Pull” feature becomes valuable. If you aim to maintain full synchronization between your environments, you can seamlessly incorporate the changes you made on the live site into your staging site.

Here are the steps to accomplish this:
- Head to your My Elementor dashboard.
- Identify the card representing the website you wish to duplicate.
- Click on “Manage this website.”
- Select “Manage Staging” from the “Staging Environment” section.
- A gold bar at the top of the screen will indicate that you are now in the staging environment.
- Scroll down to the “Staging Actions” section.
- Choose “Pull to Staging.”
- Confirm your intention to overwrite your staging site with data from your live site.
Congratulations! Your current staging site will now be updated with data from your live site, ensuring that all your environments are in perfect sync.
Mastering Your WordPress Staging Site With Elementor Hosting
In conclusion, mastering the art of WordPress Staging Sites with the seamless integration of Elementor Hosting can be a game-changer for your web development journey. With simplified processes, lightning-fast performance, robust security measures, and the flexibility to push or pull changes, you have the tools at your disposal to create, test, and refine your websites like never before.
If you want to keep yourself updated with the latest Elementor features and news, subscribe to our blog now.

![[New Extension] How to Show Vertical Text on Elementor Websites?](https://essential-addons.com/wp-content/uploads/2025/11/Essential-Addons-New-Extension-Vertical-Text-Orientation-1024x576.jpg)


