Are you looking for a way to change domain name on WordPress site? Your domain name is the cornerstone of your online presence. It is the unique address that people type into their web browsers to find your WordPress website. Just like a physical store needs a well-placed sign, a memorable and relevant domain name is crucial for attracting visitors and establishing your brand online.

Why Change Your Domain Name?
There are several reasons why a WordPress website owner might decide to change their domain name. Here are some common scenarios:
- Rebranding: As your website evolves, you might want a domain name that better reflects your current brand identity or target audience. A new name can help you connect more effectively with your user base.
- Improving Your Name: Perhaps you chose a domain name in a rush when you first started your website. If you find a better name that is more memorable, relevant, or easier to type, changing might be beneficial.
- Strategic Acquisition: Did you purchase an existing website or domain name with higher search engine authority? Migrating your content and brand to a stronger domain can boost your website’s visibility and traffic.
Important Considerations Before Changing Domain
While changing your domain name can be a positive step, it is not without its risks. Here are some crucial things to keep in mind:
- SEO Impact: Search engines use your domain name as a ranking factor. A sudden name change can temporarily affect your search engine ranking until you implement proper redirects and update your SEO strategy.
- Broken Links: Internal and external links pointing to your old domain name might break after the migration, leading to a frustrating user experience.
- Communication & Transparency: Inform your audience well in advance about the domain name change to minimize confusion and maintain trust.
- Backup Your Current Site: Create a complete backup of your website’s files and database to ensure you can restore it if needed.
- Purchase a New Domain Name: Choose a suitable domain name that aligns with your brand and is easy to remember. Register it with a reliable domain registrar like GoDaddy, Namecheap etc. Ensure the domain name availability and secure before proceeding.
There are multiple approaches to changing your WordPress domain name. We’ll delve into three of the most common methods in this guide. However, for a smooth and stress-free migration, we highly recommend considering a reliable WordPress hosting provider like xCloud.host. Their expert team can assist you with the entire process, minimizing downtime and ensuring a successful transition for your website.
Benefits of Choosing the Right Hosting Provider During Domain Change
Moving your WordPress website to a new domain name can be a big step. While the technical process might seem straightforward, the success of this transition hinges heavily on your chosen hosting provider. A reliable and well-equipped host can significantly impact the smoothness and efficiency of your domain change, minimizing downtime and potential disruptions.
Here is why selecting the right hosting provider becomes crucial during a domain migration:
Minimized Downtime: Downtime refers to the period when your website is unavailable to visitors. A reliable hosting provider with robust infrastructure and strong uptime guarantees ensures minimal disruption during the domain switch. This is crucial to maintain user experience and avoid potential revenue loss.
Seamless Migration Tools: Many top hosting providers offer dedicated domain migration tools to streamline the process. These tools automate tasks like updating database entries and website files, significantly reducing the risk of errors and saving you valuable time.
Expert Support: Domain changes can sometimes trigger unexpected issues. Having access to a knowledgeable and responsive support team is invaluable. A good hosting provider should offer 24/7 support channels staffed by WordPress specialists who can swiftly address any migration-related problems.
Note: We have chosen xCloud hosting keeping all the points here on mind to show you the methods to Change Domain Name on WordPress. Your chosen hosting settings can be different in some cases.
3 Easy Methods to Change Domain Name on WordPress (URL)
To change domain name on WordPress can be straightforward with the right approach. We are going to explore three effective methods to effectively change your WordPress site domain to a new domain.
Method 1: Clone Your Website to Another domain Using a Plugin
Easily clone your WordPress website to xCloud Hosting using the free Migrate Guru plugin. This reliable tool simplifies the website transfer process between two domains, allowing you to manage your website effortlessly on xCloud’s platform. Follow the step-by-step guide below:
Step 1: Create A Destination Website In xCloud & Install Migrate Guru Plugin
Get started by logging in to your xCloud account and creating a staging website. Follow the provided documentation for easy setup.
Next, install the Migrate Guru plugin on both your old and destination domain sites. To do this, log in to each WordPress dashboard, go to the ‘Plugins‘ section, search for ‘Migrate Guru‘, and activate it.

Step 2: Collect Migration Key From New Domain Site
Once the Migrate Guru plugin is activated on your sites, you will need to retrieve the ‘Migration Key.’ This key is unique to each migration and is required to connect your development site with your destination site.
To obtain the migration key, go to your destination domain website in xCloud and navigate to the Migrate Guru plugin tab. Click on the ‘Migration Key’ text link that appears on the dashboard and copy the key provided, as shown below.

Note: You will need this key later to connect your development site to the destination site. Keep it handy.
Step 3: Migrate Your Old Domain Website
Enter your email address on your old domain site to receive migration updates. Then, click the ‘Migrate Site‘ button to start the process.

You will be taken to a page where you choose your destination hosting. Scroll down and select ‘Other Hosts‘.

Step 4: Enter The Migration Key To Your Old Domain Site
On the next screen, paste the Migration Key you copied from your xCloud new domain site into the provided field. Then, click ‘Migrate‘ to start the migration process.

This will immediately start transferring your old domain website to your new domain site.

Once the migration finishes, you can find your cloned site in your new domain. Remember, you will need your original website’s login details to access the WordPress admin area of your new domain site. Now, You have successfully cloned your website to a new domain using Migrate Guru.
Method 2: Migrate to a New Domain Website In xCloud
Simplify your WordPress migration between domains with xCloud. This guide will walk you through the process step-by-step.
Step 1: Create A New Site
Log in to your xCloud account and click ‘Add New Site’ on the dashboard to get started.

Next, select a server for your new site. You can either create a new one or choose an existing server.

You will be taken to the site creation dashboard. Click ‘Migrate An Existing WordPress Website’ to start the migration process.

Step 2: Add Information To Migrate An Existing WordPress Website
Choose the destination server for your website migration.

On the domain page, you need to add your source site URL. And if you choose to migrate to a new domain you can include your custom domain. xCloud offers a staging environment with a temporary domain for testing. You can update to your custom domain after a successful migration.
Note: To ensure a smooth launch, migrating your website to a staging domain is recommended. This allows you to thoroughly test the migrated site before making it live to a new domain. Once satisfied, you can easily switch your domain to the live version.

Next, you will be on the ‘Settings’ page. Carefully configure options like PHP version, database prefix, and user migration settings.

Step 3: Add Plugin File & Authentication Token To WordPress Site
Now, you will be redirected to a plugin page. Download the provided plugin file and install it on your WordPress website.

Once activated, paste the access token copied from the plugin tab into the plugin’s settings. The image below shows a successful installation and token input.

Finally, click ‘Update Token’ to save your changes.
Step 4: Complete Database Settings & Finalize
The ‘Database‘ tab lets you customize your database migration. Choose to transfer all database tables or just the file system data.

With your settings configured, you can now successfully migrate your WordPress website to xCloud.

Experience the ease of migrating your WordPress website with xCloud’s streamlined process.
Method 3: Change the WordPress Domain Name in the Database
This method should be cautiously approached as it directly modifies the WordPress database.
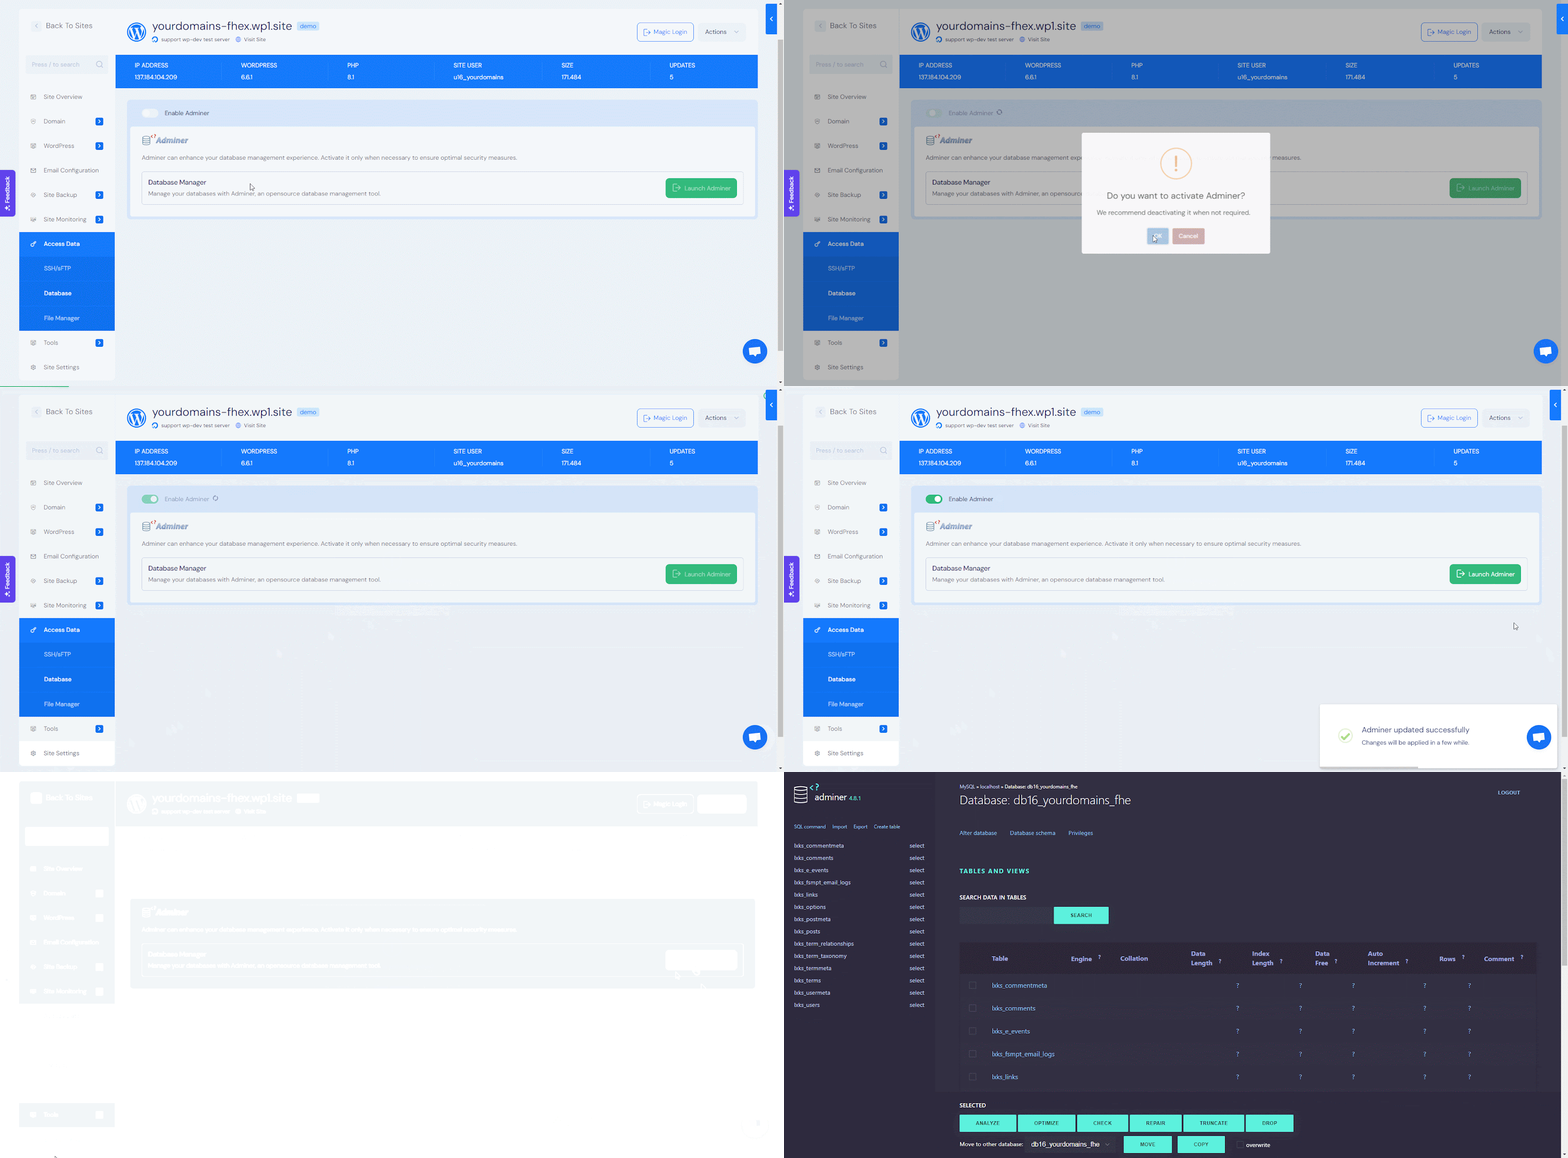
Log in to your xCloud web hosting control panel and navigate to the ‘Access Data’ section to access the database management interface.

Note: While the exact steps may vary based on your hosting provider, most cPanel hosting environments allow you to modify database settings.
Enable Adminer by toggling the button and clicking ‘Ok’ on the popup notification. Then,
Hit the ‘Launch Adminer’ button to open the database.

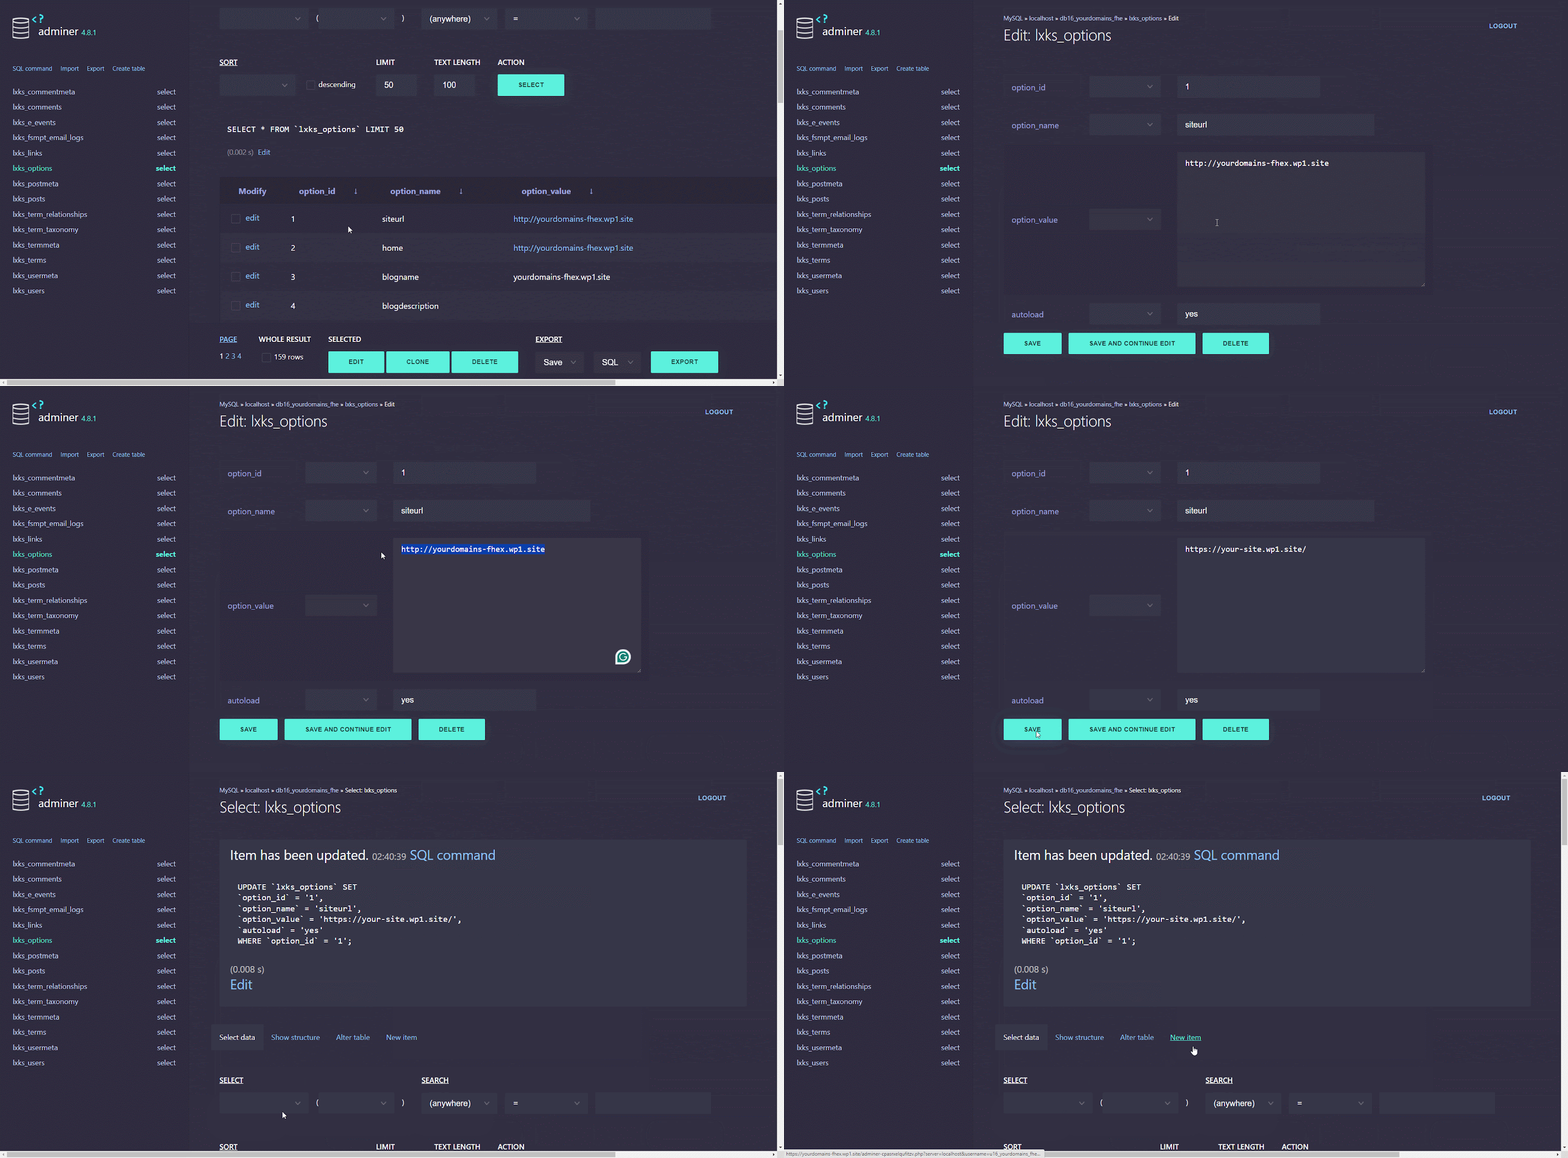
You will find a table named ‘Lxks_options‘ (or similar, depending on your WordPress prefix) in your database. Click on ‘Select’ to access the contents of this table.

Within the Lxks_options table, you will find rows with specific option names. Locate the rows labeled ‘siteurl‘ and ‘home‘. These rows contain your website’s URL information.

Click on the Edit button next to the siteurl row. In the option_value field, replace the current URL with your new site URL. Click the ‘Save’ to save your database changes.

Repeat the same process for the home row. You will the site and home url is changed

Visit your website using the new URL to ensure everything is working correctly. This is how you change domain name on WordPress Site in xCloud using your database.
Upgrade Your Online Presence With a New Domain
Changing your WordPress domain name can be a strategic move, but it requires careful planning. Today we explored three methods for migrating your site: using a plugin, xCloud’s built-in migration tool, and directly modifying the database.
Consider seeking assistance from a reliable WordPress hosting provider like xCloud. Their expert team can guide you through the process, minimizing downtime and ensuring a successful transition for your website.
Subscribe to our blogs to get more helpful blogs like this one and join our Facebook Community to get in touch with more WordPress enthusiasts like you.


