What if you could instantly improve your website usability and assist website visitors in navigating through the site? In that case, you can guide website visitors based on their type, post type, category, etc. when you add conditional logic to WordPress menus. Read this thorough blog below to find out more about applying conditional logic to menus.
The most popular way among WordPress users is an all-purpose approach to menus in WordPress. But it might not work for you. What if the WordPress website could display different menus according to the user type? For instance, website administrators will view a certain set of menu items, while users who have signed in to your website will see a different set of menu items. It will aid users in making decisions about the actions they wish to do and improve your website’s navigation.
Conditional Logic: What Is It Exactly?
We must comprehend the idea of conditional logic before we can discuss the benefits of adding it to WordPress menus. You may be familiar with the “if-then” concept, which states that if you do this or that, a specific outcome will occur that wouldn’t have occurred if you didn’t take the specified actions. The ability to determine a result based on the fulfillment of particular requirements is known as conditional logic.
It is common knowledge that WordPress is made of PHP language. Utilizing conditional tags, which are brief blocks of code that let you specify what shows on your website menus and under what parameters, you may add conditional logic to WordPress. Let’s see how easily you can add conditional logic to menus in WordPress below.
Two Ways To Add Conditional Logic To Menus In WordPress
As you are a WordPress user, you might want to use plugins to add conditional logic to menus but there are other ways to do this task in the easiest way. In that case, all you need to do is copy and paste the right code into the exact section we will be guiding you to. Let’s see how simple the way is below:
Method 1: Add Custom Conditional Logic To Menus In WordPress
Even if you think of using conditional logic plugins for your menu in WordPress, adding custom codes to your WordPress theme will open up multiple doors to show designated menus at once. WordPress already has a set of conditional tags for the menu from which you can choose your preferred ones easily.
First, navigate to your Theme’s function.php file. For that, click on ‘Appearance’ from your WordPress dashboard and click on the ‘Theme File Editor’ option. Click on the ‘Theme Function’ from the right-hand side. Now in the code editor, paste the code given below:
add_filter(‘if_menu_conditions’, ‘additional_menu_conditions’);
function additional_menu_conditions($conditions) {
$conditions[] = array(
‘id’ => ‘the-post-is-sticky’,
‘name’ => __(‘The post is sticky’),
‘condition’ => function($item) {
return is_sticky(‘the-post-is-sticky’);
}
);
return $conditions;
}
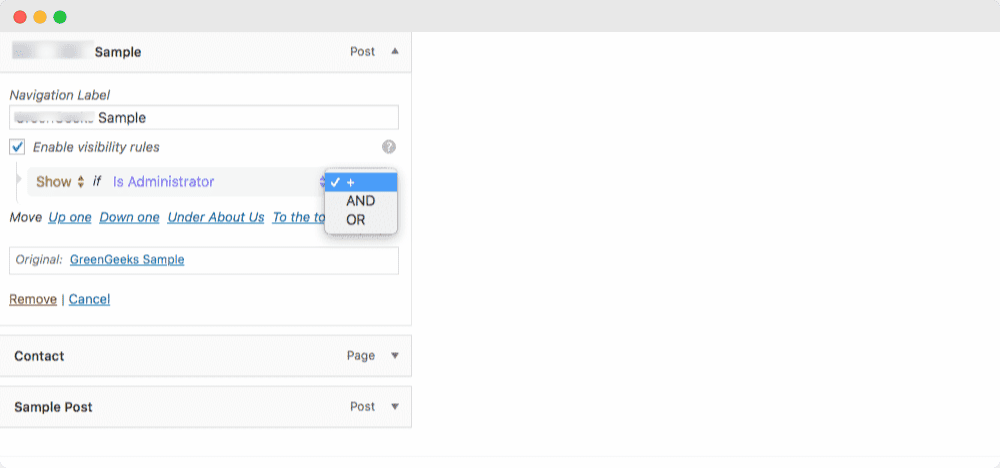
After you have pasted the code manually in the code editor, click on ‘Save changes’ and store the progress. When you go back to the WordPress menu option from the Appearance, you will be able to apply the conditional logic in menus from the dashboard like this:
 Method 2: Add Conditional Display To Menus Without Coding
If you want to avoid any code-related work, Essential Addons For Elementor can help you to do this task even faster and better. When you install the Essential Addons plugin in your WordPress, you will see the extension that comes with it.
You can display your chosen information in accordance with the logic conditions you’ve built up with the Conditional Display extension from Essential Addons for Elementor. You can use any of the criteria or logic included in this advanced extension on your website using Elementor. To do this work, you need to install the Essential Addons Pro.
Open any brand-new or existing page from your WordPress dashboard to use this Essential Addons feature. Select any area by clicking it, then select EA Conditional Display. To properly activate the extension, select “Enable Conditional Display” from the menu.

After completing the prior step successfully, click EA Conditional Display to access all the configuration options.
You will have a variety of conditional logic to pick from after activating the EA Conditional Display extension on your page, and each one of them serves a different function. You can display dynamic information based on the various user roles on your WordPress site by enabling the “User Role” condition.
This can assist you in automatically displaying particular content to website subscribers, administrators, or authors. Depending on your “User Type” and “Login Status,” you can display your content here.

To display particular sorts of information, enable the “Post Type” conditional logic in the Elementor editor. You can select “Post,” “Pages,” or “Landing Pages” to display in this logical scenario.

In addition to this, you can also display a section or page in Elementor just during particular times of the day by using the “Date & Time” conditional logic. For campaigns or seasonal, promotional offers, like those for Black Friday, this can be helpful. You have a choice of four conditions, including “Between” two dates, “Not Between” two dates, and “Simply Remove the Date.”

Now that you are done with all the configurations for Essential Addons Conditional Display extension, get ready to see the end result and how it appeared finally.

This is how easily you can add conditional logic to menus in WordPress using custom codes or the Essential Addons for Elementor. If you find this blog insightful and informative, subscribe to our blog to read more like this. Share your thoughts with other WordPress users around the world and join our super-friendly community.


![[New Extension] How to Show Vertical Text on Elementor Websites?](https://essential-addons.com/wp-content/uploads/2025/11/Essential-Addons-New-Extension-Vertical-Text-Orientation-1024x576.jpg)


