As the most popular website builder for WordPress, Elementor aims to provide users with the highest level of flexibility when designing websites. To give designers the ultimate freedom when designing carousels and static positions, Elementor has introduced Nested Carousels & Loop Grids. If you are also an Elementor design fan like us, then let’s check out our guide below where we explore how to use Elementor Nested Carousels and Loop Grids and what benefits they bring.

Introducing Elementor Nested Carousels & Loop Grid Ads
Elementor 3.14 brings you many new design tools with which you can improve the appearance of your website. One of these, the much-anticipated new Nested Carousel widget, uses Containers to allow you to add content to each carousel slide, allowing you to create countless design options.
Additionally, this release improves the Loop Alternate Template in the Loop Grid, enabling you to update your Product and Post listings with fresh, static material. This edition comes with a ton of new design upgrades to further personalize your website, in addition to these two capabilities.
Let’s check out details about this latest Elementor addition below.
Use Nested Carousel Widget To Design Every Slide With Freedom
The groundbreaking Nested Carousel widget is the first feature highlighted in Elementor 3.14. With this tool, you have far more creative freedom and control over how different kinds of content are displayed. And this will enable you to nest items within the carousel’s slides to produce many possible design combinations. This will allow you to create a multitude of design options by nesting things within the carousel’s slides.
With so many modification possibilities available, the Carousel widget can make your content stand out. You can quickly add buttons and other interactions to engage visitors by changing the backdrop and styling to match the brand style of your company.
To put it simply, the Nested Carousel gives you an infinite canvas to fill with any Elementor widget within each slide and make your website stand out from the rest.
💡 Instead of using several of the current widgets, including Image Carousel, Media Carousel (Pro), Testimonial Carousel (Pro), and Reviews (Pro), you can use the new Nested Carousel widget. There were few content and customization options available, and each of these carousels had a predetermined arrangement
Tutorial: How To Create Nested Carousels With New Elementor Widget
Now we will dive into how we can create nested carousels with the latest Elementor widget. Before getting started, we need to mention that, this is a PRO feature, so make sure you have purchased and activated Elementor PRO.
First, you have to enable the widget from the panel. To enable the new Carousel widget, be sure to activate the Container and Nested Element features by going to WordPress Dashboard → Elementor → Settings → Features.
With the new Carousel, you have access to a more complete and adaptable solution that enhances user experience and draws in viewers. To generate 3D-like effects on a slide, try overlaying a video on top of a background image to create engaging experiences.

Enhance Content Visibility With Elementor Loop Grid
Another notable feature added to Elementor 3.14 is the ability to specify a Static Item Position within your Loop Grid. With the use of this helpful tool, you may highlight any material within your normal content loop, including products, events, and other types of information. Think of it as your advertisement in a plethora of posts or goods.
With the help of this tool, you can insert a static piece of content, such as a picture, a video, or a contact form into your usual content flow. You only need to choose the location, and Elementor will take care of the rest. It enables you to create your custom design to display the content of post listings, portfolios, and much more. The selected static item advances the remainder of your content by taking the place of a product or article.
This new function has several choices that can be customized. You can modify the alternate template’s layout by adjusting the Column Span option, as well as the static item’s position within the grid and whether it shows only once or frequently. It’s about giving your grids a creative boost.

Tutorial: How To Use New Static Item Position Feature In Loop Grid?
It’s time to check out how we can set items to new static positions using Loop Grid. And yes, this is also a PRO feature, so you must have Elementor PRO activated on your WordPress website before you can get started.
To access the Static Item Position feature, remember to have the Loop Feature enabled on your website. You can find this in your WordPress Dashboard → Elementor → Features.
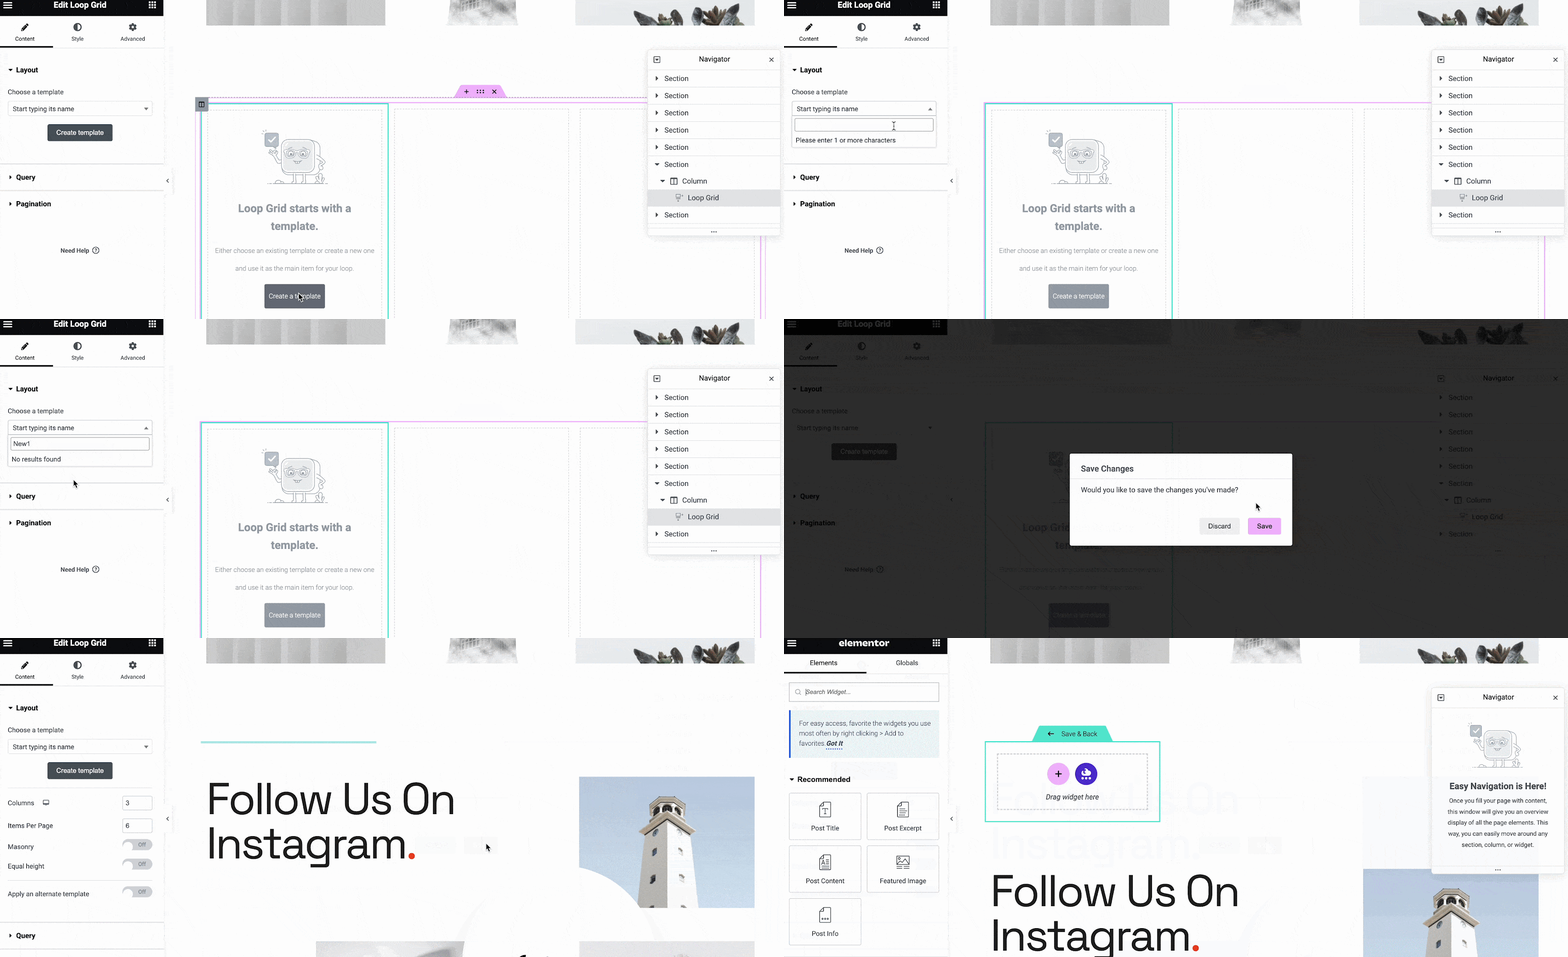
Now, open a new page in Elementor. Then search for ‘Loop Grid’ and drag and drop the widget into the page. There, you will find the option to enter old templates or create a new one. Now all varial widgets like feature image, post title, post excerpt, etc. will be available.

Now keep the elements one by one as you want. You can create any pattern you want easily in a few clicks. This is how you can use Elementor loop Grid and create static position items seamlessly.
Take Your Website’s Appearance To New Heights With Elementor
Hopefully, you will explore all the advanced features of Elementor 3.14 and take your website designs to the next level. If you want to keep yourself updated with the latest Elementor features and news, then subscribe to our blog now.


