To showcase product or service pricing plans, a well-structured pricing table is a must-have for any website. The table makes your pricing plan visually appealing & easy to understand for the users/visitors. With the continuation of bringing new widgets, Essential Addons for Elementor introduces the Multicolumn Pricing Table that helps you to create stunning pricing tables with multiple columns, custom layouts and feature-rich customization options.

In this guide, we will walk you through the different use cases of the Multicolumn Pricing Table and how you can implement it to enhance your Elementor website’s pricing presentation.
Why Use a Multicolumn Pricing Table – Different Use Cases
The Multicolumn Pricing Table is a highly versatile tool that you can use across various industries to enhance pricing transparency, improve customer decision-making and boost conversions. No matter which industry/niche you own & have an Elementor website, you must require a pricing plan. Let us have a look at a few examples:
1. SaaS & Subscription Services
For SaaS businesses and subscription-based services, a Multicolumn Pricing Table is essential to showcase different pricing tiers. It allows companies to present various plans, such as Basic, Pro, and Enterprise, while highlighting premium features in higher-priced plans.

Additionally, businesses can use the table to promote free trials, discounts, and annual vs. monthly billing options, making it easier for users to choose the best plan.
2. eCommerce & Online Stores
Online stores can utilize multicolumn pricing tables to display product bundles, single vs. bulk pricing, and wholesale deals. These tables help customers compare different purchase options side by side, making informed buying decisions.
Additionally, stores running seasonal sales or flash deals can showcase discounted prices alongside the original rates to encourage conversions.
3. Membership & Online Communities

For websites offering memberships, such as premium content platforms, loyalty programs, and exclusive communities, a multicolumn pricing table can clearly outline different membership levels like Silver, Gold, and Platinum. This format helps potential members understand the benefits, perks, and pricing structure, leading to higher sign-ups.
4. Educational Platforms & Course Providers
Online education platforms and course providers can use multicolumn pricing tables to present various course packages, certification options, and installment plans. Whether offering a one-time payment or a subscription model, a structured pricing table ensures learners can compare the benefits and choose the best plan based on their budget and needs.
5. Service-Based Businesses
Freelancers, agencies, and consultants can use pricing tables to showcase different service packages, such as hourly rates, project-based fees, and monthly retainers. This transparent comparison allows potential clients to understand the value of each package and choose the most suitable option. It also helps businesses highlight premium services or add-ons for an upselling opportunity.
6. Web Hosting & Domain Providers
Web hosting companies can use Multicolumn Pricing Tables to compare different hosting plans, such as Shared, VPS, and Dedicated Hosting. These tables allow customers to compare storage, bandwidth, security features, and pricing at a glance, making it easier for them to select a suitable hosting plan. Additionally, businesses can highlight discounted first-year prices vs. renewal costs to drive conversions.
7. Digital Products & Software Licenses
For businesses selling digital products, themes, plugins, or software, a Multicolumn Pricing Table can clearly present different licensing options, such as Single License, Lifetime Access, and Agency License.

These tables allow users to compare the benefits of each plan, including the number of sites they can use the product on, customer support duration, and extra features.
How Essential Addons’ Multicolumn Pricing Table Helps Your Business
With the 2 million+ active installations, Essential Addons always bringing new exciting elements to supercharge web-building using Elementor. With that continuation carried forward, a new widget has been added into its elements hub—Multicolumn Pricing Table.

Having this Elementor widget on your side, you can easily create a pricing table for your website that attact the visitors & make them interested to buy your plan. Let us have a look at how you can configure your multicolumn pricing table on your Elementor website.
How to Configure Multicolumn Pricing Table in Your Elementor Website?
Configuring a multicolumn pricing table in Elementor website is pretty much easy. All you have to do is drag & drop the element, and tweak the way you want to showcase your pricing with the unlimited package adding options.
Enabling & Adding Multicolumn Pricing Table
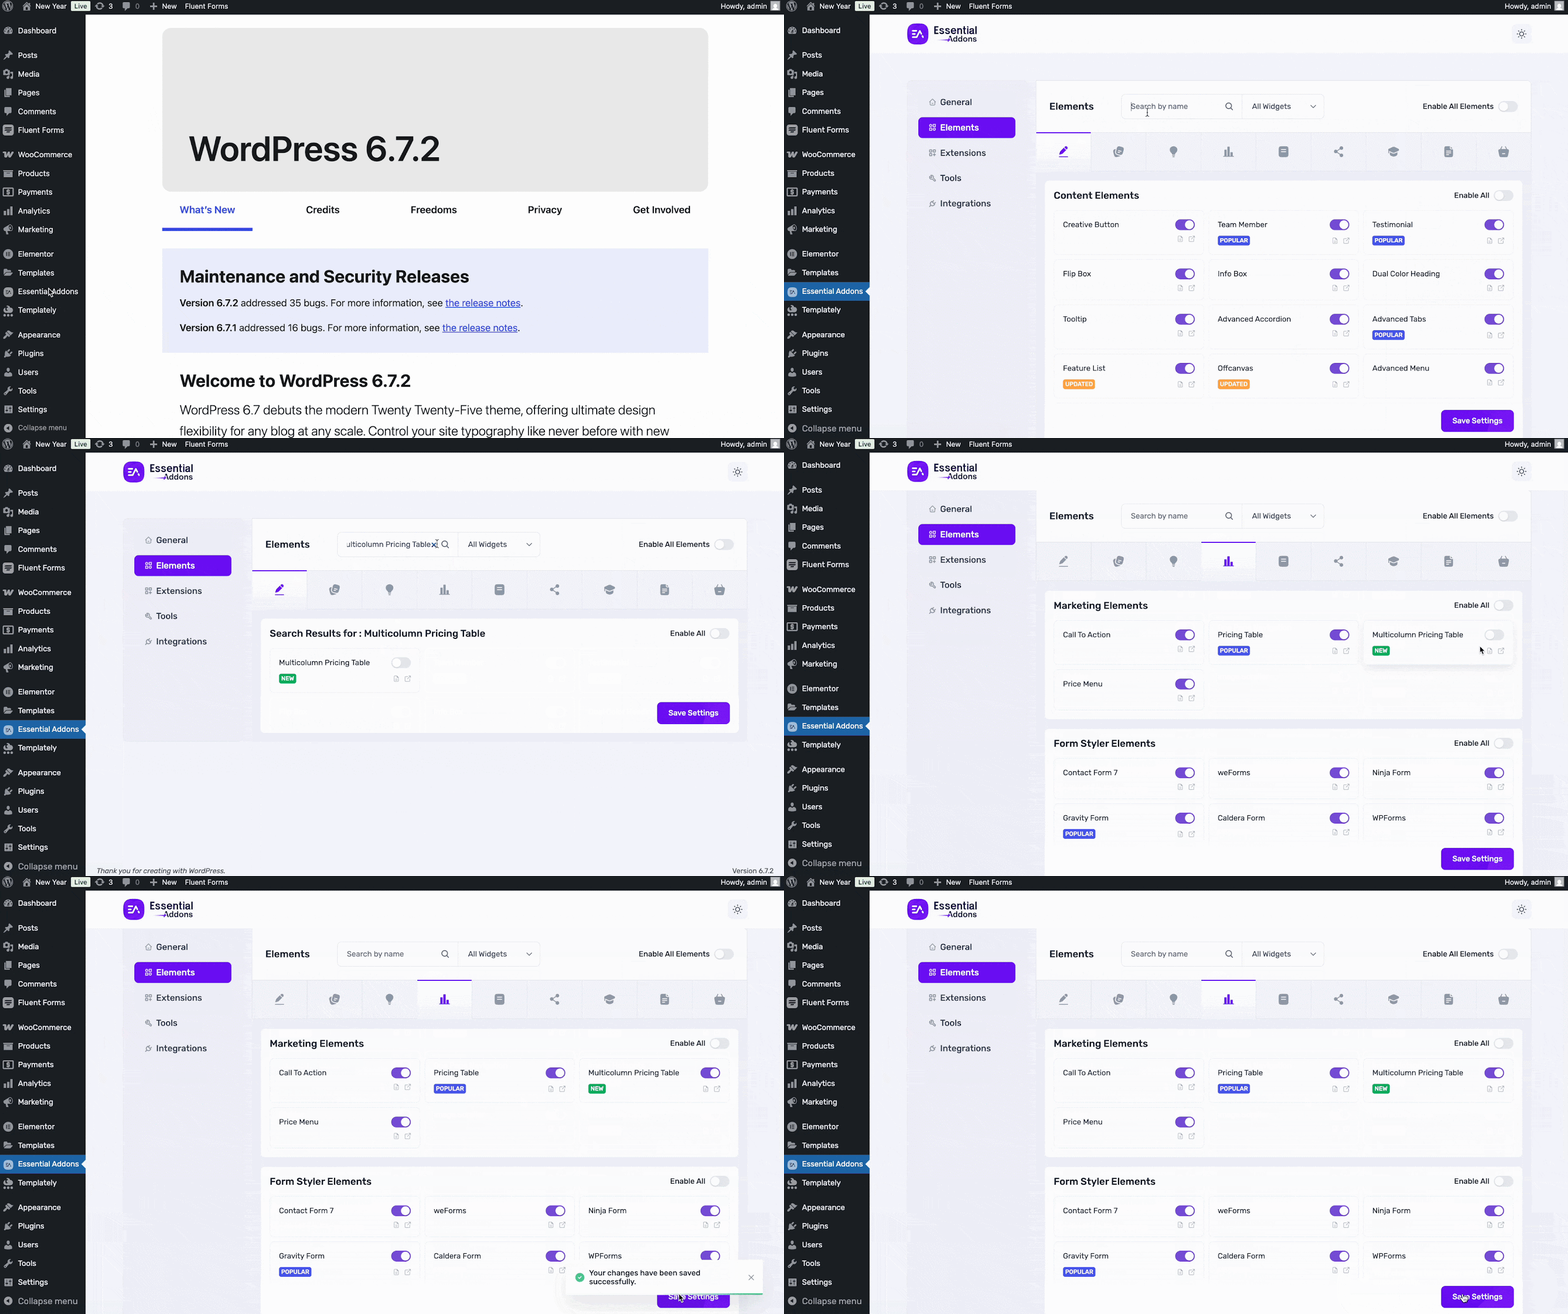
Head over to your WordPress dashboard and open Essential Addons. In the Elements tab, either search for Multicolumn Pricing Table or find it under Marketing Elements. Simply switch it on and hit Save Settings—you are all set.
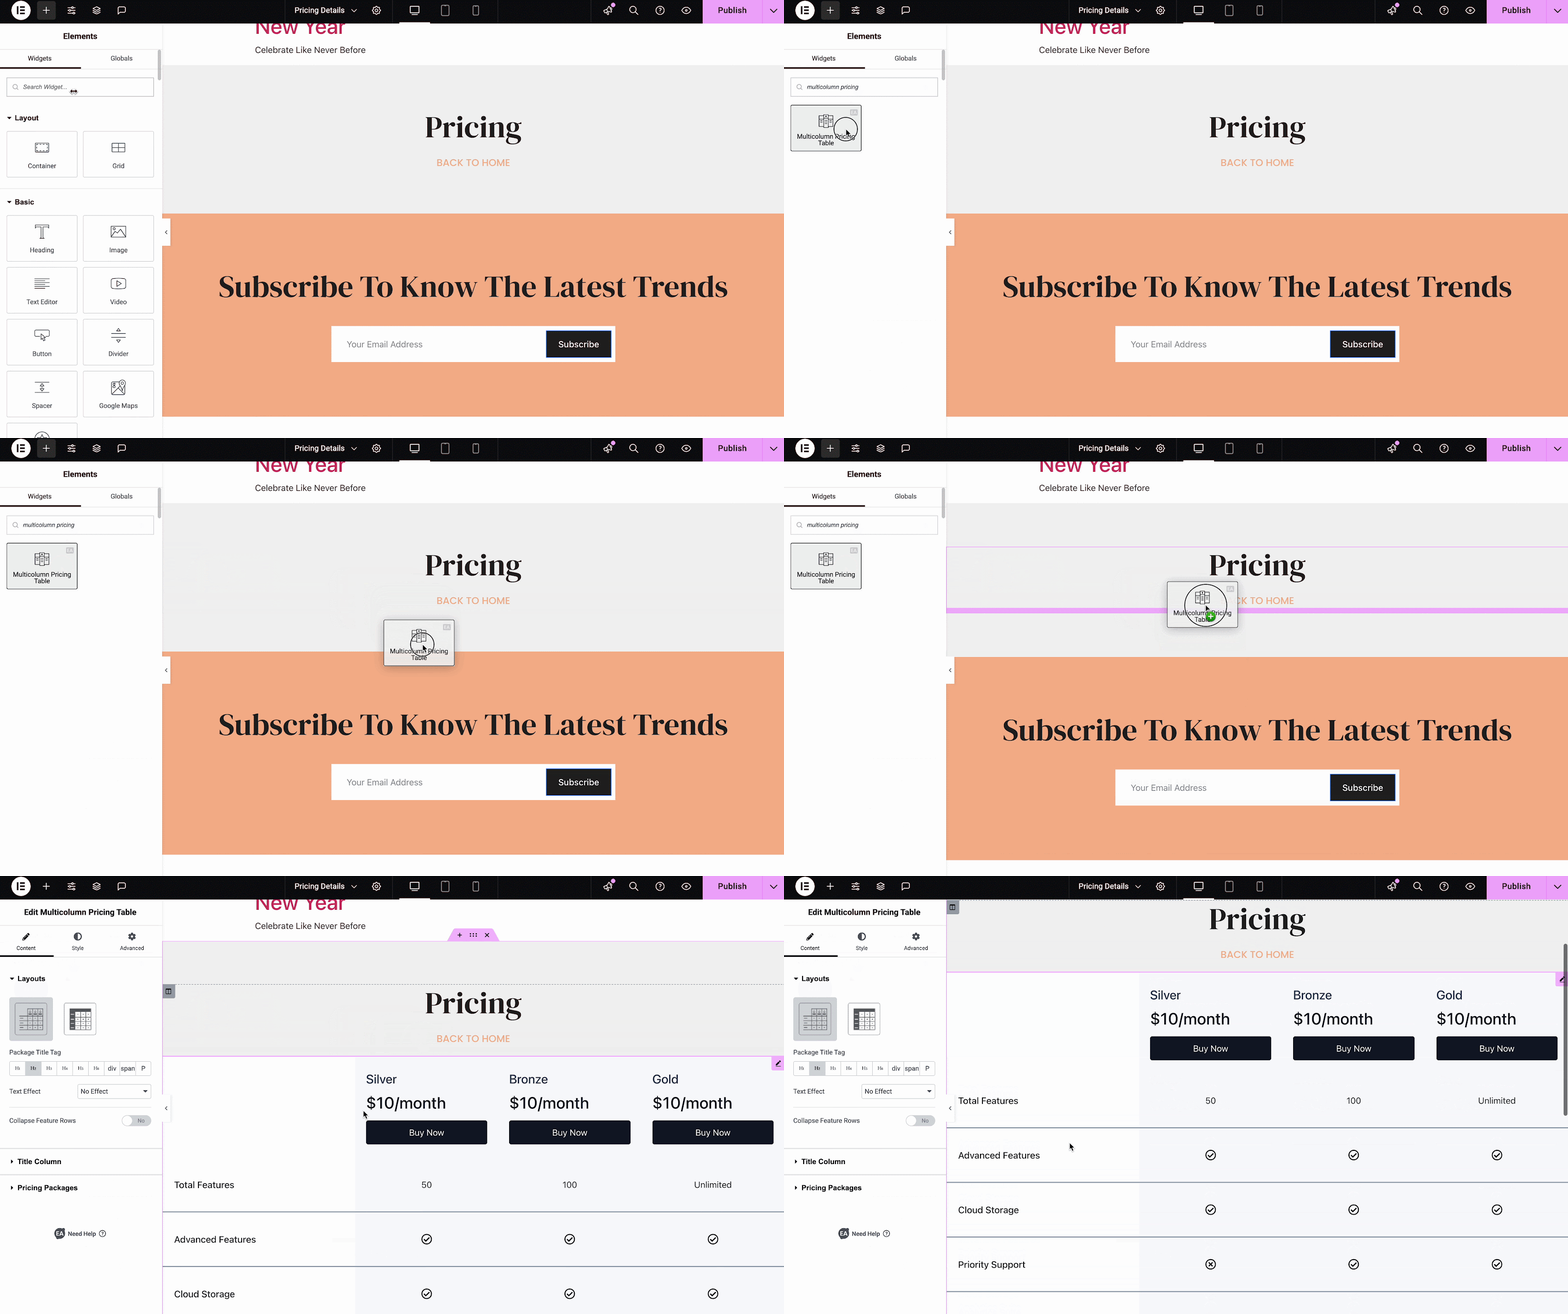
To insert your multicolumn pricing table, open the page in the Elementor editor. Use the search bar to find ‘Multicolumn Pricing Table’ and drag it into the perfect spot.
Configuring Pricing Items
The Content section gives you full control over the Layout, Title Column, and Pricing Packages. You can choose between two stylish layouts: Retro and Modern. Right beneath those, you’ll find the option to select the perfect Package Title Tag.

To customize the title or name text of each pricing card, choose either Marquee or Reflect from the Text Effect options. If your pricing includes multiple features or listings, enable the “Collapse Feature Rows” option. This gives you control over the number of rows, as well as the collapse/expand labels and icons.

Just below the Header Content options, you’ll find a list of features you can easily add or remove. You can also customize the title and icon for each feature — even the ones you just added! Once you’re happy with your changes, hit the ‘Sync Features’ button, reload the page, and your updates will be live.

Now, let us explore the Pricing Packages section. You have the flexibility to customize each package by adding or removing as many as you need. For every package, you can change the name, enable the featured option, modify the currency and its position, adjust the price and sale price for promotions, and even set up a button with URL and link options.
Once you have made all your changes, click the sync pricing packages button, just like you did earlier with the Title Column. Afterward, simply reload the page to view your updates.

One of the best features of this pricing table is the ability to fully customize your packages. You can change icons, colors, content positions, spacing, and more—giving you the flexibility to make it your own.

Configuring Style Items
Once you’ve finished customizing the content elements, it’s time to enhance the design. Head over to the Style tab, where you can fine-tune the background type, colors, featured badge, title column, packages, features, and buy button. Adjust typography, margins, padding, icon sizes, and more to create a visually appealing and cohesive pricing table.

Configuring Advanced Items
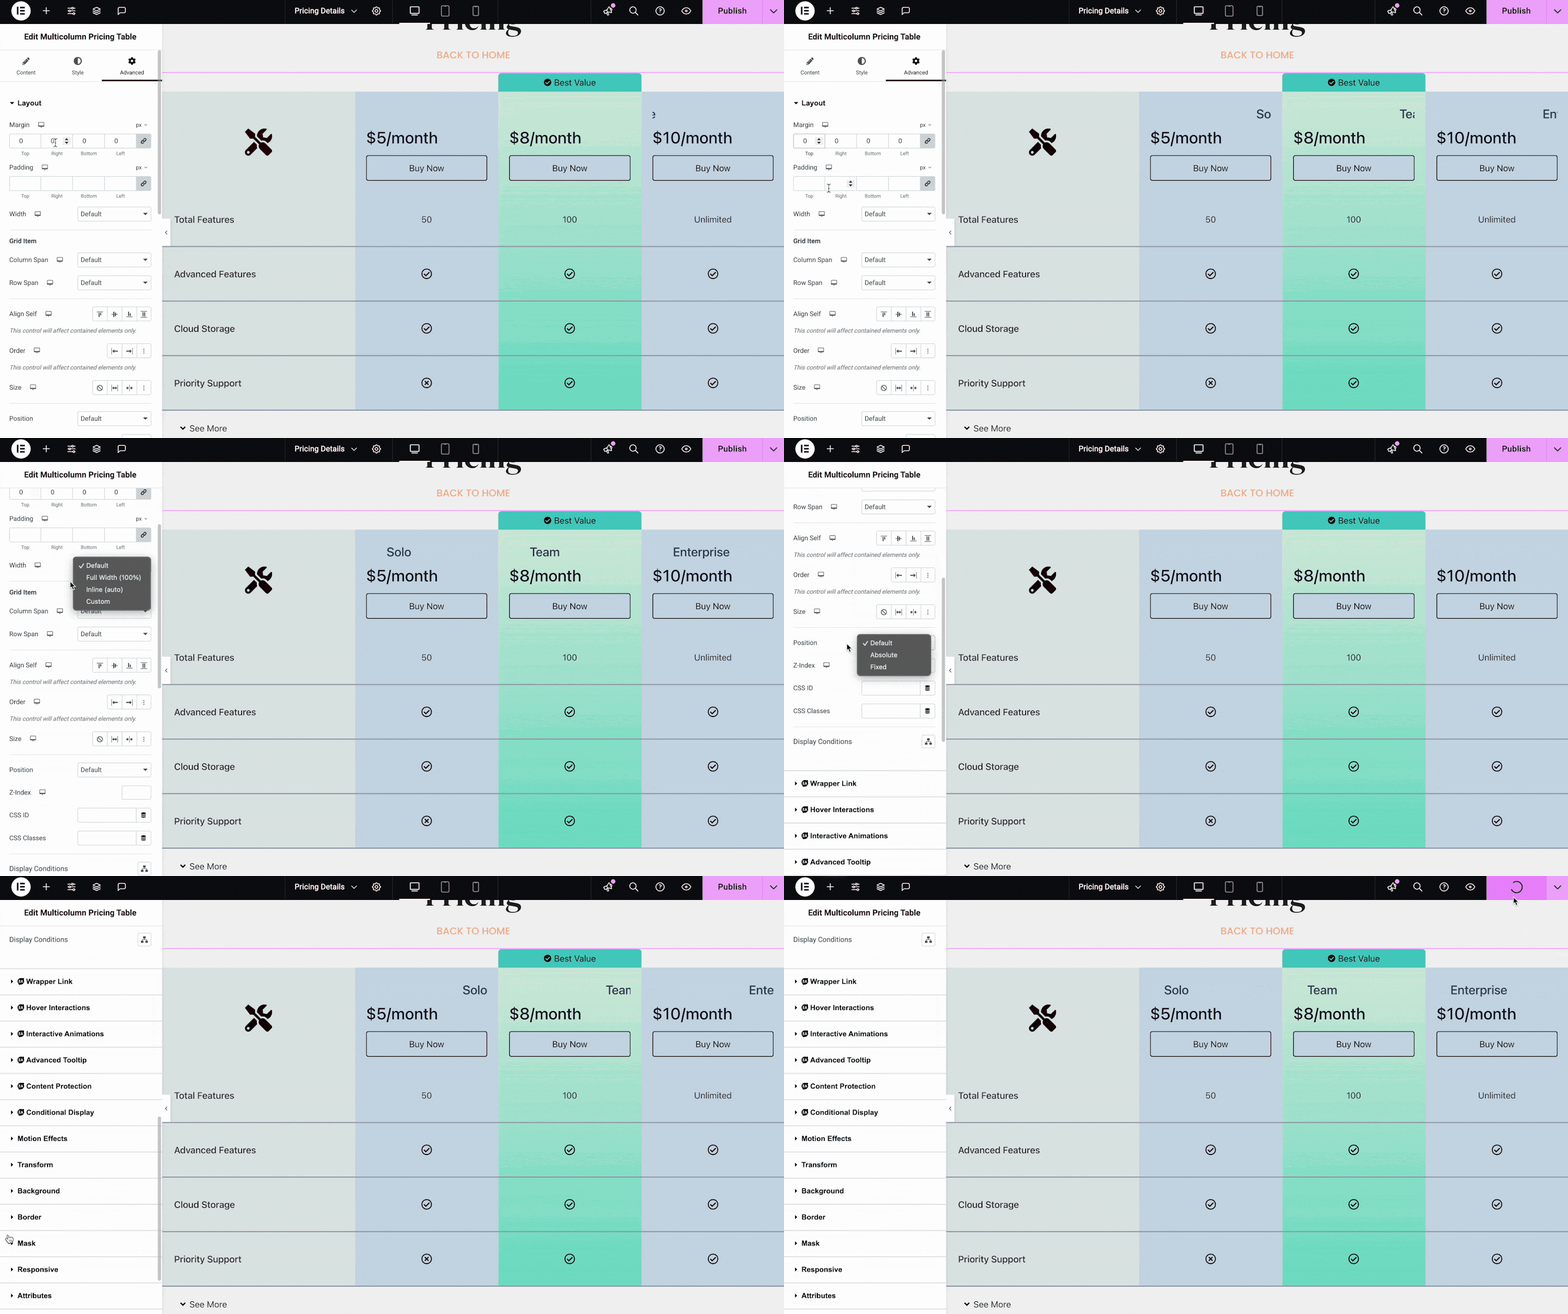
After perfecting the style settings, the next step is diving into the Advanced tab. This section allows you to modify the layout’s position, apply motion effects, tweak transform settings, and adjust background borders or masks. To take your customization even further, leverage the exclusive extensions from Essential Addons to make your pricing table stand out.
Once done with all the customization, publish or update the page/post you have been working on. Now, here is how it will look like to the visitors of your web page.
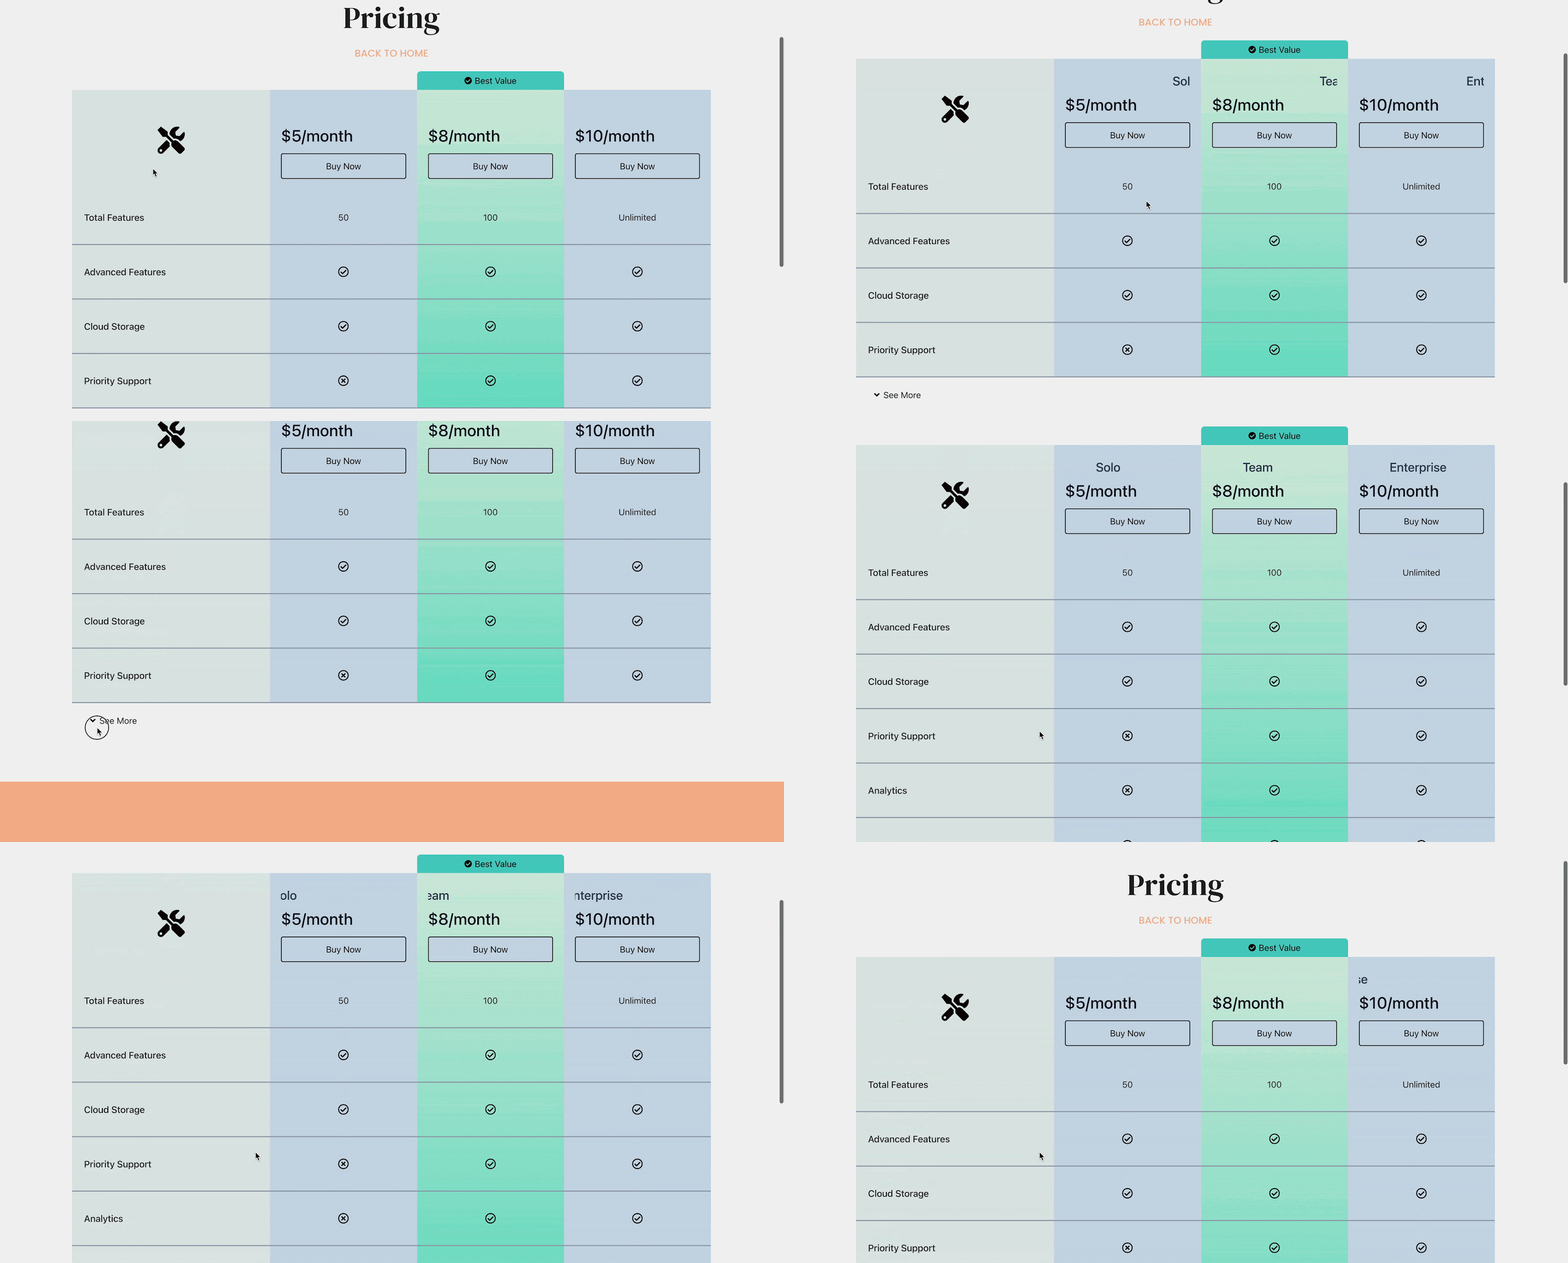
After doing all the customization, you can create attractive pricing plans for your business that not only look clean but also persuade visitors to take action.

Scale Up Your Business with High-Converting Pricing Table
A clean, well-structured Multicolumn Pricing Table can make a huge difference in how potential customers perceive your pricing plans. By offering a side-by-side comparison of features and costs, you make decision-making easier and increase conversions.
With Essential Addons for Elementor, you can easily build a fully customizable pricing table tailored to your business needs. Now, take the next step—implement what you have learned and create a pricing table that leaves a lasting impression.
If you want to get more tips and guides to enhance your Elementor website, subscribe to our blogs. To stay connected with the Essential Addons community, join our Facebook Group.
![[New Extension] How to Show Vertical Text on Elementor Websites?](https://essential-addons.com/wp-content/uploads/2025/11/Essential-Addons-New-Extension-Vertical-Text-Orientation-1024x576.jpg)


