Creating your own login registration page may seem very complicated and difficult, but with the help of page builder like Elementor, you can create stunning login register forms without any coding.
Introducing EA Login Register Form by Essential Addons For Elementor, the most popular and extensive elements library with over 700,000 active users. With this new widget for Elementor, you can now design eye-catching login register forms instantly within a few minutes.
Table of Contents
Why Do You Need A Well-Designed Login Registration Form?
If your aim is to get people to register as members on your website, then you need to have an attractive looking, easy-to-use login registration form. A well-designed login registration form makes your site visitors feel excited about becoming a member on your website. Moreover, if your login registration form looks interesting and is easy to use, then site visitors might feel a sense of security when registering for membership.

It’s important to remember that login registration pages are some of the most visited pages for websites that offer membership to its users. So if your site visitors cannot access their account, or if they are facing difficulties when trying to register themselves as members, then you will not get the engagement you are looking for.
This is why a login registration form needs to be well-designed and user friendly. Fortunately, with Essential Addons, you can now create your own custom login registration form easily in Elementor without having to touch a single line of code.
How To Create Login Registration Forms In Elementor
In this section, we’re going to walk you through the steps of creating your very own login registration form in Elementor. To get started, you need to first install and activate Essential Addons on your WordPress website. Once this is done, follow these step-by-step instructions and you will be good to go.
Watch The Video Tutorial Here
Step One: Enable Membership On Your WordPress Site
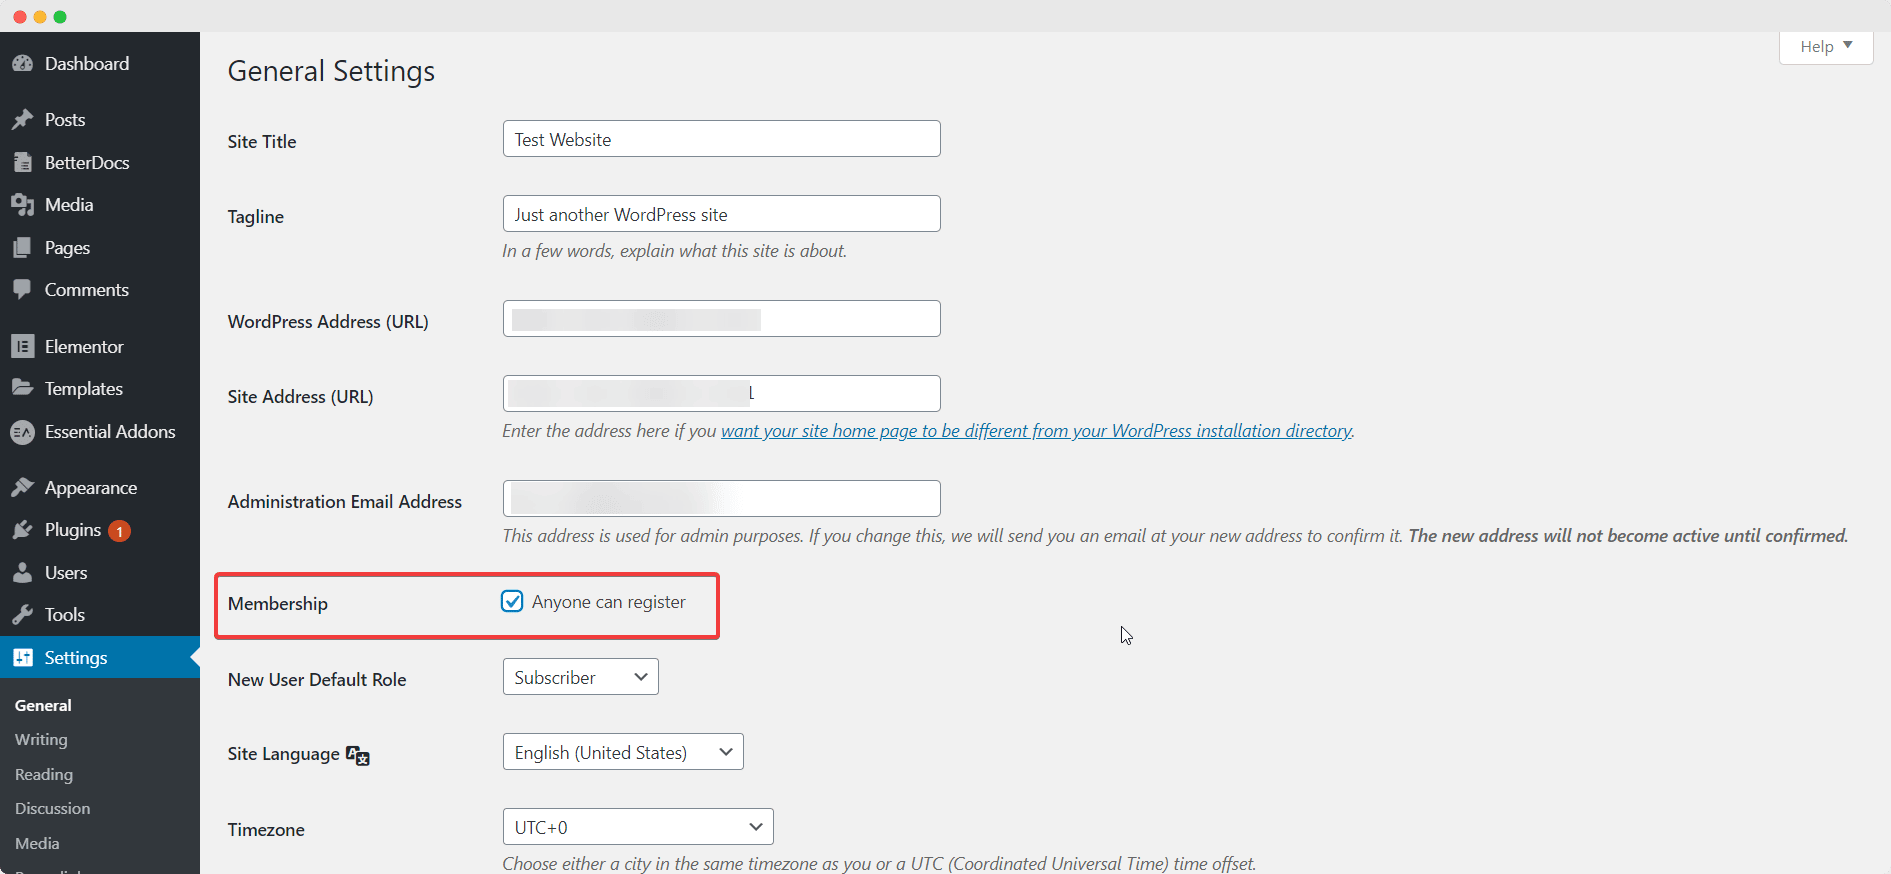
If you are planning on creating a registration form in Elementor without coding, you need to first make sure that you have allowed membership on your WordPress website. This is very easy to do. Just head over to Settings→ General from your WordPress dashboard and scroll down the page to enable the ‘Membership’ option.
Step Two: Activate EA Login | Register Form In Elementor
Afterwards, you need to create a new page in Elementor by navigating to Pages→ Add New and clicking on the blue ‘Edit With Elementor’ button. When the Elementor Editor is done loading, look for the ‘Login | Register Form’ element in the search bar under the ‘ELEMENTS’ tab. Just drag and drop the widget anywhere on your page to activate it.
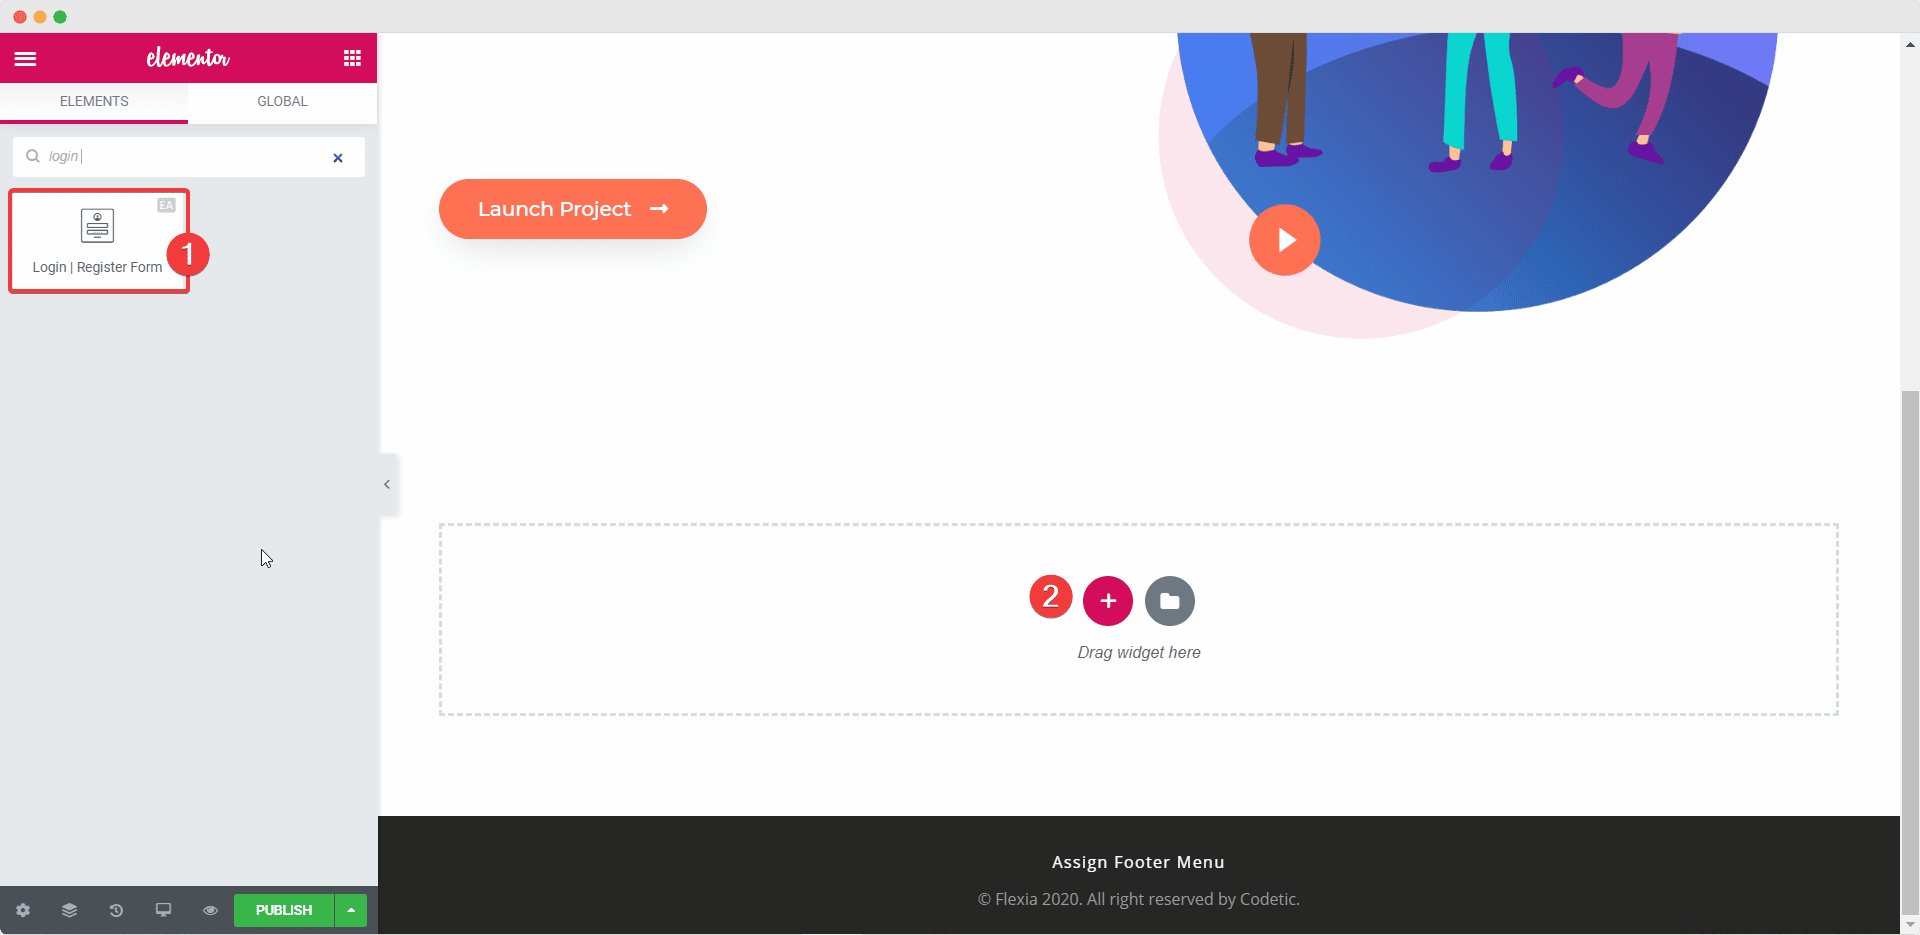
Once you drag and drop the element into any section of your page, this is the default layout you will see.
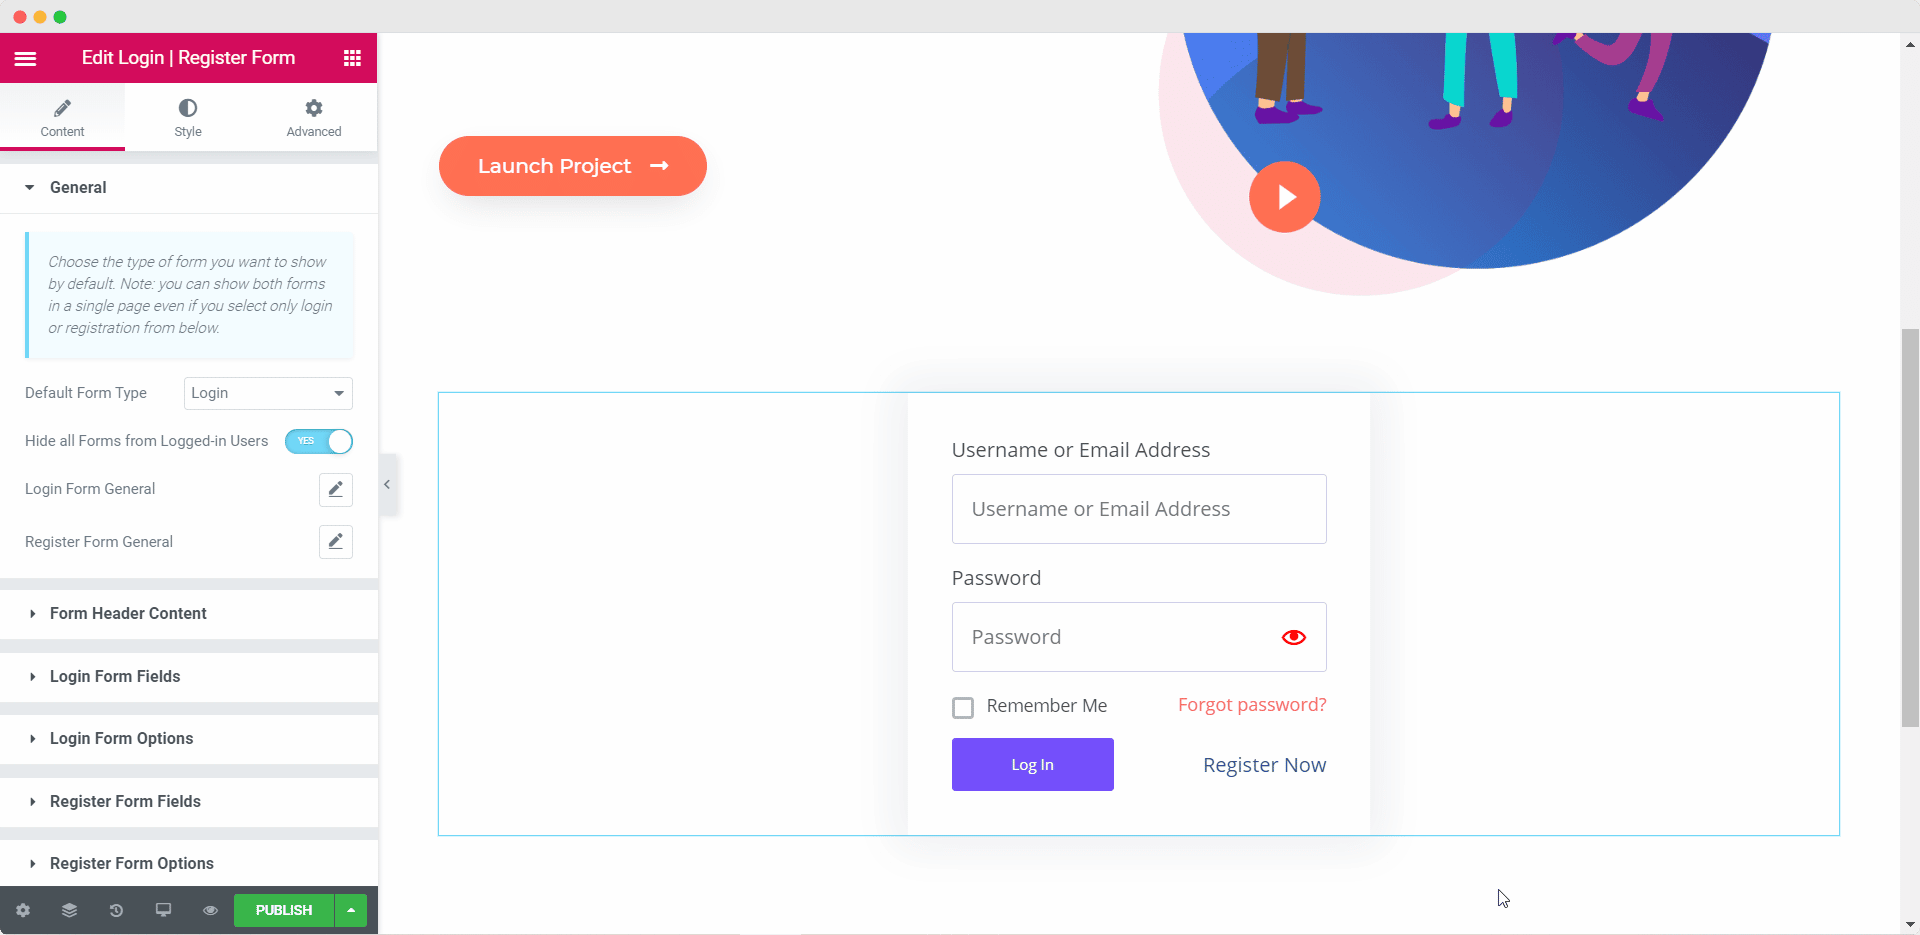
Step 3: Add Content For Your Login Registration Form
Now that you have successfully activated the EA Login | Register element, you can start configuring the content of your login registration form to make it more suitable for your website.
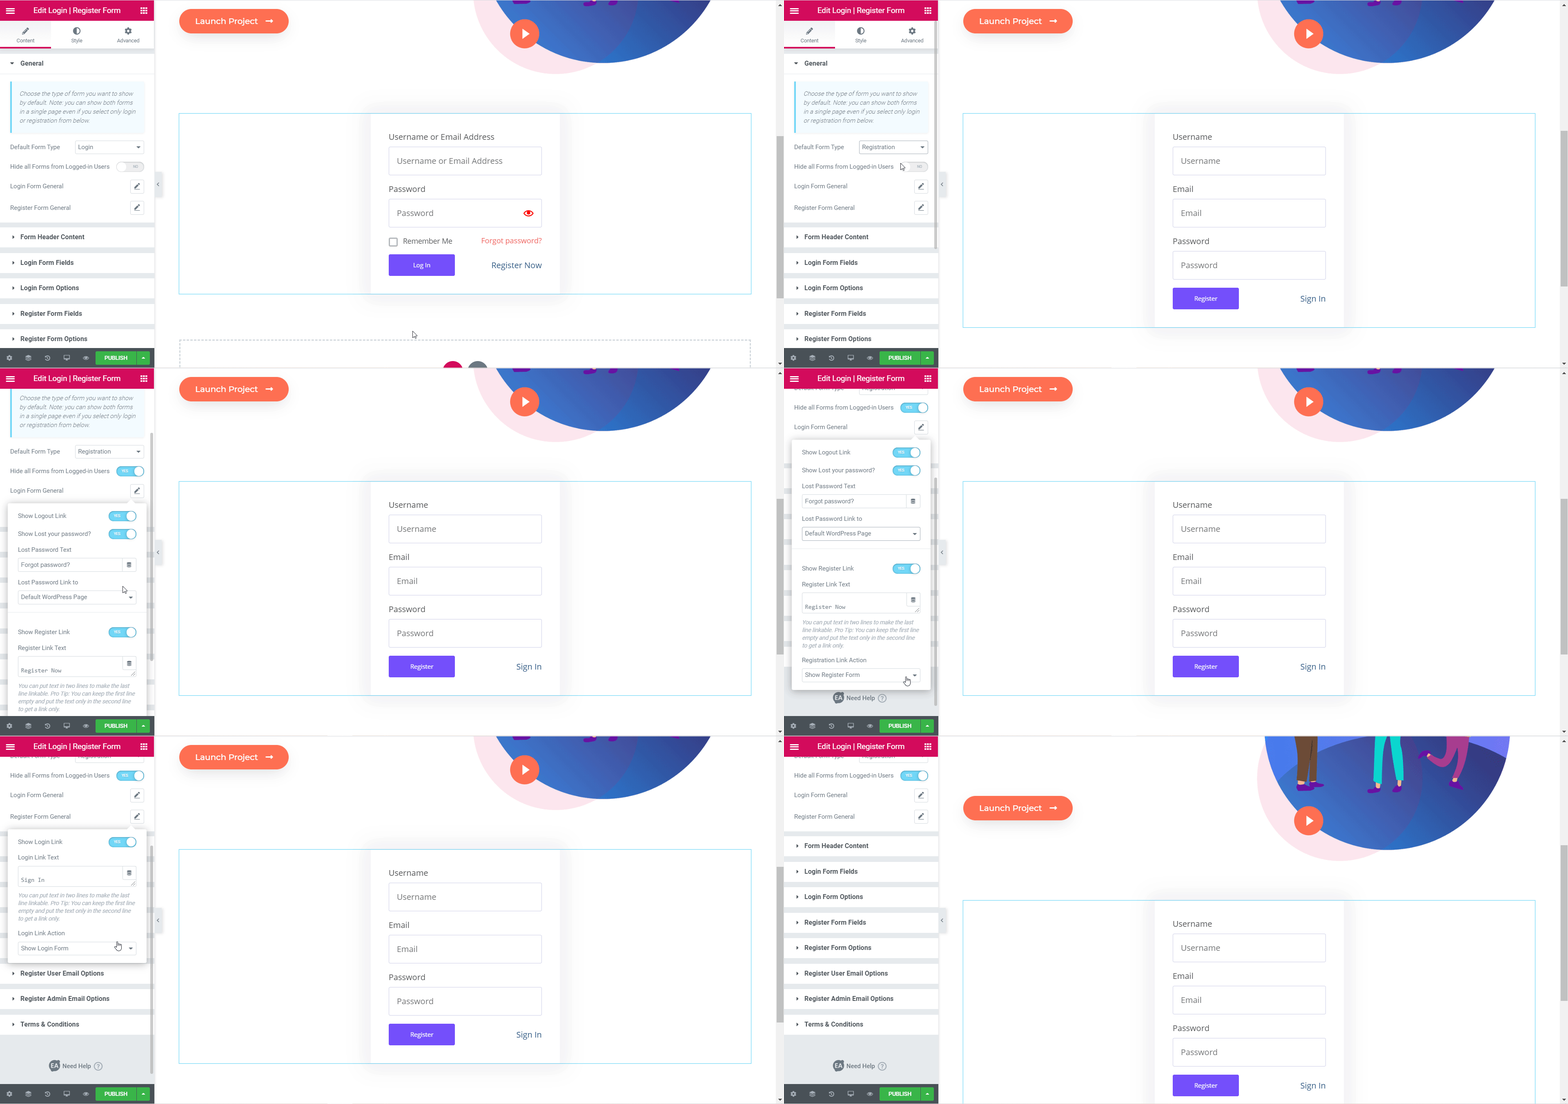
Under the ‘Content’ tab you will see several options to customize the content of your login registration form. For instance, you can choose to set your default form type to either the ‘Login’ form or the ‘Registration’ form from the ‘General’ settings. You can also toggle to hide the form from all logged in users, show or hide registration link, login link, lost password link and much more.
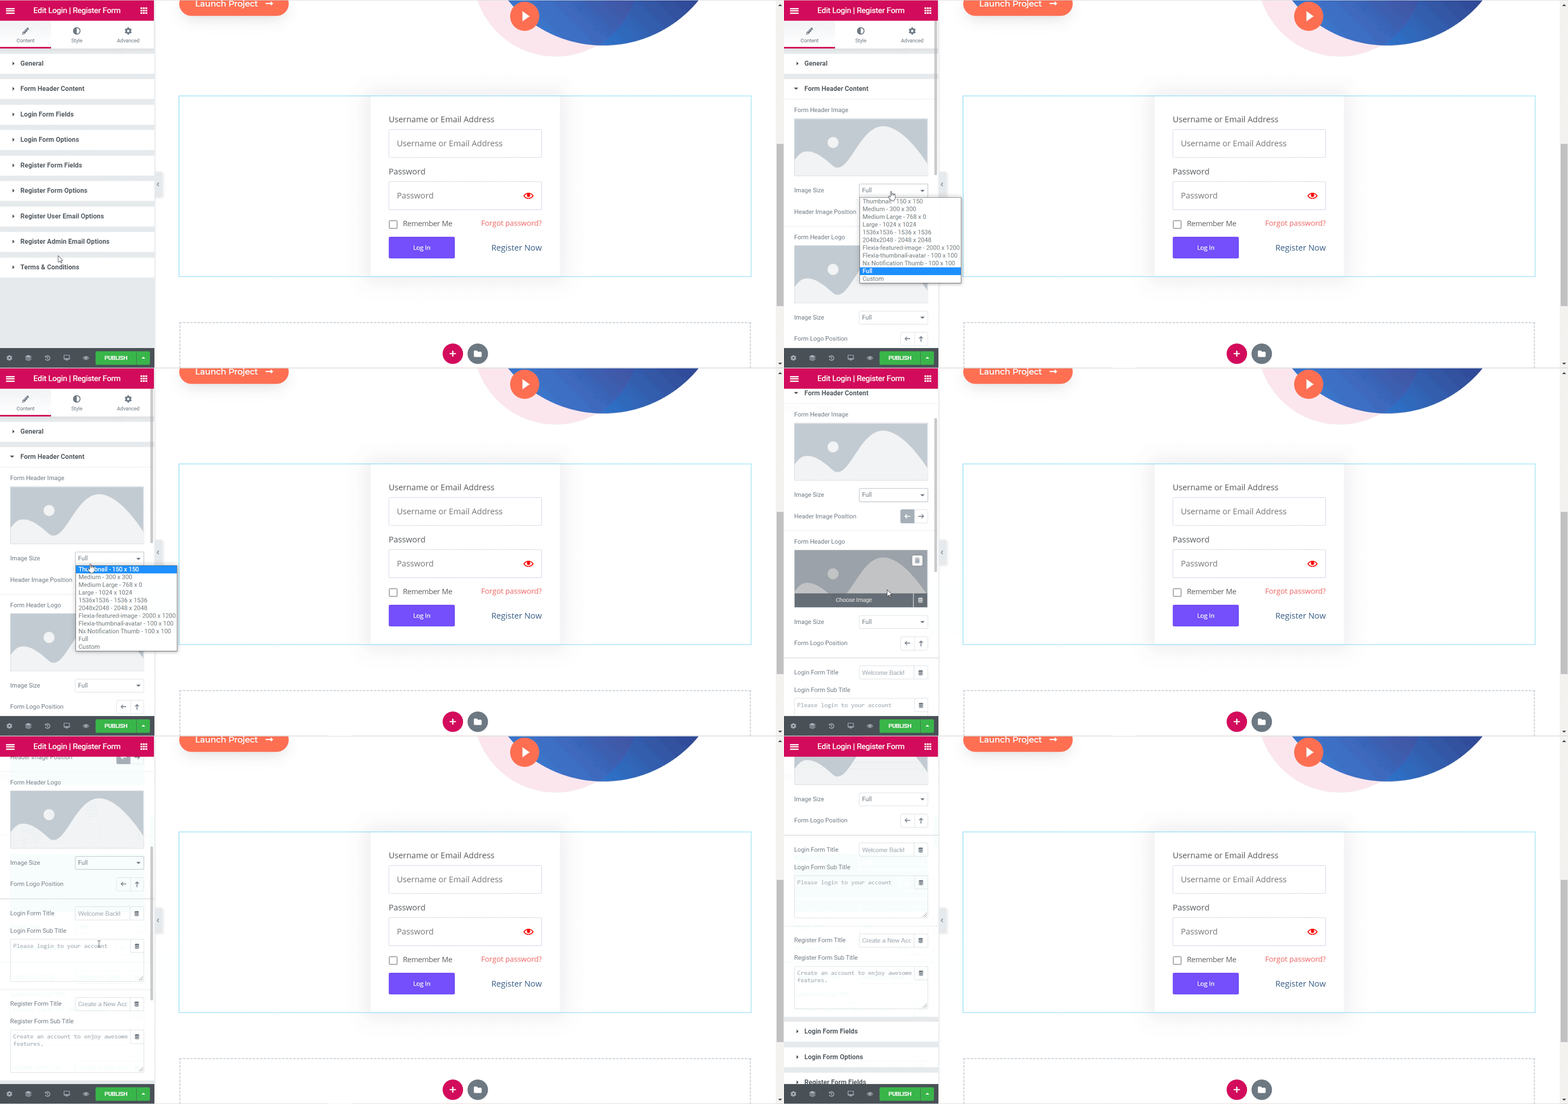
Similarly, from the ‘Form Header Content’ section, you can set images for your Form Header and Form Logo, adjust the size of the images and their position, and add titles and subtitles for your login registration form.
Finally, you can edit the content of the placeholders for your login registration form in Elementor by playing around with the Login Form Fields & Options and the Register Form Fields & Options settings.
There are tons of more things you can do to configure the content of your login registration form in Elementor. You can choose to enforce Terms & Conditions if you like, or configure the email template, content and more from the ‘Register User & Admin Email Options’.
Step 4: Style Your Login Registration Form In Elementor
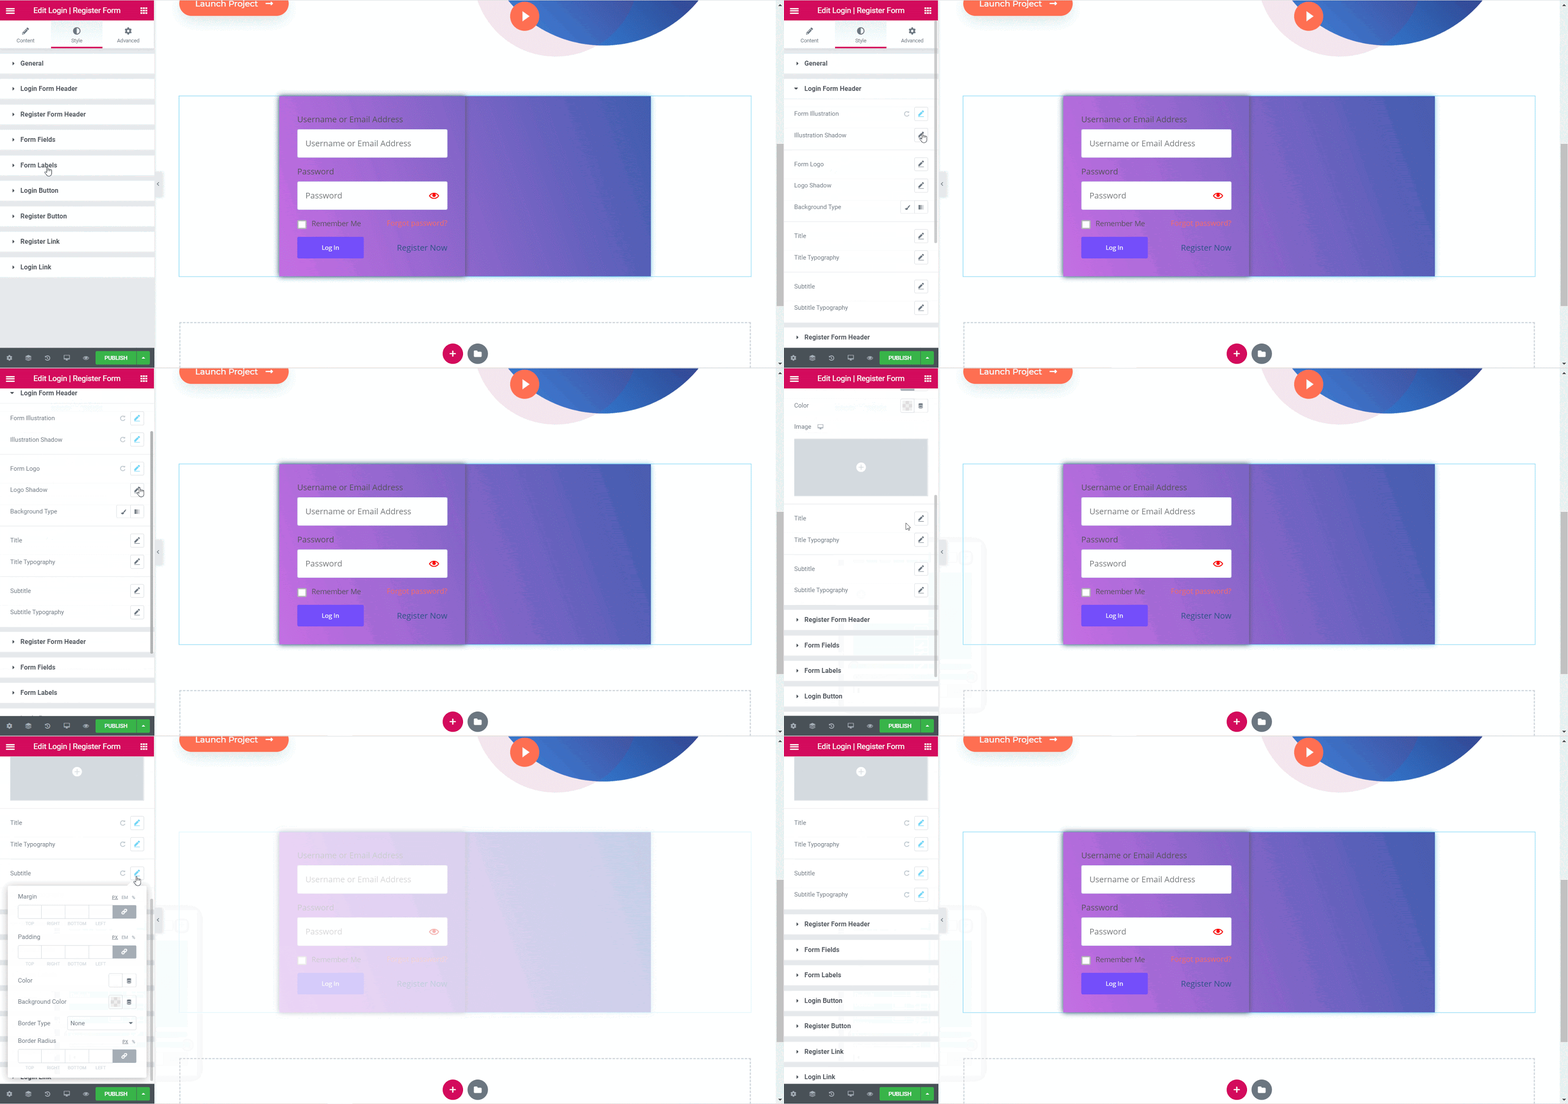
When you are done adding the content for your login registration form, you can switch to the ‘Style’ tab in Elementor editor to customize it and add your own personal touch.
There are tons of options available to style your login registration form in any way you like. From changing the background, typography, adding images and colors, and styling the buttons, the EA Login | Register Form element gives you full control over how you want to present your login registration form.
Step 4: Save Your Changes & View Final Outcome
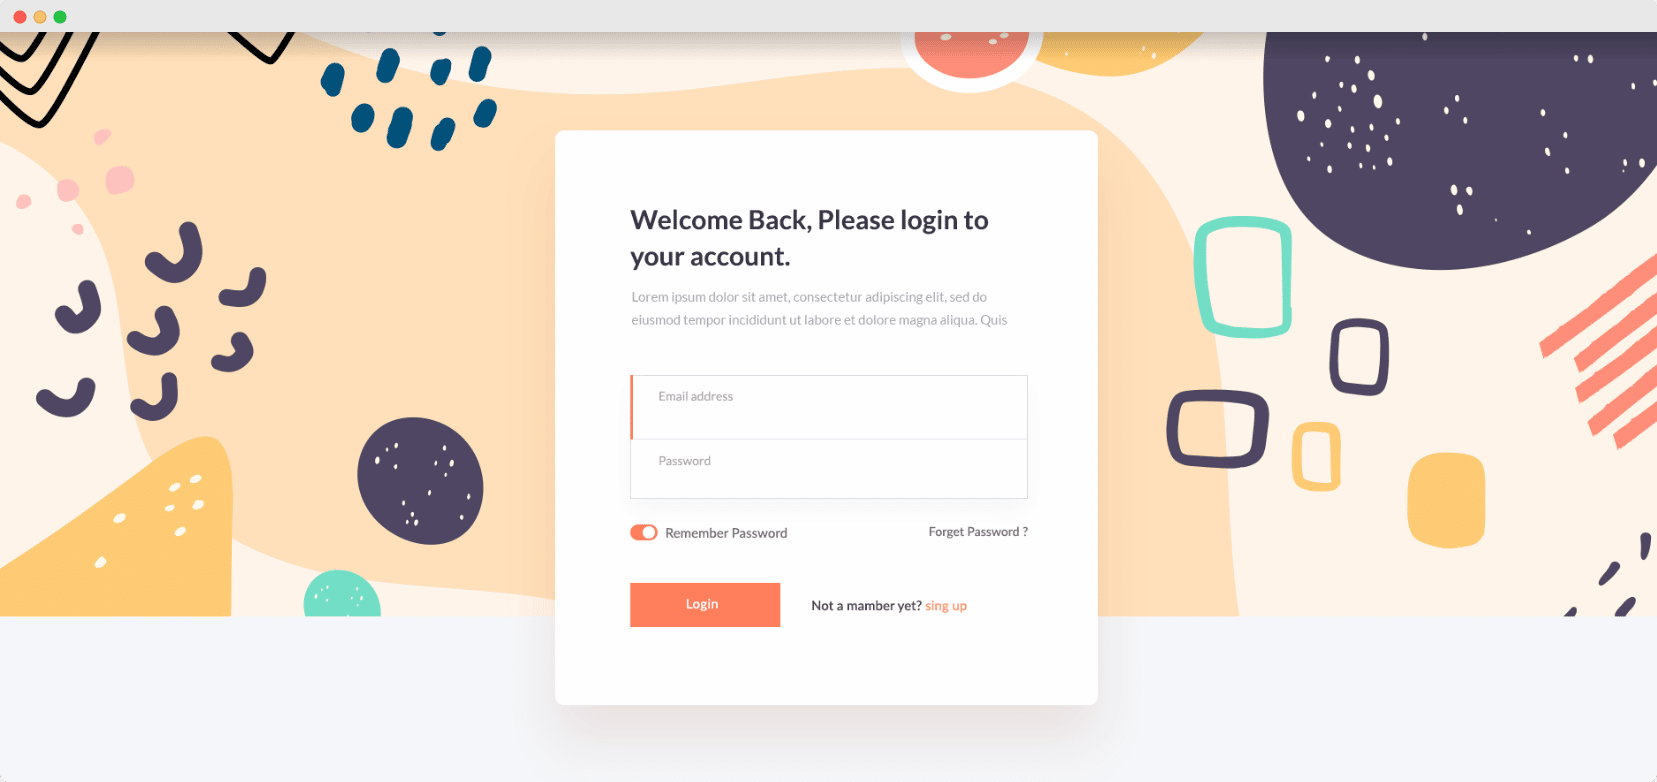
When you are happy with how your login registration form looks, make sure to save your changes in Elementor. If you want, you can preview the final outcome by copying the preview link of your page and opening it in a new incognito window where you are not logged in to your website.
Wrapping Up
Just like that, you’ve created an eye-catching login registration form in Elementor with the help of the new EA Login / Register Form element from Essential Addons. Wasn’t that easy?
We hope you will find this tutorial helpful and would love to hear your thoughts. If you face any difficulties, feel free to reach out to our support team or join our Facebook Community to connect with other web creators like yourself.
![Design Your Podcast Website In WordPress In 5 Minutes [Elementor Template] 13 PodCast Website](https://essential-addons.com/wp-content/uploads/2020/07/Design-A-PodCast-Website-PODCAST-PRO.png)
![Design Your Podcast Website In WordPress In 5 Minutes [Elementor Template] 15 Podcast Website](https://essential-addons.com/wp-content/uploads/2020/07/banner_inner-page.jpg)
![Design Your Podcast Website In WordPress In 5 Minutes [Elementor Template] 16 Podcast Website](https://essential-addons.com/wp-content/uploads/2020/07/PODCAST-WEBSITE.png)
![Design Your Podcast Website In WordPress In 5 Minutes [Elementor Template] 17 Podcast Website](https://essential-addons.com/wp-content/uploads/2020/07/4uJ73wLoqr.gif)
![Design Your Podcast Website In WordPress In 5 Minutes [Elementor Template] 18 Design Your Podcast Website In WordPress In 5 Minutes [Elementor Template] 3](https://essential-addons.com/wp-content/uploads/2020/07/screely-1594805494247.png)
![Design Your Podcast Website In WordPress In 5 Minutes [Elementor Template] 19 Podcast Website](https://essential-addons.com/wp-content/uploads/2020/07/k11vF3alhX.gif)
![Design Your Podcast Website In WordPress In 5 Minutes [Elementor Template] 20 Podcast Website](https://essential-addons.com/wp-content/uploads/2020/07/screely-1594805739814.png)
![Design Your Podcast Website In WordPress In 5 Minutes [Elementor Template] 21 Podcast Website](https://essential-addons.com/wp-content/uploads/2020/07/ezgif-2-b53bb6778ab4.gif)
![Create A Stunning Hotel Booking Website On WordPress [Without Coding] 23 Hotel Booking Website](https://essential-addons.com/wp-content/uploads/2020/07/Create-A-Stunning-Hotel-Booking-Website-On-WordPress.png)
![Create A Stunning Hotel Booking Website On WordPress [Without Coding] 25 Online Education Website](https://essential-addons.com/wp-content/uploads/2020/06/trustaid-1.png)
![Create A Stunning Hotel Booking Website On WordPress [Without Coding] 26 Hotel Booking Website](https://essential-addons.com/elementor/wp-content/uploads/2020/06/ezgif-2-c7327cac3e50.gif)
![Create A Stunning Hotel Booking Website On WordPress [Without Coding] 27 Hotel Booking Website](https://essential-addons.com/wp-content/uploads/2020/06/screely-1592793352741.png)
![Create A Stunning Hotel Booking Website On WordPress [Without Coding] 28 Hotel Booking Website](https://essential-addons.com/wp-content/uploads/2020/06/screely-1593062919017.png)
![Create A Stunning Hotel Booking Website On WordPress [Without Coding] 29 Hotel Booking Website](https://essential-addons.com/wp-content/uploads/2020/06/screely-1592793544084.png)
![Create A Stunning Hotel Booking Website On WordPress [Without Coding] 30 Hotel Booking Website](https://essential-addons.com/elementor/wp-content/uploads/2020/06/ezgif-2-912a28044c97.gif)
![Create A Stunning Hotel Booking Website On WordPress [Without Coding] 31 Templately ready templates](https://essential-addons.com/wp-content/uploads/2020/10/Banner.gif)


