Elementor WooCommerce

Elementor WooCommerce – The Complete Guide To Design eCommerce Site Faster

If you are wondering how you can use Elementor to create your own eCommerce site, then you are in the right place. This comprehensive Elementor WooCommerce tutorial will help you learn everything you need to know about creating a fully functional eCommerce website.
Elementor WooCommerce

From creating your WooCommerce shop pages, product pages, cart pages and checkout pages with Elemetor, we’re going to give you a detailed, step-by-step guide on how you can create an entire WooCommerce site with Elementor.

Table of Contents

Using WordPress As An eCommerce Solution

WordPress is one of the best platforms to create any and all kinds of websites and can be easily used to quickly set up an eCommerce store. In fact, with WordPress, you can set up an online store to sell anything–from digital products to physical goods and even services. 

There are tons of people who are using WordPress as an eCommerce platform with the help of eCommerce plugins like Easy Digital Downloads, Freemius, Zapier, and WooCommerce. This tutorial will only focus on WooCommerce, which has over 5 million active users and is one of the most recommended solutions for running an eCommerce business.

WooCommerce: One Of The Most Popular eCommerce Solutions For WordPress

Wondering why you should choose WooCommerce to start your eCommerce business? Well, there are several reasons why WooCommerce is one of the most popular eCommerce solutions for WordPress.

👉 Easy To Set Up Your eCommerce Shop On WordPress

Setting up your online business on WordPress with WooCommerce is very easy and can be done in only a matter of minutes. Furthermore, WooCommerce is free to use, and only some functionalities require you to get the premium version. However, if you are just getting started, then you can easily and quickly set up your eCommerce shop on WordPress for free with WooCommerce.

👉 Tons Of Useful Features To Sell Digital & Physical Products

Another great thing about WooCommerce is its flexibility. WooCommerce isn’t just for physical products, you can offer digital products, affiliate products, and services too. To facilitate this, WooCommerce comes with tons of useful features that let you create an outstanding store for all kinds of businesses.

👉 A Secure Solution For Running Your Online Shop On WordPress

Security is definitely one of the main and most important concerns for anyone who wants to start an eCommerce business. With WooCommerce, you can rest easy knowing that your online shop is secured as it has its own API system and regularly receives security audits to ensure safety.

👉 Seamless Integrations With A Huge Number Of Plugins

WooCommerce can be easily integrated with a huge number of WordPress plugins, allowing you to truly expand its functionality and enjoy more versatility. For instance, WooCommerce can be integrated with social proof marketing solutions like NotificationX to help you increase your sales. We will discuss this in more detail later in this post, so keep reading to find out more.

Why You Should Use Elementor For WooCommerce Sites

You may already be aware that Elementor is one of the best drag and drop’ page builders that let you create websites instantly without coding, and it has amazing integrations with WooCommerce. 

However, what you might not know is that you can design a complete and fully functional WooCommerce website that has all the essential pages like Cart Pages, Checkout Pages, and even more with Elementor.

That’s right! With the help of Elementor WooCommerce Builder and Essential Addons, the most popular elements library for Elementor, you can design a whole WooCommerce website in Elementor. Essential Addons has over 1 Million active users who are using its 70+ advanced elements to design stunning websites without any coding. 

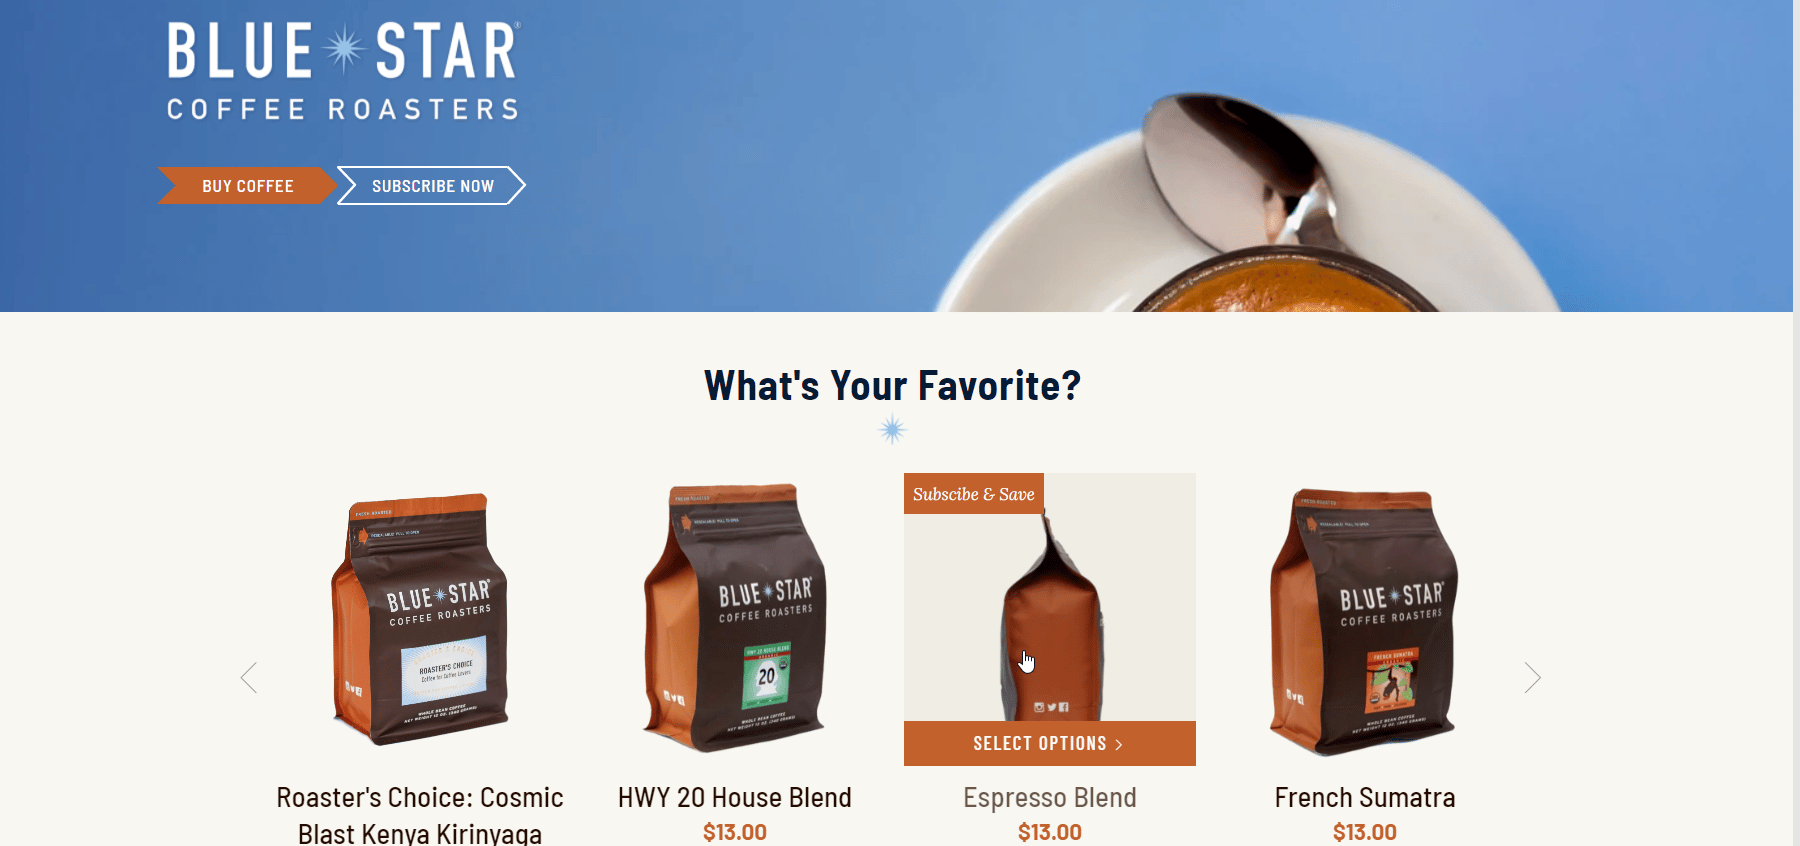
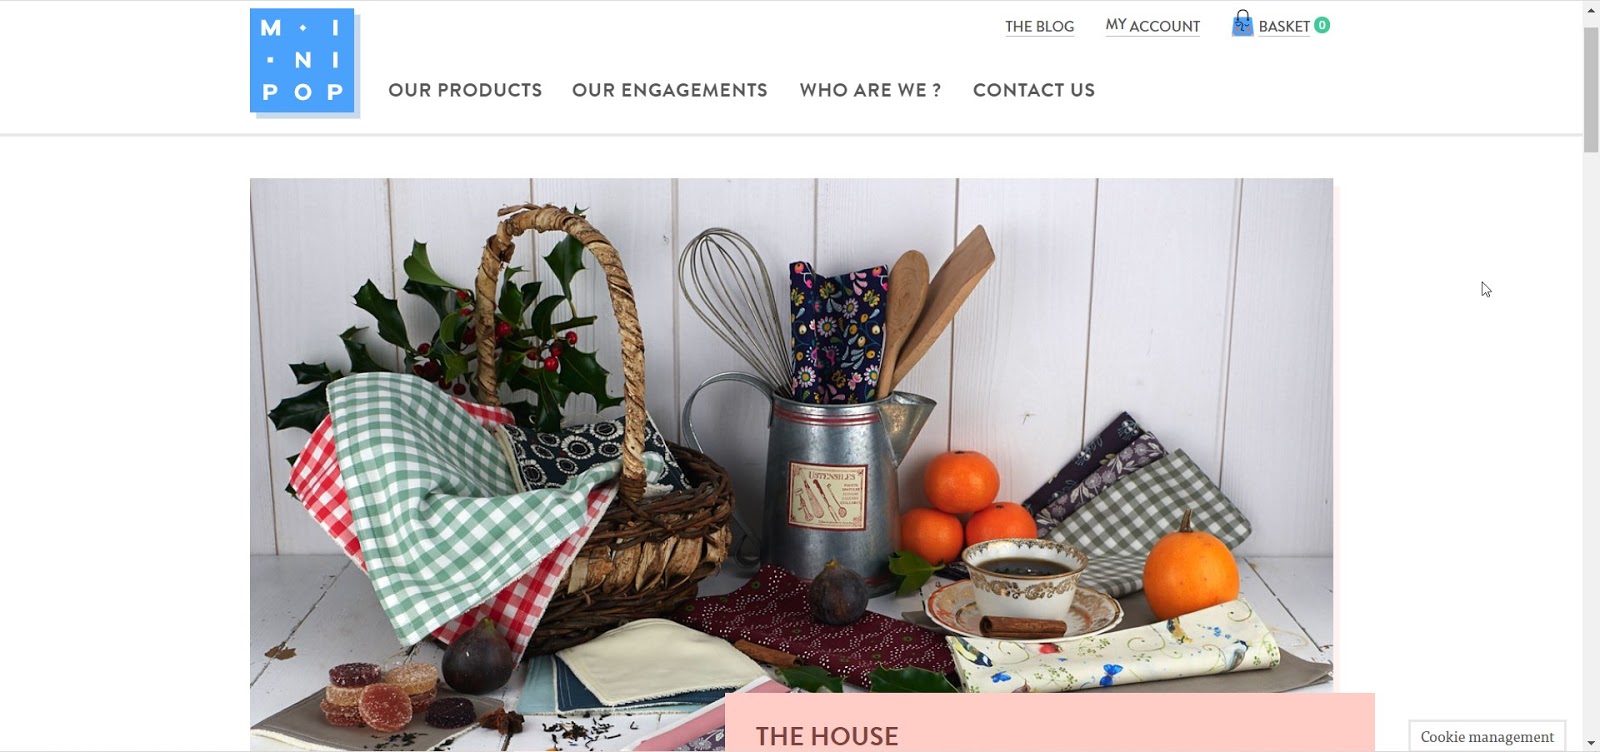
With elements like Woo Product Grid, Woo Product Collections, and Woo Checkout, you can create an amazing website for your online store, which we will show you how to do in this Elementor WooCommerce tutorial. To get some ideas for some of the best WooCommerce websites, check out these sites below.
Elementor WooCommerce Tutorial: How To Get Started With Your Online Store

Now that you know why WooCommerce is so popular, let’s get started with our Elmentor WooCommerce tutorial. Before creating your WooCommerce site using Elementor, you have to first set up your WooCommerce store.

To do this, you first need to sign up for a WordPress account and get your own domain if you don’t have one already. These are actually the first basic steps for creating any kind of website on WordPress.

Once you have your own domain, follow these step- guidelines given in this Elementor WooCommerce tutorial.

Step 1: Choose The Right WordPress Theme For WooCommerce 

Once you have your own domain, the first thing you will need to do is choose the right WordPress theme for your WooCommerce site. There are several options, but the best ones are listed below:

Hello: This is a lightweight theme with a minimalist design, and is brought to you by the team behind Elementor. Hello theme works well with popular plugins and extensions including WooCommerce, and its minimalist design means you can be very creative when designing your eCommerce website.

Elementor WooCommerce - The Complete Guide To Design eCommerce Site Faster 2

Flexia: What makes Flexia stand out is the huge number of things you can do with it. It has very few restrictions when it comes to customizing when compared to other WordPress themes. It loads very quickly, and also supports popular plugins like WooCommerce, so it is perfect for your eCommerce business.

Elementor WooCommerce - The Complete Guide To Design eCommerce Site Faster 3

Step 2: Set Up Your WooCommerce Store On WordPress

After you are done choosing a theme for your eCommerce website on WordPress, the next step in our Elementor WooCommerce tutorial involves setting up your WooCommerce store.

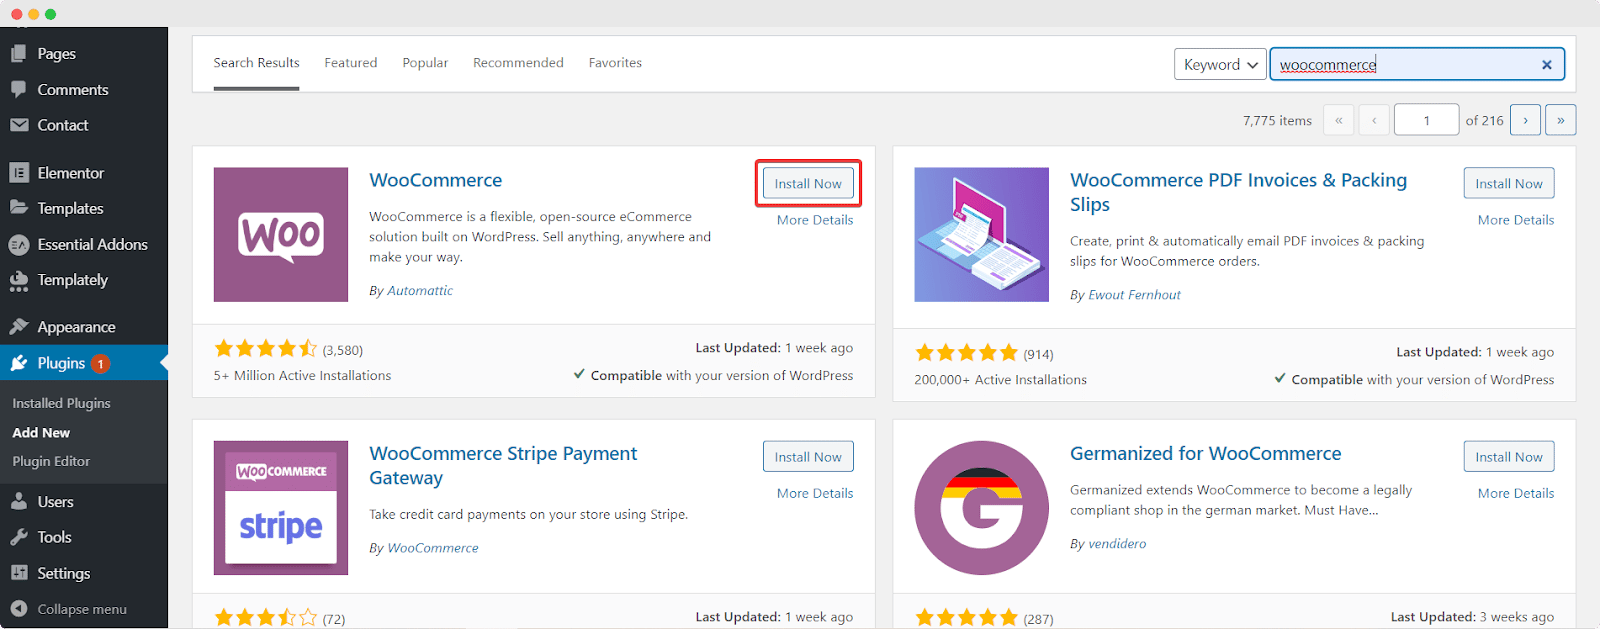
To do this, first install and activate the WooCommerce plugin by navigating to Plugins→ Add New from your WordPress dashboard. Search for the keyword ‘WooCommerce’. Once you find it, install and activate the plugin.
Elementor WooCommerce

After the WooCommerce plugin is installed and activated on your WordPress website, simply follow the on-screen instructions to set up your WooCommerce store. You’ll have to include information about your business such as your location, contact information, payment and shipping details, type of products, and more.

Step 3: Add Your WooCommerce Products And Set Tags & Categories

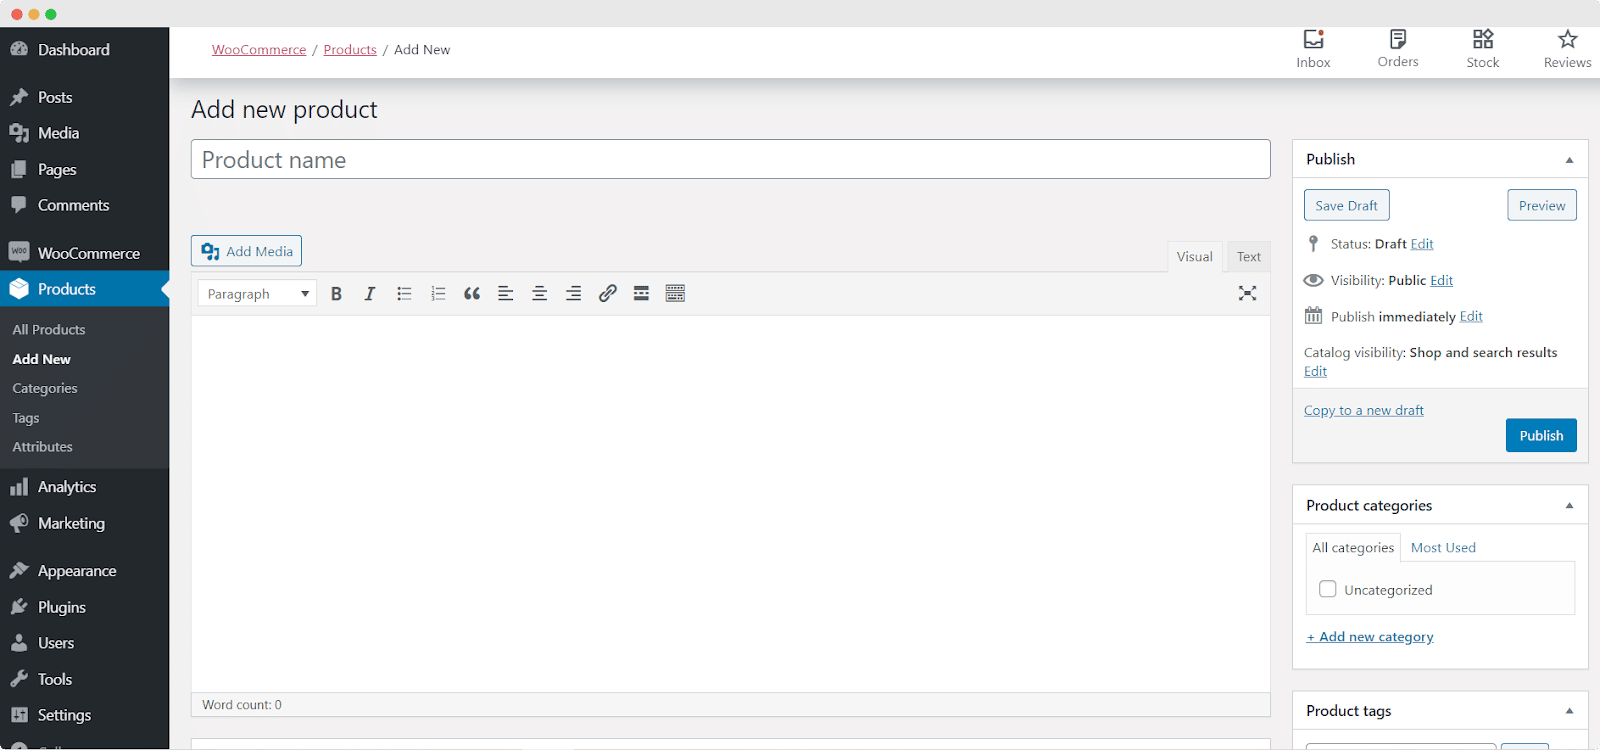
When you are done setting up your online shop with the WooCommerce SetUp Wizard, you can add your by simply navigating to WooCommerce→ Product→ Add New Product.
Elementor WooCommerce

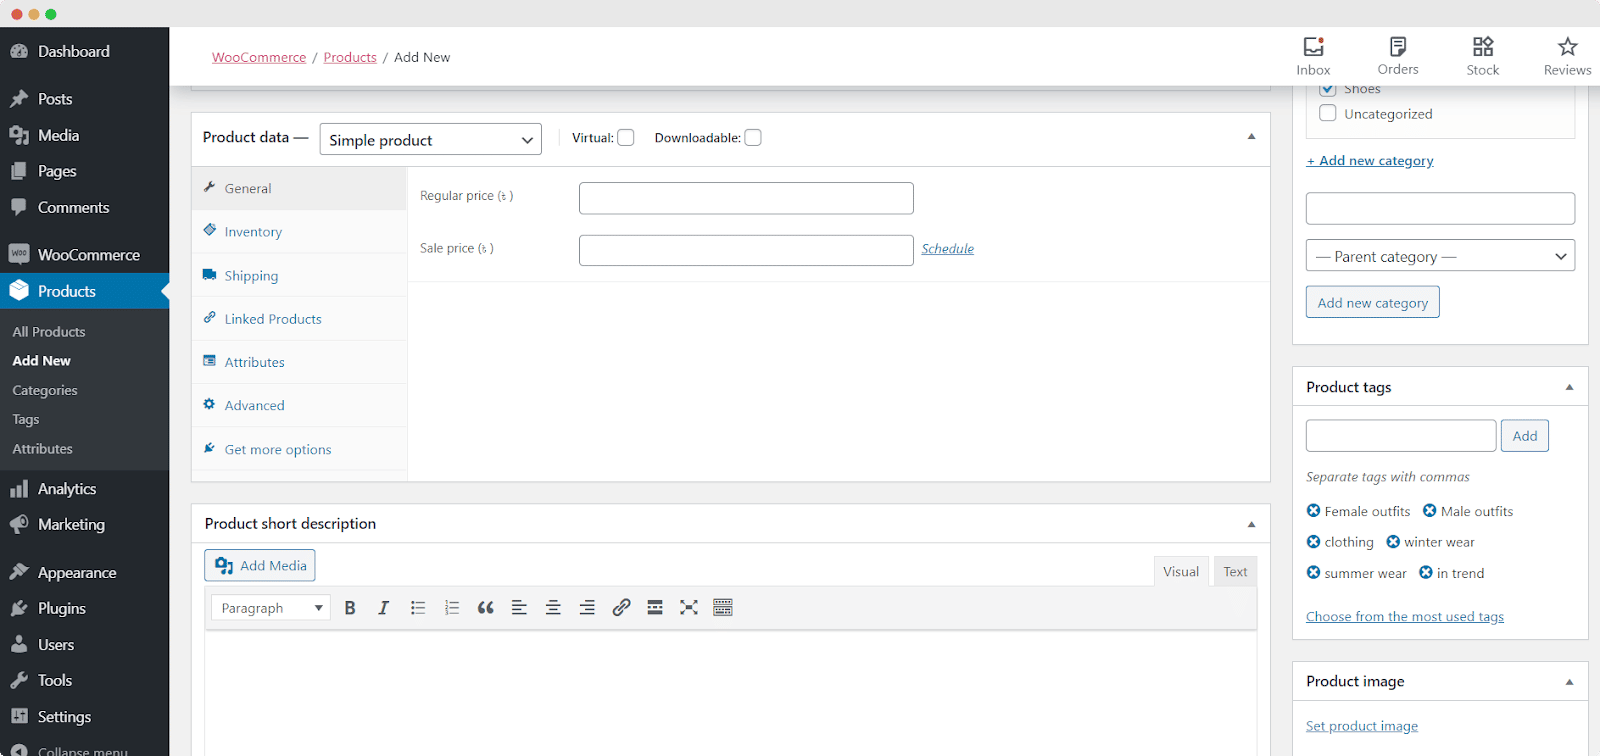
Here you can add names for each product, and also set your product tags and categories. If you scroll further down you will also be able to add more details such as Product Data and set your Product Short Description, Product Image, and more.
Elementor WooCommerce

If you are done with this step, then congratulations! You have set up your WooCommerce store and added your products to your eCommerce site. Next, we need to design and style the pages of your WooCommerce website in Elementor.

How To Design Your WooCommerce Shop Page Using Elementor [No Coding Required]

Now that we are done with the basic set up for your eCommerce store, let’s move on to one of the most important part of this Elementor WooCommerce tutorial. In this section, we are going to show you how to create your WooCommerce shop page.

To do this,  you need to first install both Elementor and Elementor Pro as the widgets that you get with Elementor WooCommerce Builder are premium widgets.

Then, create a new page for your WooCommerce site by navigating to Pages→ Add New from your WordPress Dashboard. Click on the blue ‘Edit With Elementor’ button to open up the Elementor Editor.

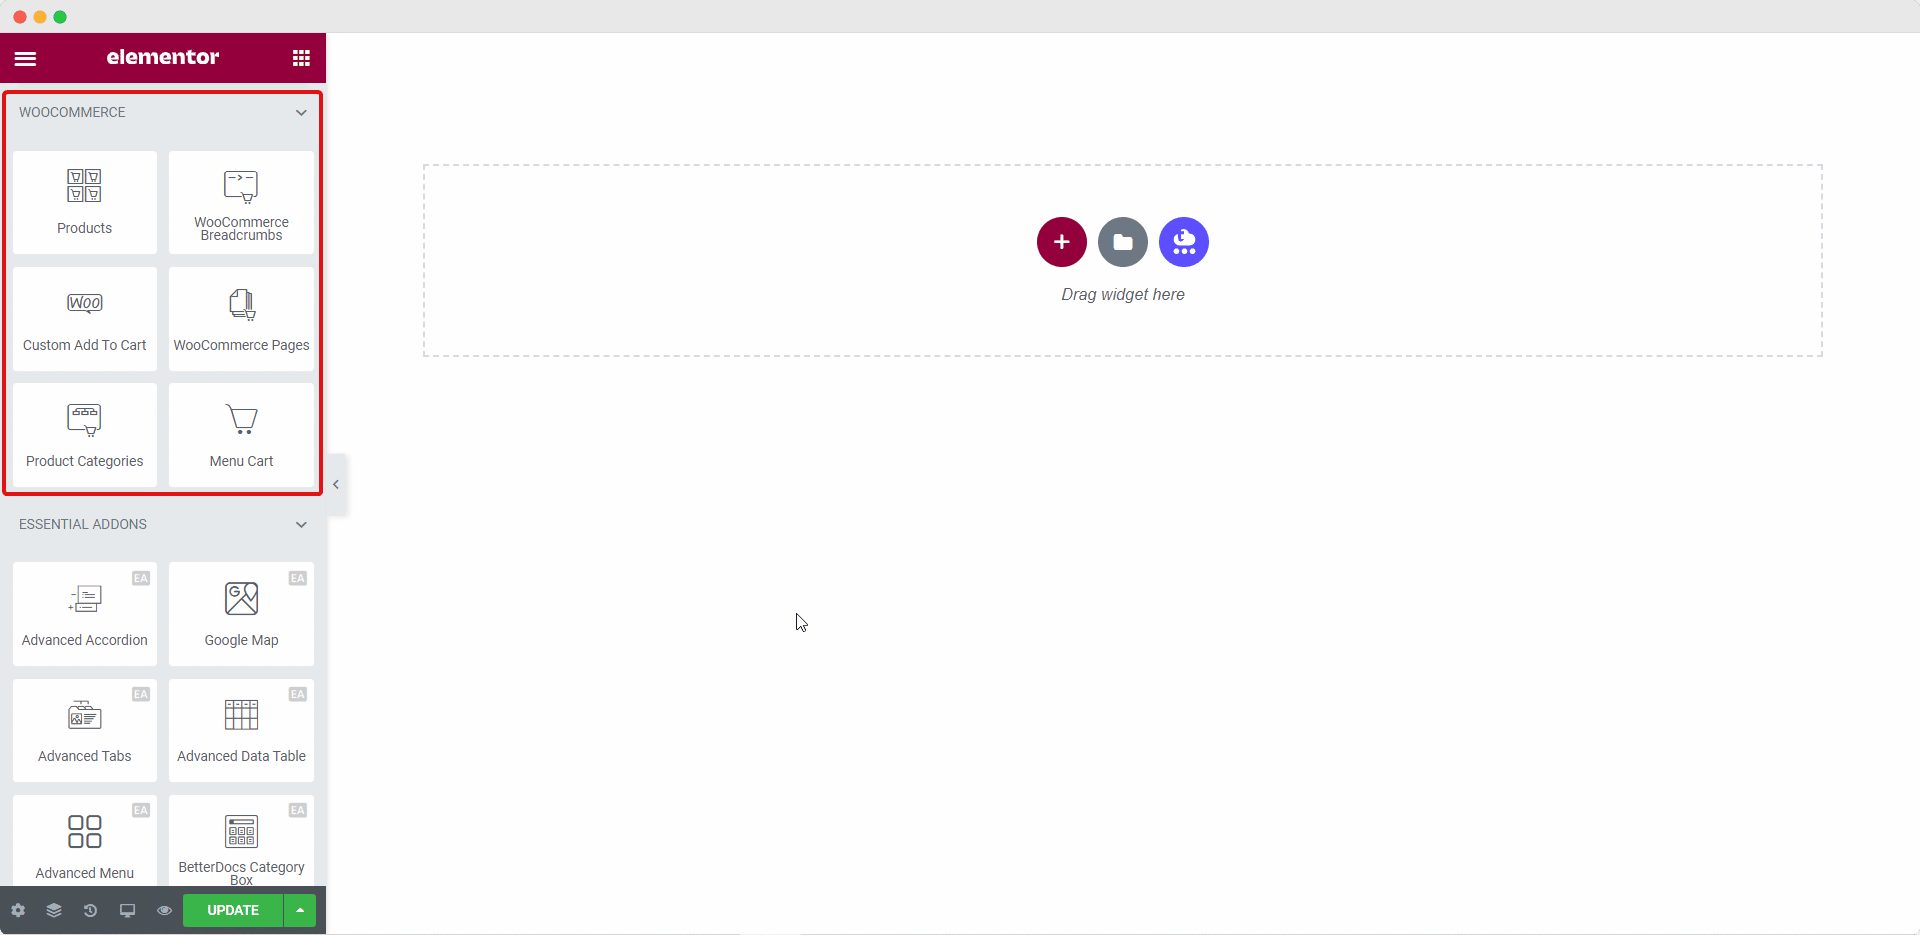
Once the Elementor Editor is done loading, you can drag and drop the WooCommerce elements to design your  store’s home page from scratch.
Elementor WooCommerce

Play around with these elements to create your eCommerce website’s home page. If you want to showcase your store products more creatively, then move on to the next step of this Elementor WooCommerce tutorial.

How To Showcase Your WooCommerce Product Collections Beautifully Using Elementor

While you can definitely use the elements available with Elementor WooCommerce builder to create pages for your online store, you can go a step further and truly captivate your customers with Essential Addons for Elementor. Here’s how you can do this.

You can display your WooCommerce Product Collections in an amazing layout complete with hover animation with Elementor by using the EA Woo Product Collections element. This cool element lets you display your product collections beautifully based on  categories, attributes, and tags.

Step 1: Activate The EA Woo Product Collections Element

You can activate the EA Woo Product Collections Element by searching for it under the ELEMENTS tab of your Elementor editor. Once you find it, simply drag and drop the element anywhere on your page.
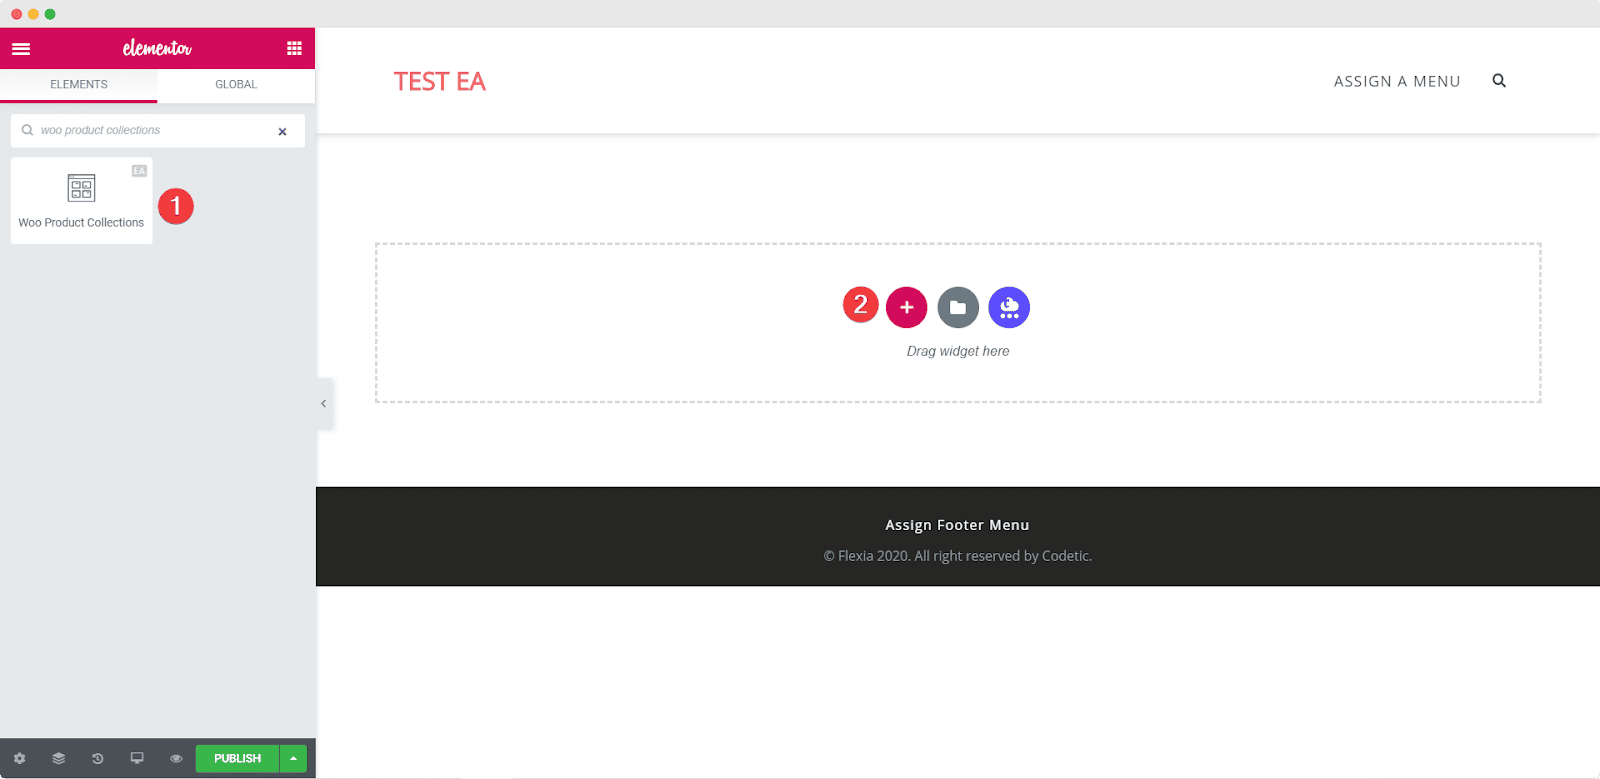
Elementor WooCommerce

Once you drag and drop the element into any section of your page, this is the default layout you will see.
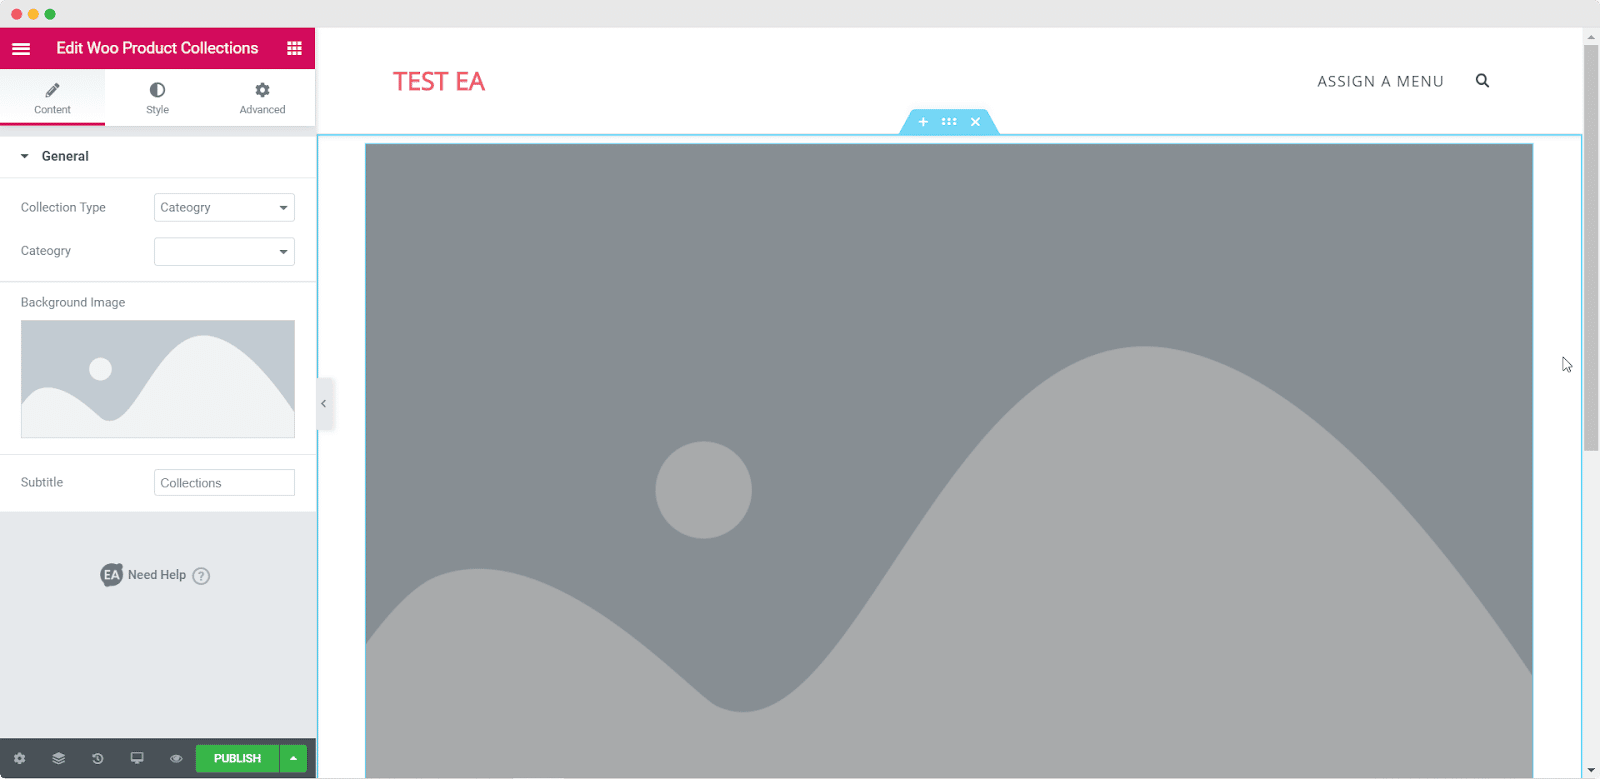
Elementor WooCommerce

Step 2: Edit The Content Settings

After you have successfully activated the EA Woo Product Collections element, you can start editing the content to add your product collections on the basis of tags, categories, or product attributes.

Under the ‘Content’ tab you will see an option called ‘General Settings’. From here you can choose the Collection Type and Category. You can also change the Subtitle for your WooCommerce Product Collections.
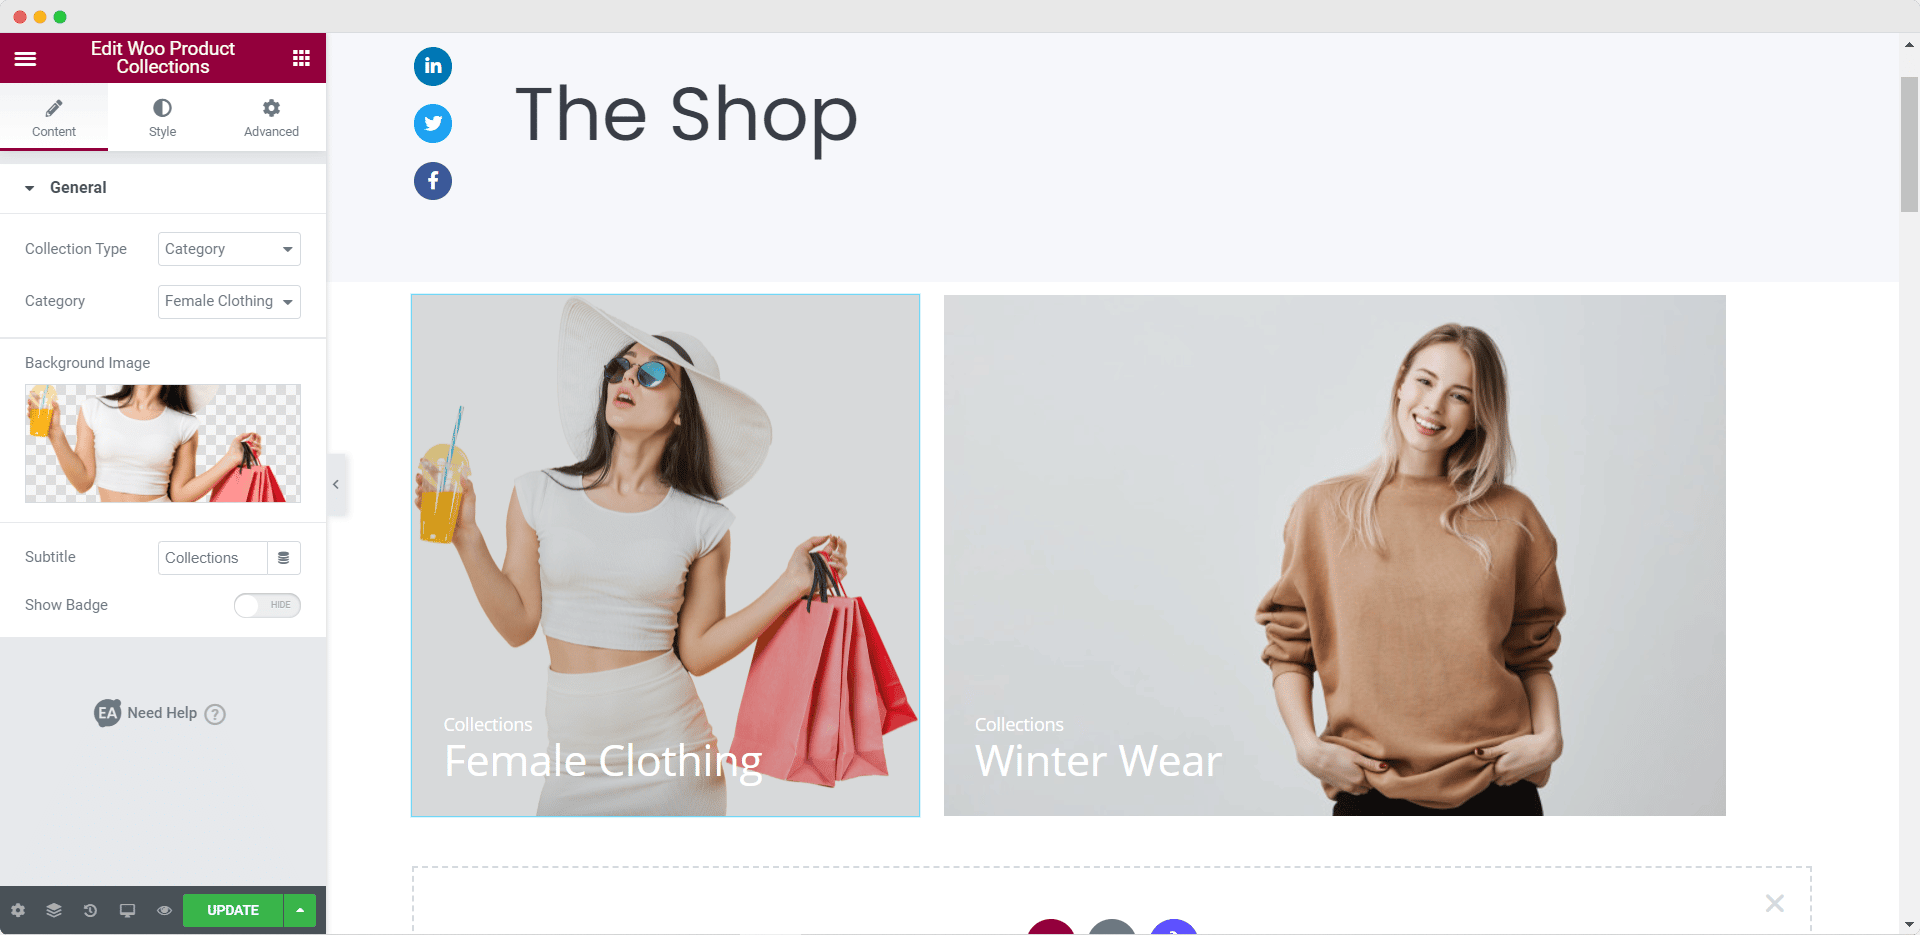
Elementor WooCommerce

Step 3: Style Your Woo Product Collection

Next, you have to style your WooCommerce Product Collection by heading over to the Style tab. There you will see options like ‘General’, ‘Thumbnail Style’ and ‘Typography’. From the ‘General’ settings you can adjust the overlay color, hover animation, alignment, and more. From the ‘Typography’ settings you have the freedom to change the font color and size.
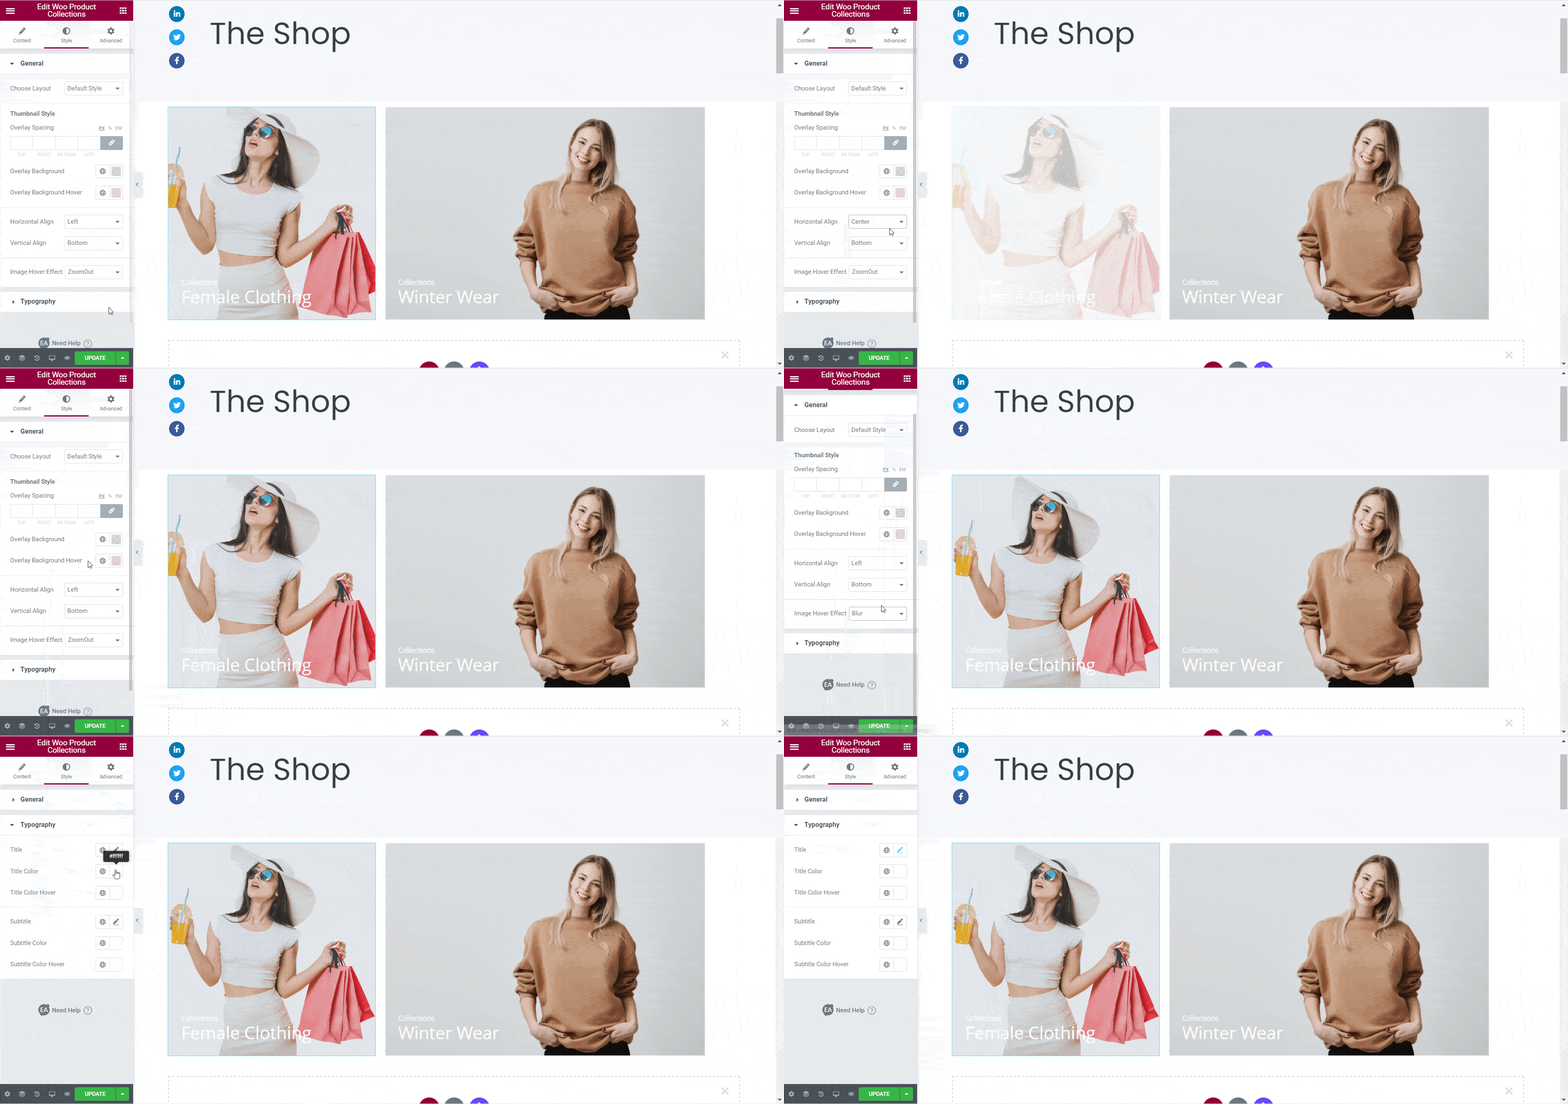
Elementor WooCommerce

When you are done customizing the EA Woo Product Collection you should have something like this.

Elementor WooCommerce

How To Showcase Your WooCommerce Products In Grid Layout Using Elementor

With the EA Woo Product Grid element, you can display your product in a beautiful grid layout, by following these simple steps below.

Step 1: Activate The EA Woo Product Grid Element

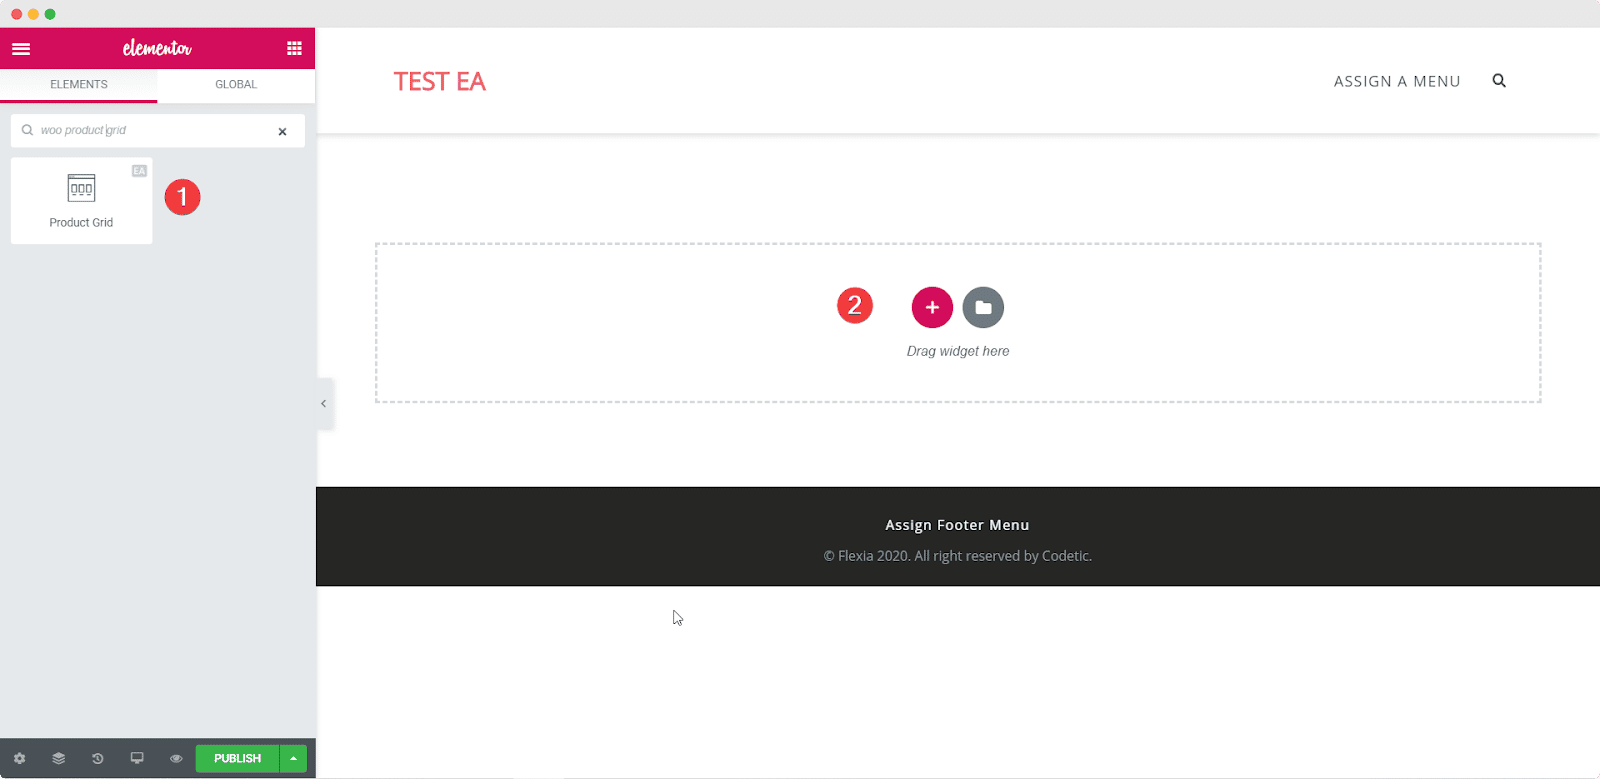
First, you need to activate the EA Woo Product Grid Element by searching for it under the ELEMENTS tab of your Elementor editor. Once you find it, simply drag and drop the element anywhere on your page.
Elementor WooCommerce

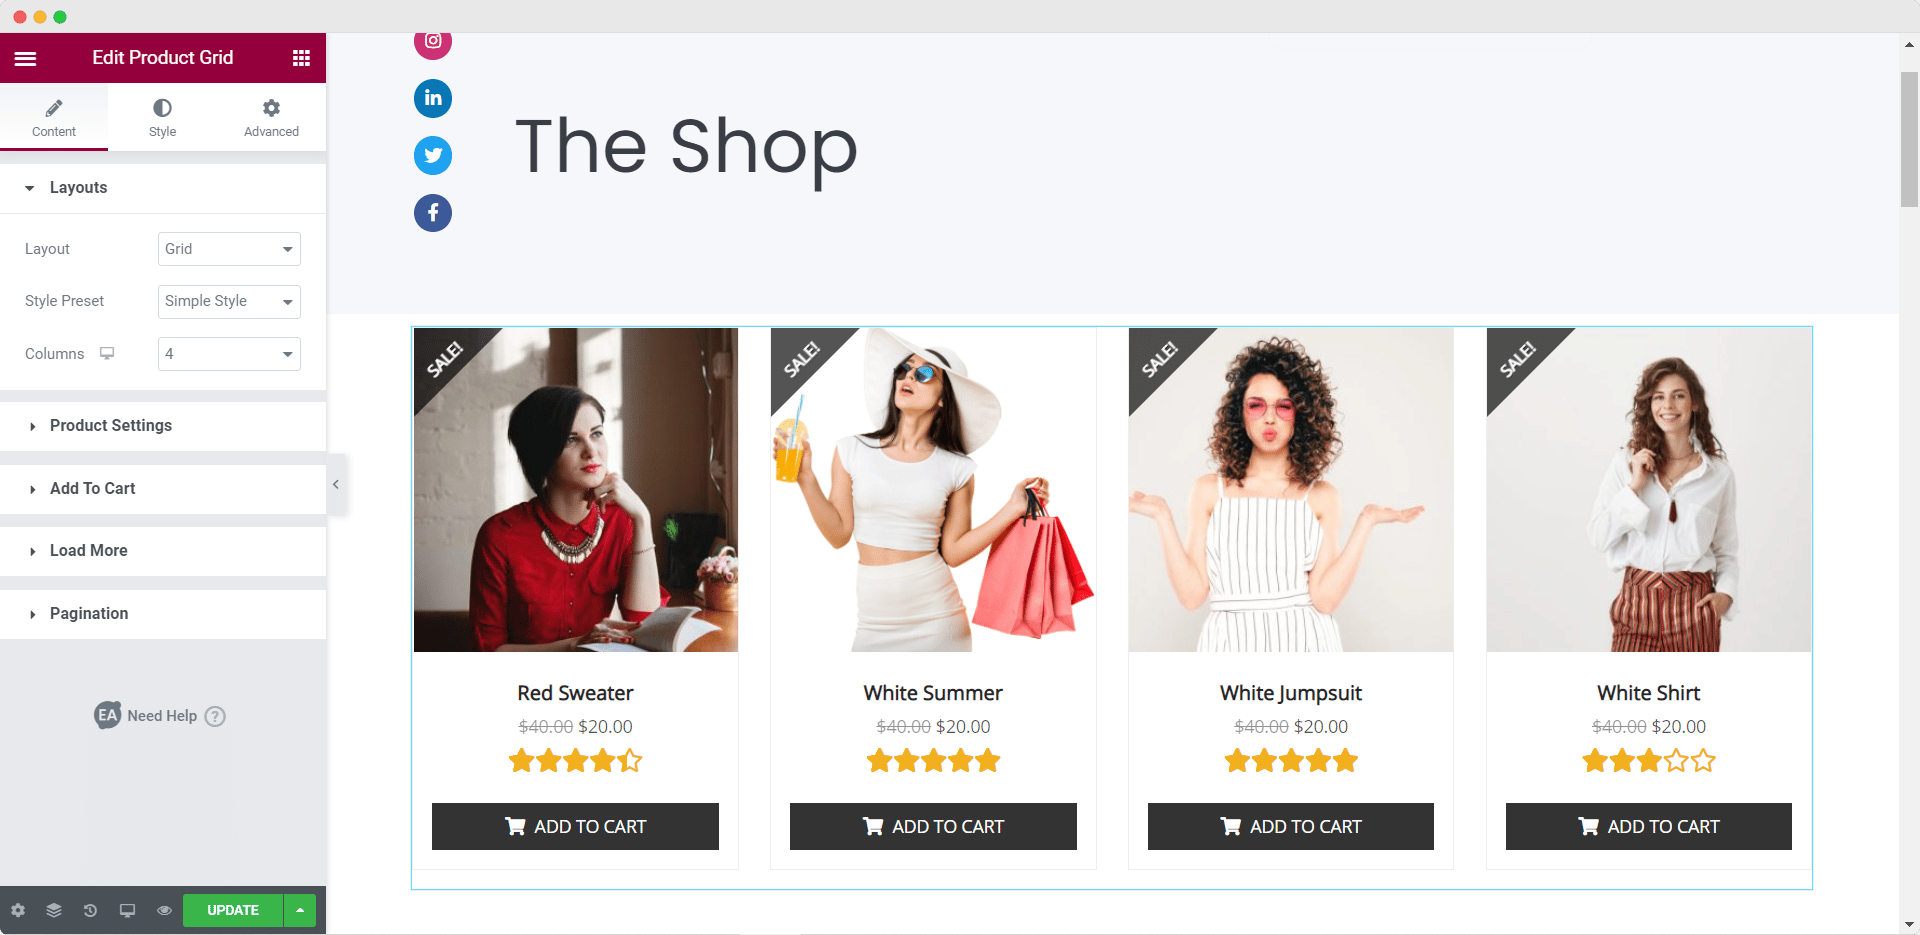
Once you drag and drop the element into any section of your page, this is the default layout you will see.
Elementor WooCommerce - The Complete Guide To Design eCommerce Site Faster 4

Step 2: Edit The Content Settings For Your Woo Product Grid

When you have activated the EA Woo Product Grid element, you need to edit the content settings to properly display your WooCommerce products in the grid layout. 

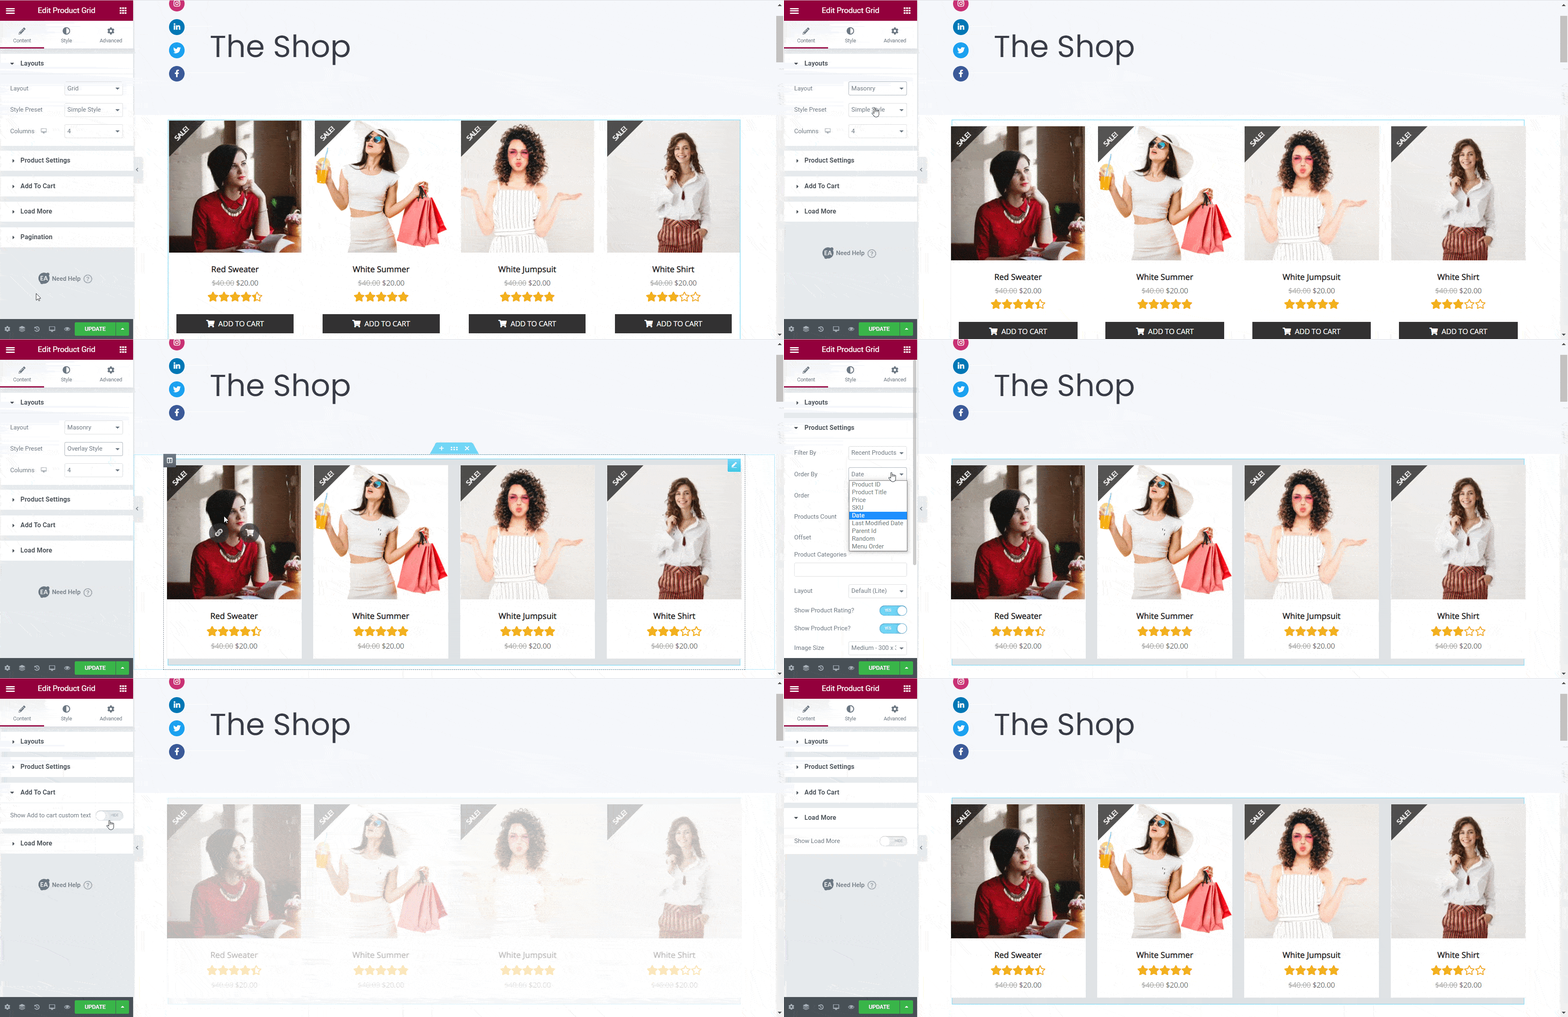
Under the ‘Content’ tab you will see many options such as ‘Product Settings’ and ‘Load More’. From the ‘Product Settings’ option, you can filter your products by recent products, featured products, and more. You can also choose the number of columns to be displayed, the Product Count, and much more.
Elementor WooCommerce

Besides this, you can also set the Style Presets. You can choose from Default, Simple Style, Reveal Style, and Overlay Style. Moreover, you have the freedom to show product ratings if you want to.

Step 3: Style Your Woo Product Grid

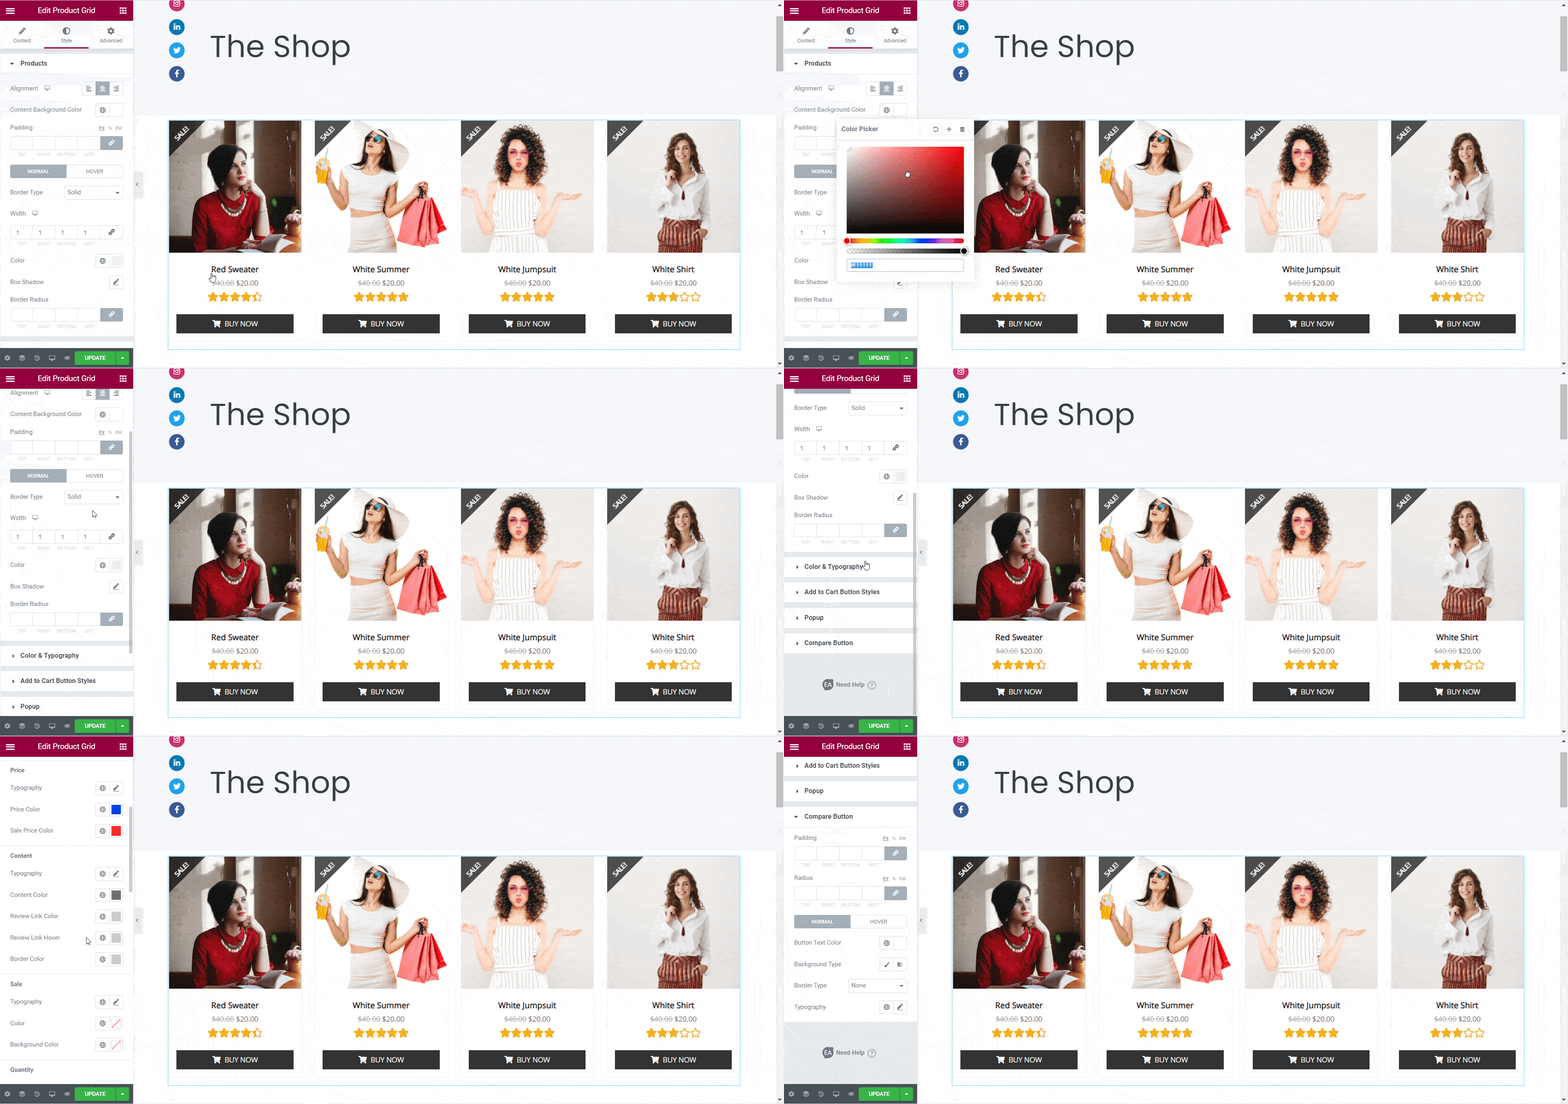
Next, you have to style your WooCommerce Product Grid by heading over to the Style tab. There you will see several options. From each of these settings you can change the content background color, border type, change the ‘Color & Typography’ and even your ‘Add To Cart’ Button styles.
Elementor WooCommerce

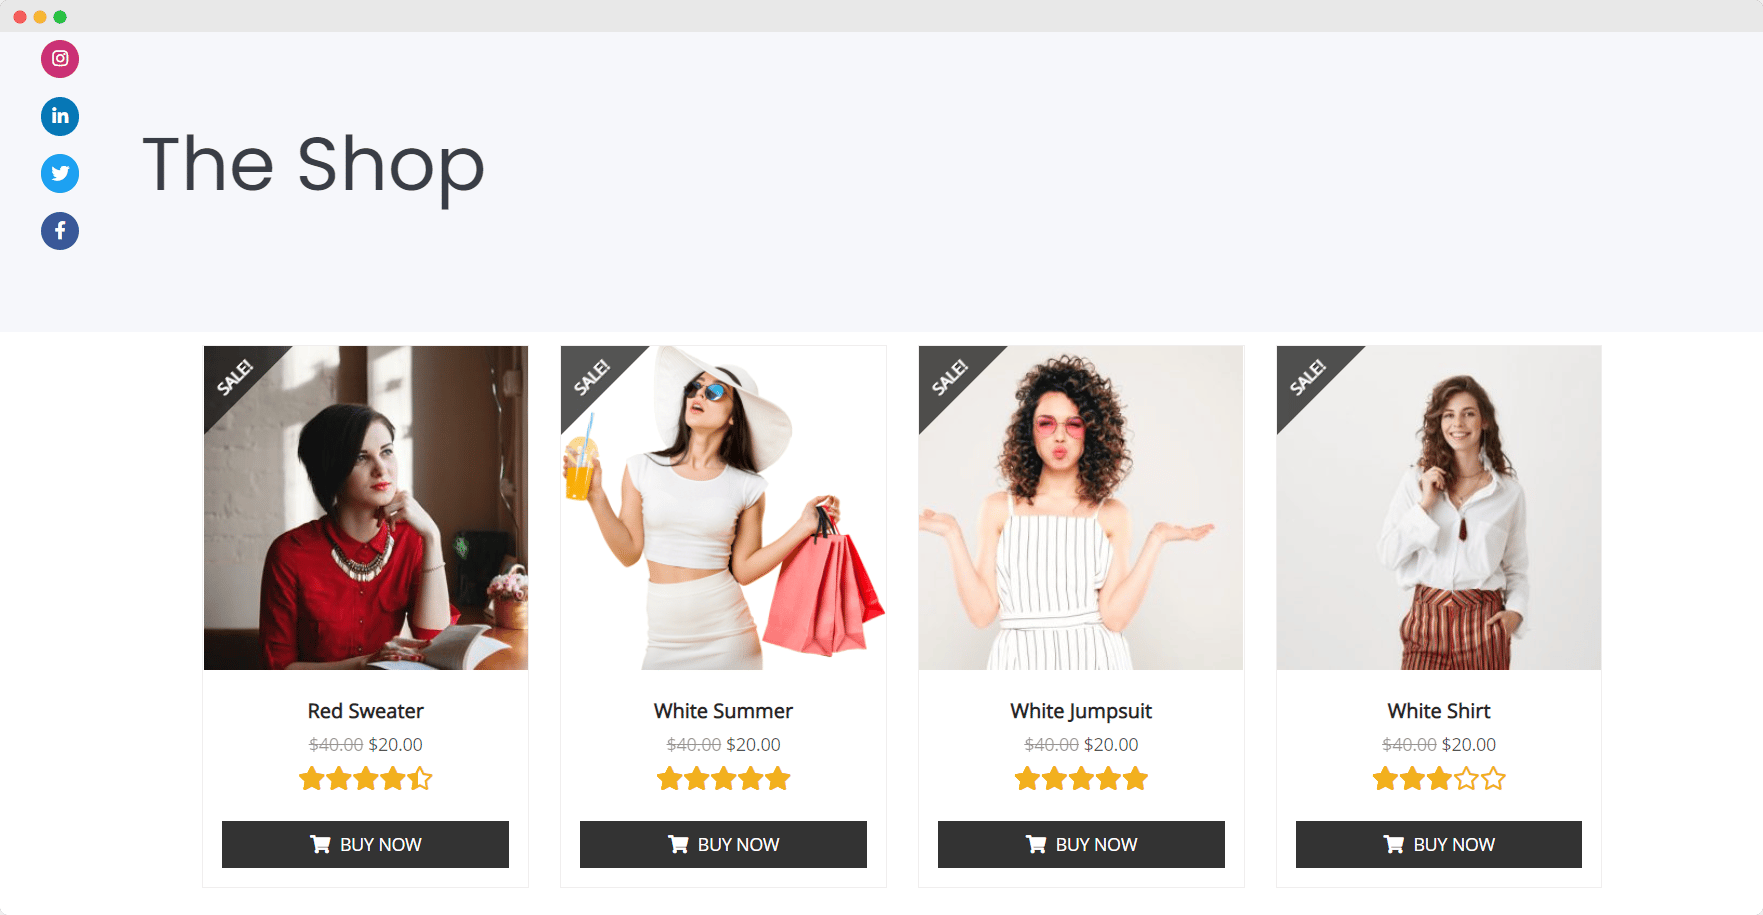
Play around with these settings until you are happy with how your EA Woo Product Grid looks.
Elementor WooCommerce

By following these simple steps you should be able to showcase your products in an attractive grid layout on your Elementor WooCommerce site.

How To Create A Checkout Page For Your WooCommerce Site In Elementor

A Checkout Page is essential for any WooCommerce site, and you can easily create one in Elementor using the EA Woo Checkout element from Essential Addons. With this element, you can create an attractive and fully functional WooCommerce Checkout Page in Elementor. You will even have the option to choose between three different layouts for your Woo Checkout Page. 

Just follow these step-by-step instructions given in this quick video tutorial below to create a Checkout Page for your WooCommerce site in Elementor.

Or, you can read our full, detailed blog post on how to create a WooCommerce Checkout Page in Elementor.

Besides these, you can also add a product comparison table to your Elementor WooCommerce website. This will allow customers to compare similar products on your store and make a purchase decision more quickly.

You can do this easily with the EA Woo Product Compare widget. Check out our blog post here to learn more in details.

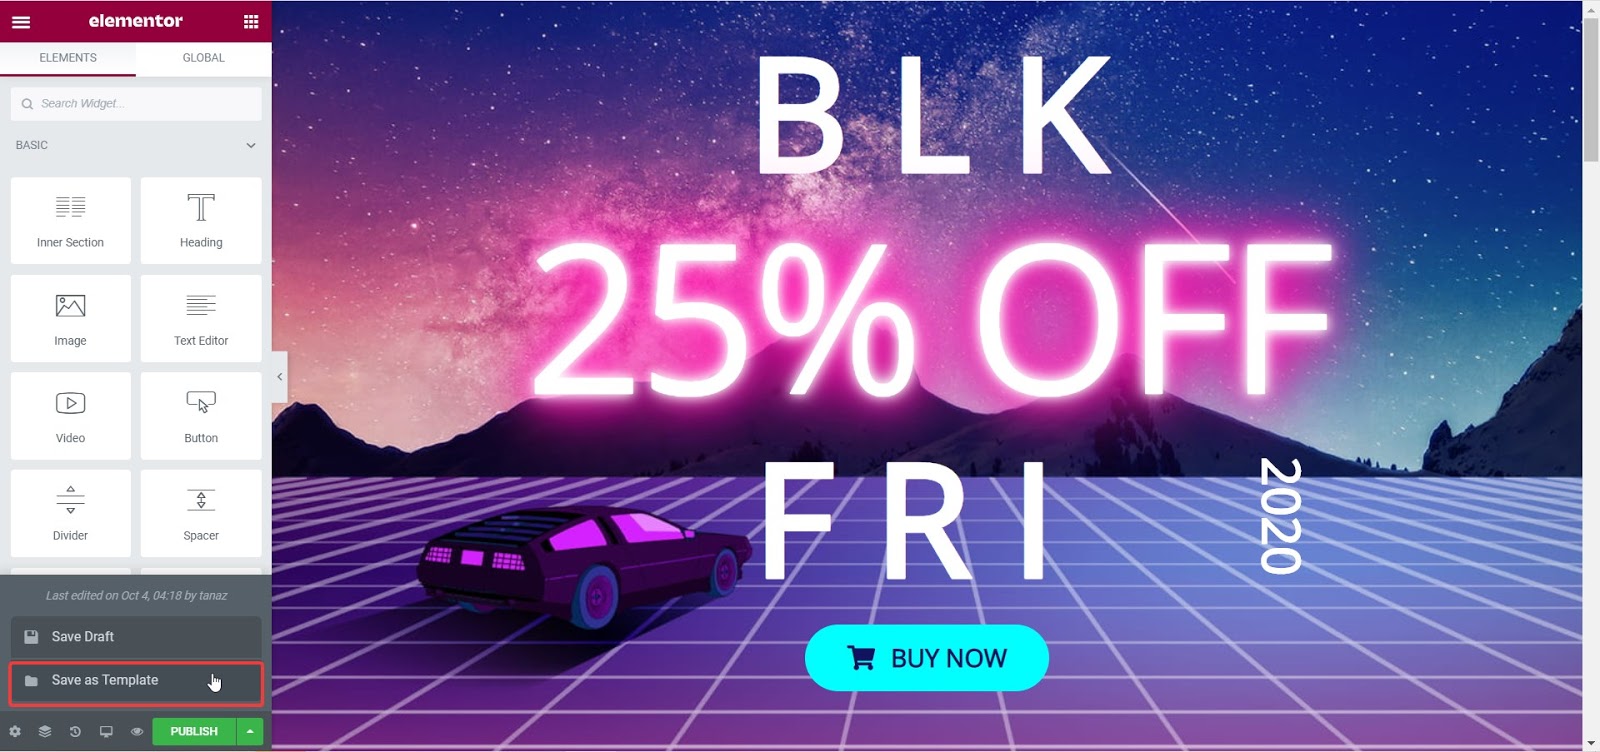
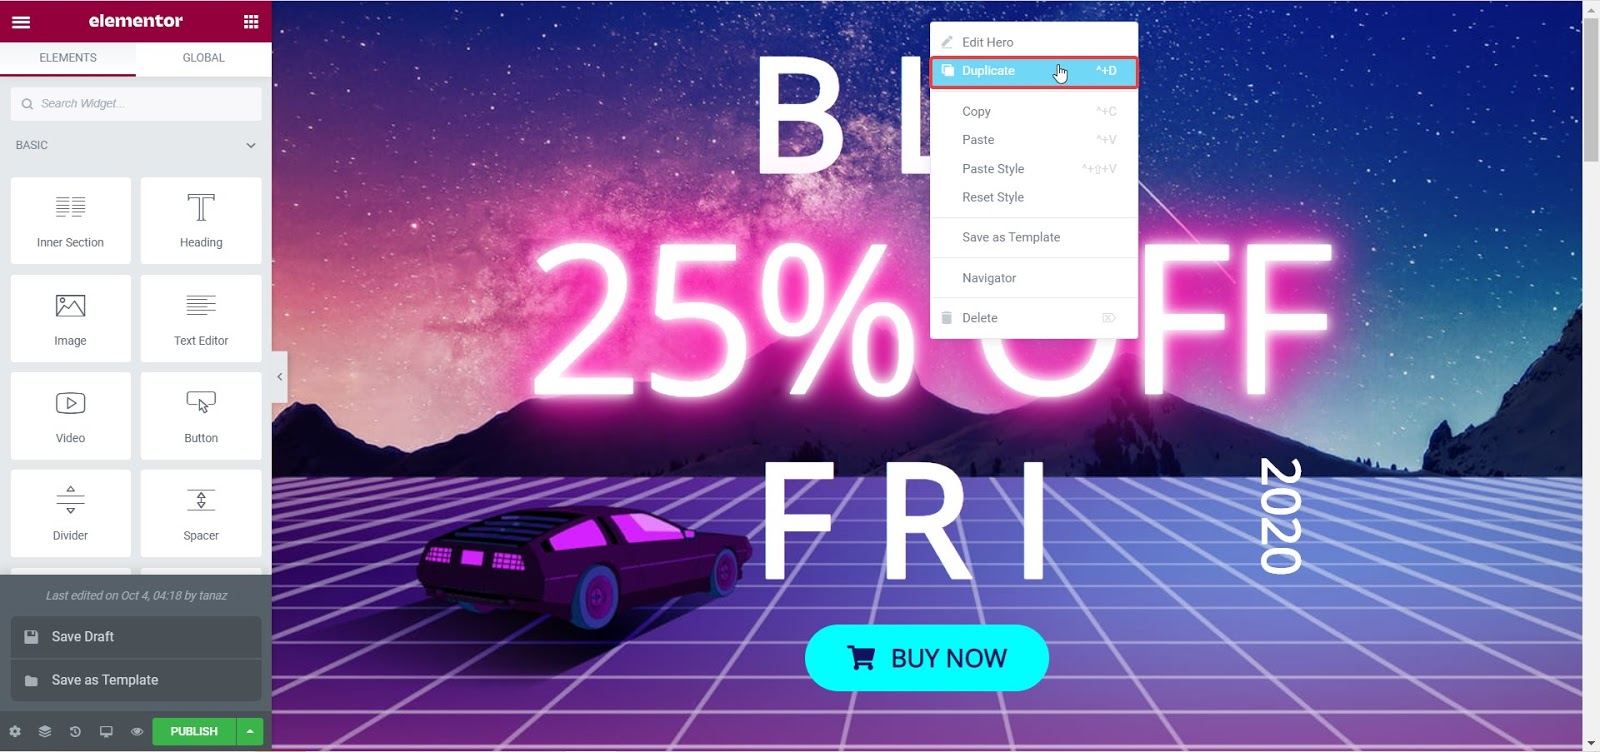
How To Instantly Create A WooCommerce Site With Ready Elementor Templates

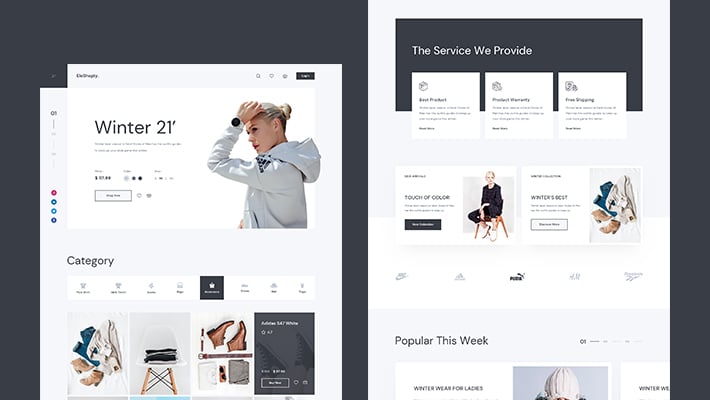
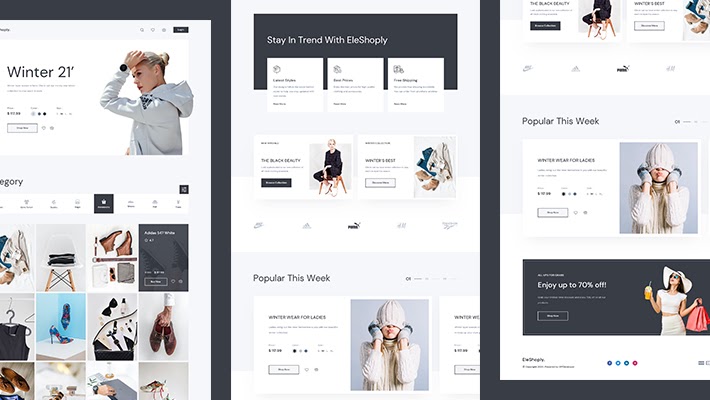
Want to know an easy trick to create your eCommerce website even faster? You can use ready Elementor WooCommerce templates to build your online store with a few clicks. And, one of the best Elementor WooCommerce templates that you can use to do this is the EleShoply template pack from Templately.

With more than 1000 ready Elementor templates, Templately has a huge collection of some of the best Elementor WooCommerce templates with which you can create any kind of eCommerce website instantly. You don’t have to bother building your page layout; with these Elementor WooCommerce template packs from Templately everything comes ready-to-use.

As for EleShoply, well, this is a stunning template pack designed with Elementor, and it comes with several beautiful ready to use pages, including:

  • Home Page
  • Product Collection Page
  • Single Product Page
  • Shopping Cart Page
  • Account Page
  • Checkout Page
  • About Us Page
  • Contact Us Page

You can instantly create a stunning WooCommerce website using this ready Elementor template in two easy steps.

Step 1: Insert The EleShoply Template Pack From Templately

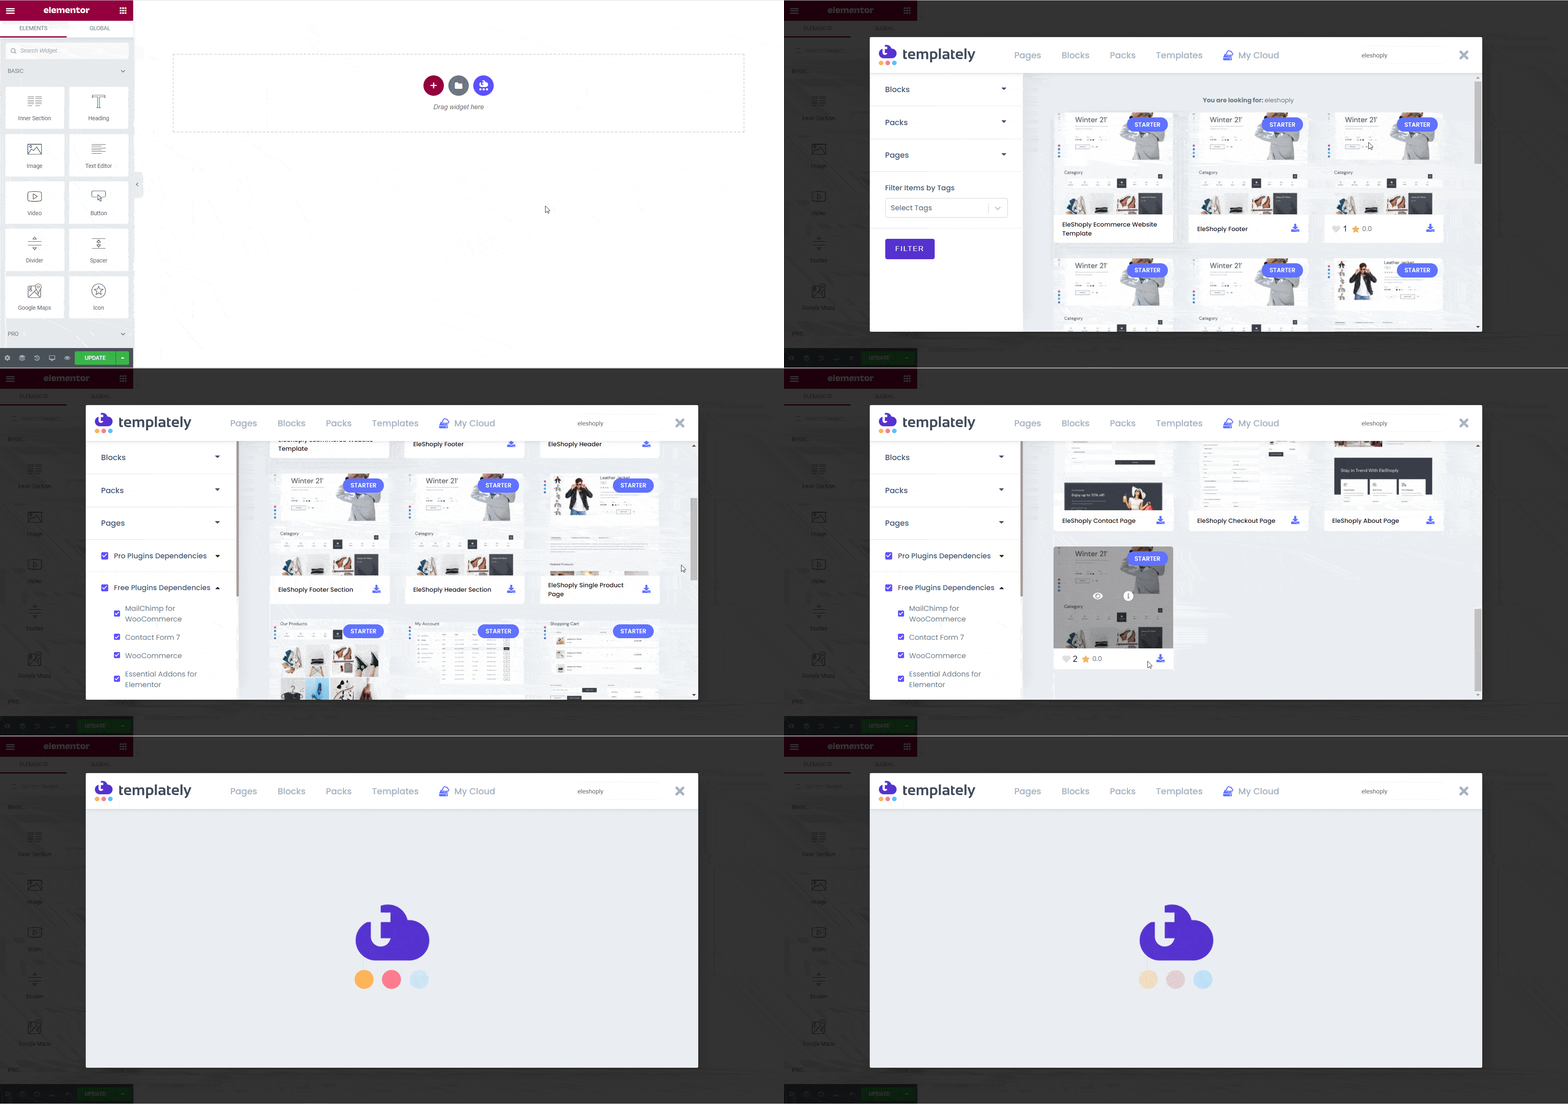
First, sign up for an account on Templately and install the Templately plugin for WordPress. Afterward insert any of the premade EleShoply page templates into your website by clicking on the blue Templately button.
Elementor WooCommerce

Step 2: Customize The Pages To Suit Your Style

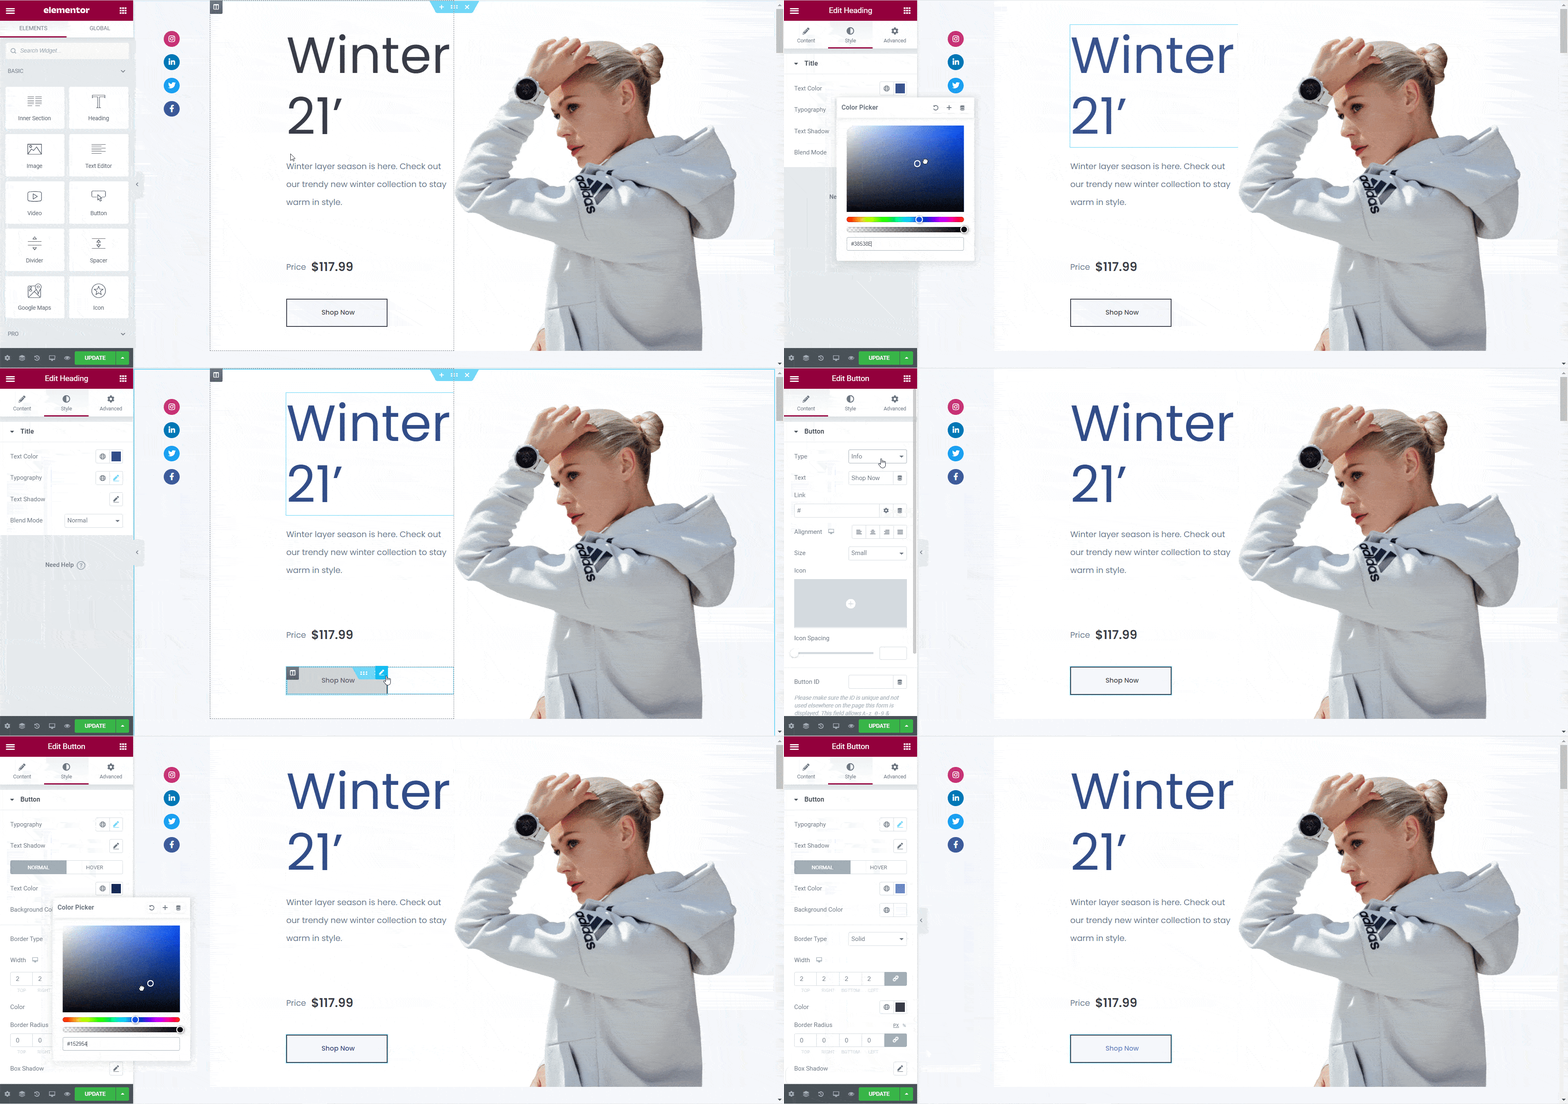
Now, you can customize your pages to add your personal style to it. Change the colors, fonts, typography and add your own content to the ready template.

When you are done, simply save your changes and publish it for the world to see. 
Elementor WooCommerce

Just like that, you have designed your own eCommerce website instantly with ready Elementor WooCommerce templates from Templately.

Elementor WooCommerce - The Complete Guide To Design eCommerce Site Faster 7

Bonus: Use Growth Hacks To Boost Sales On Your WooCommerce Site

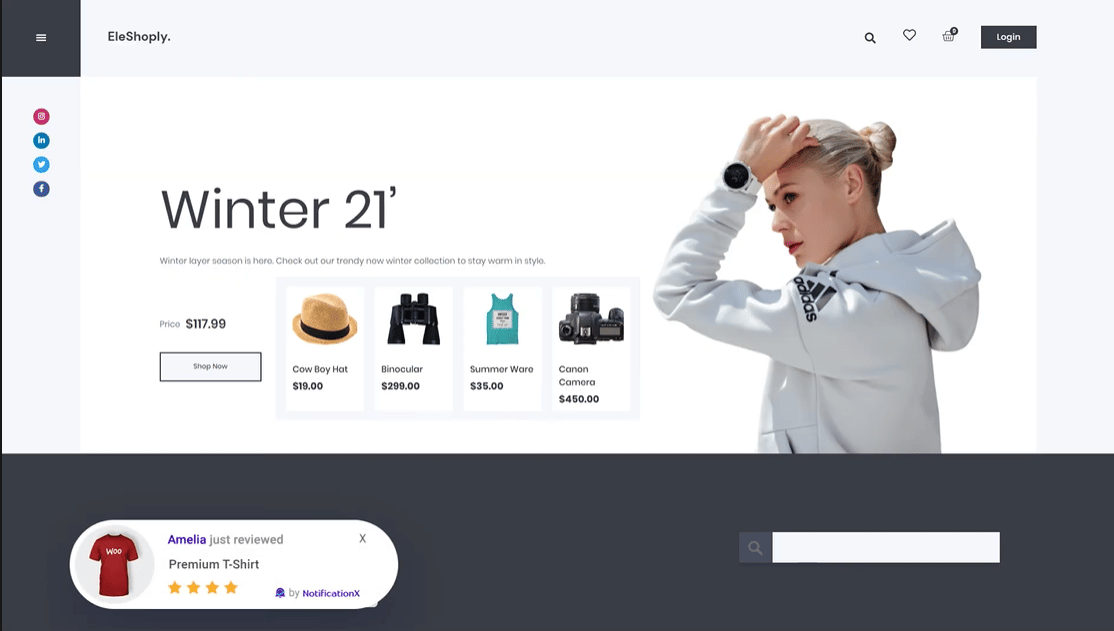
If you want, you can increase sales on your WooCommerce site by using FOMO and social proof marketing. The best way to do this is with NotificationX, which helps you boost sales on your WooCommerce site by adding more credibility.

With NotificationX, you can create stunning notification alerts every time someone makes a purchase, or views your products, or leaves a review, and more.
Elementor WooCommerce - The Complete Guide To Design eCommerce Site Faster 8

What’s more, NotificationX comes with seamless integration with Elementor, and lets you create stunning WordPress notification bars in Elementor to help you boost your engagement rates.

Elementor WooCommerce - The Complete Guide To Design eCommerce Site Faster 9

As you can see, creating your Elementor WooCommerce website can be easier and faster than you think, especially if you are using Essential Addons for Elementor and Templately. With just a few steps, you can create a stunning eCommerce website without any coding.

That brings us to the conclusion of our Elementor WooCommerce guide. We hope you find this blog post useful and would love to hear your feedback. If you face any difficulties, or have some feature requests for Essential Addons, feel free to contact us.

WooCommerce Product Carousel

New Widget: Introducing WooCommerce Product Carousel For Elementor

For any eCommerce business, keeping your customers engaged and having them stay on your website is absolutely essential. Introducing EA WooCommerce product carousel for Elementor to easily create product carousel without any coding and improve user experience for your visitors.

WooCommerce Product Carousel

Using EA Woo Product Carousel by Essential Addons for Elementor, you can easily create an animated product carousel or slider for your WooCommerce store without any coding and enhance your customer’s shopping experience.

Table of Contents

Engage Your Customers With A Product Carousel Widget

A WooCommerce product carousel or a product slider is the easiest way to showcase all of your products and offerings on your website. It’s a great way to both keep your site visitors engaged, while also letting them easily browse through a large number of products on your eCommerce site. 

In fact, you can even boost your eCommerce sales by adding ‘Add To Cart’ buttons to your WooCommerce product carousel. This way, if a customer likes a product, they can easily add it to their cart and purchase it during the checkout process.

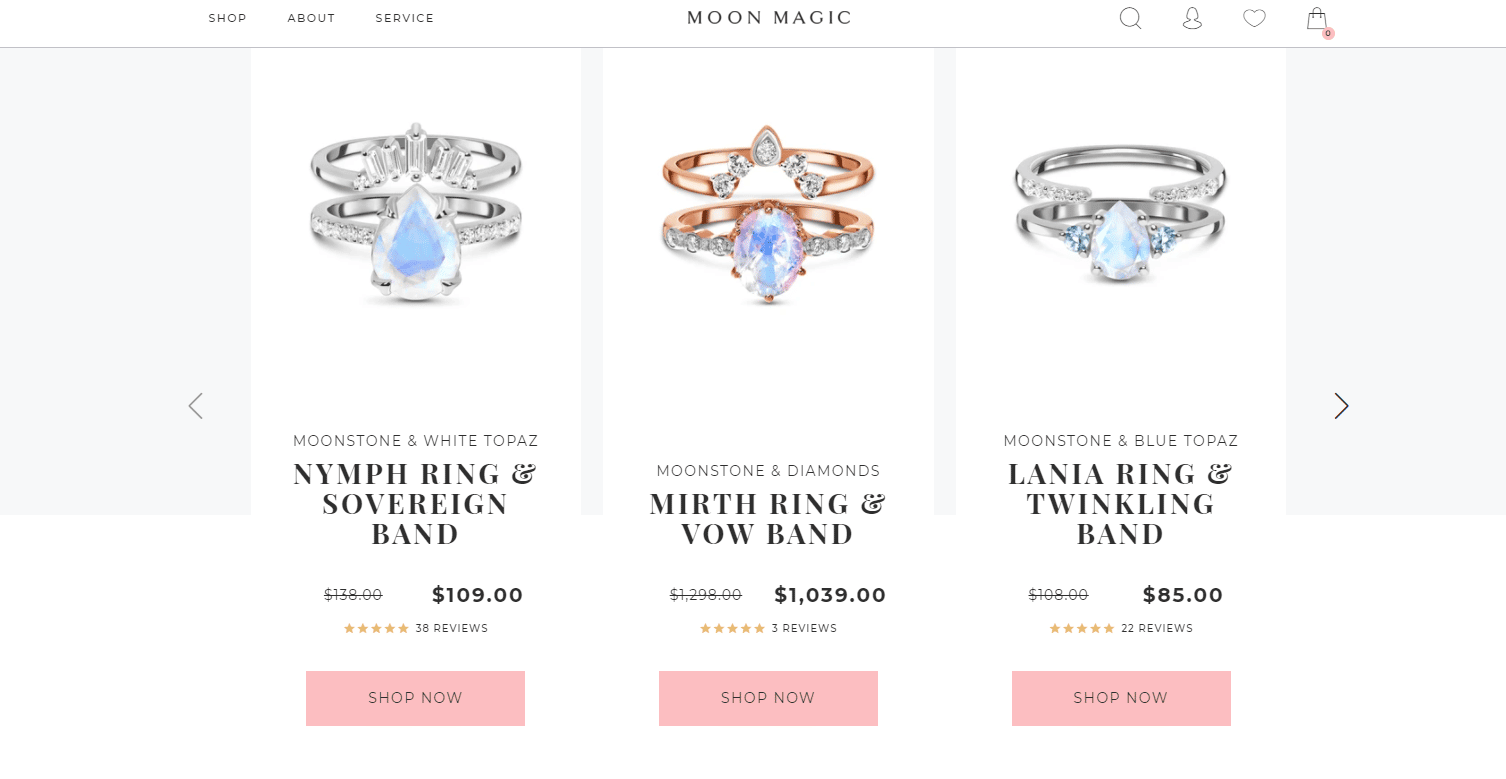
For ideas, take a look at how Moon Magic designed their product carousel with buttons for adding the items to cart.

WooCommerce Product Carousel
Image Source: Moon Magic

Another reason why many eCommerce websites use WooCommerce product carousel or any animated product sliders for that matter is so that they can immediately capture their site visitors’ attention. As soon as a potential customer lands on your web page, they will notice the animated product carousel on your website and will be able to easily find what they are looking for.

A product slider is also a creative way to promote and highlight your best selling products, new arrivals, or special offers and encourage visitors to purchase them too. 

WooCommerce Product Carousel

Introducing WooCommerce Product Carousel Widget From Essential Addons For Elementor

Now, if you want to create a product carousel for your online store, you can do that without any coding. With the help of Essential Addons for Elementor, the most popular widgets library for the website builder Elementor with over 1 million active users, you can create a product slider for your WooCommerce store in less than 5 minutes.

With the EA Woo Product Carousel widget from Essential Addons, you can create a stunning and attractive product slider with four beautiful, ready layouts and advanced styling options. You can add hover animations, coverflow effects, ‘Add To Cart’ buttons and much more to make your WooCommerce product carousel stand out and captivate your site visitors.

WooCommerce Product Carousel

How To Create A WooCommerce Product Carousel In Elementor?

If you are already familiar with Elementor, then creating a product slider with the EA Woo Product Carousel widget will be a breeze for you. And if you are new to page building with Elementor, you can always check out our complete beginner’s guide to Elementor to find out how you can use this popular, drag-and-drop website builder. 

All you have to do is set up your WooCommerce store (if you haven’t already), add your products, and then install Essential Addons for Elementor to get started. Below, we have given you a quick checklist of things you will need to make it easier for you.

Things You Will Need Before You Start

☑️ Elementor: To create a product slider for your WooCommerce store without coding, you will need to install and activate Elementor on your website.

☑️ WooCommerce: Make sure that you have the WooCommerce plugin for WordPress installed and then follow the on-screen instructions to set up your store and add your products.

☑️ Essential Addons for Elementor: As the EA Woo Product Carousel widget is an element from Essential Addons for Elementor, you need to install and activate Essential Addons on your website.

If you are done setting everything up according to the checklist above, then you are ready to get started. Follow the step-by-step instructions given below to find out how to create a WooCommerce product carousel in Elementor.

Step 1: Activate EA Woo Product Carousel Widget In Elementor

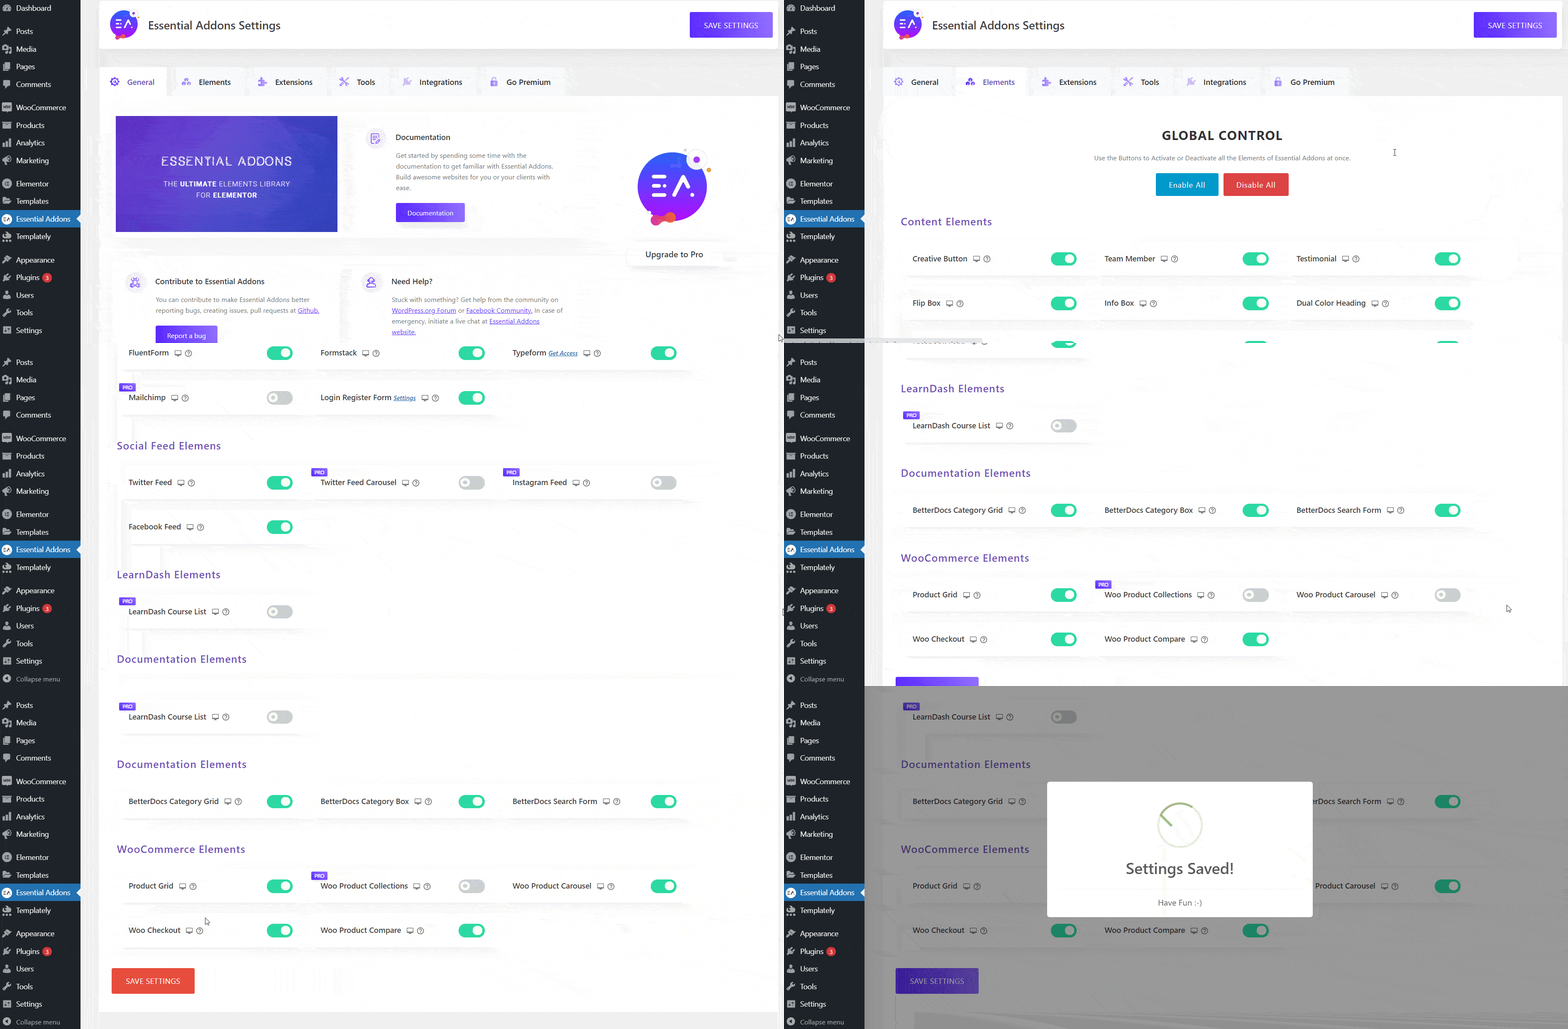
First, we are going to activate the WooCommerce product carousel widget in Elementor. To do this, navigate to Essential Addons→ Elements from your WordPress dashboard as shown below. From here, make sure that the ‘Woo Product Carousel’ widget is enabled. If it is not, you can toggle to turn on the widget so it is activated. Don’t forget to click on the ‘Save Settings’ button when you are done.

WooCommerce Product Carousel

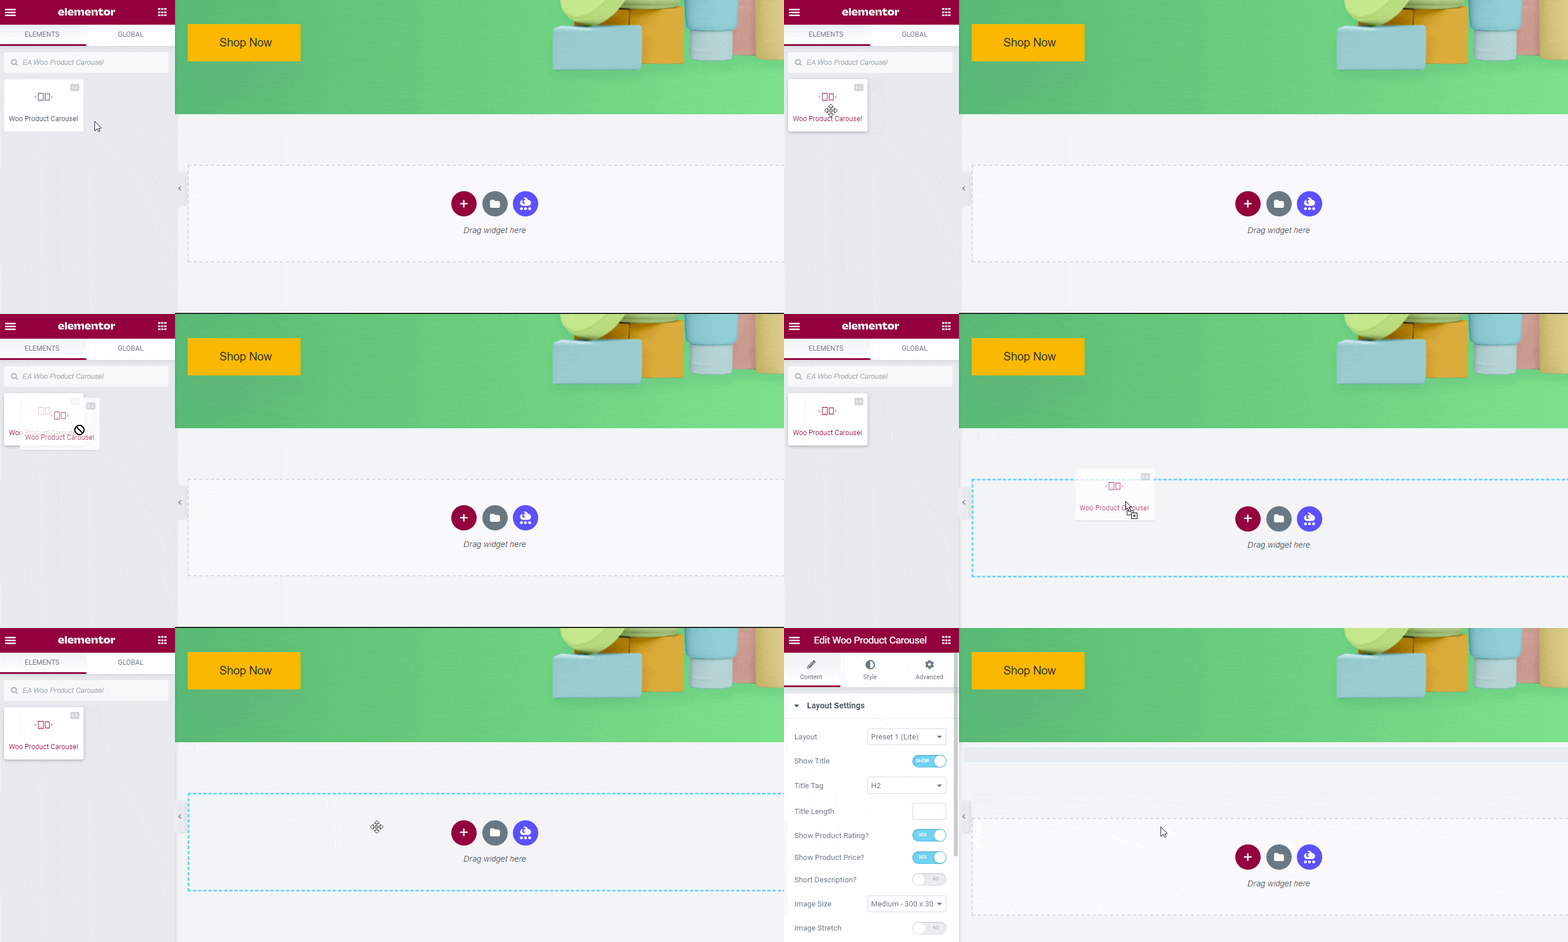
Afterwards, return to the page where you want to display a product slider for your eCommerce store. Open the page in Elementor Editor and look for the ‘Woo Product Carousel’ widget in the ‘ELEMENTS’ tab. 

You can now simply drag and drop the widget anywhere on your page. As soon as you do so, you will see a WooCommerce product carousel on your website. This is what it will look like by default; you can later customize it to your preferences. We will get to that part soon.

WooCommerce Product Carousel

Step 2: Configure Your WooCommerce Product Carousel

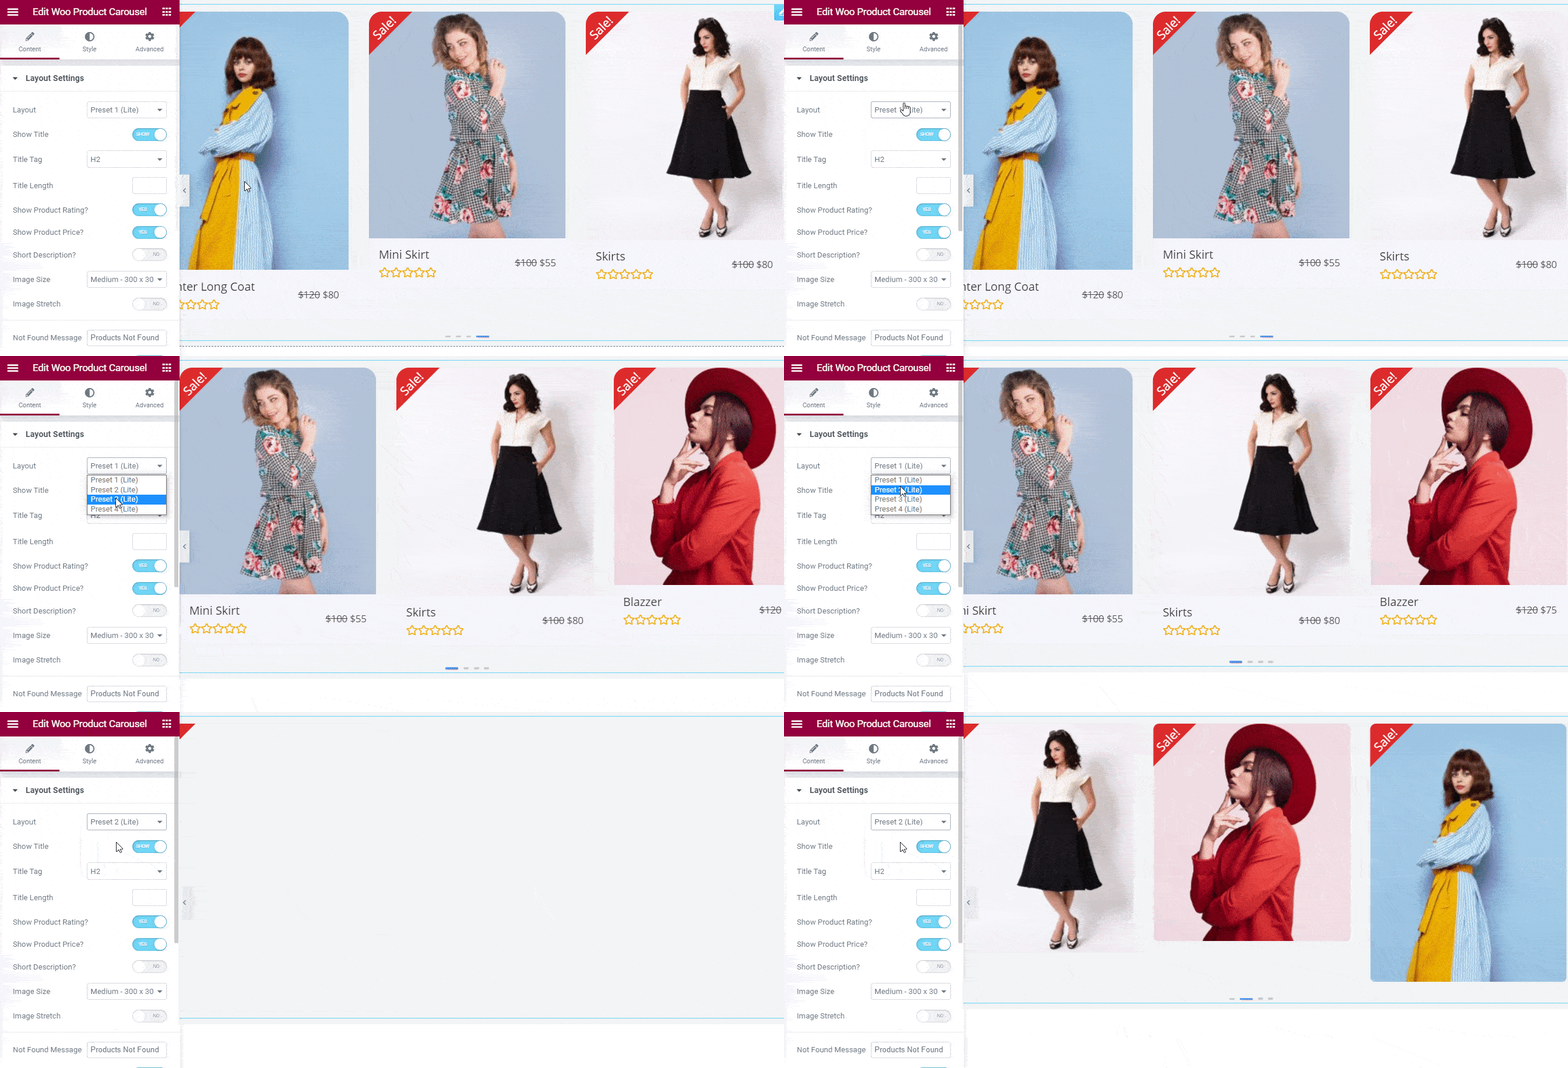
Under the ‘Content’ tab in Elementor Editor, you will see there are many different options to configure the content of your WooCommerce product carousel. From the ‘Layout’ settings , you can choose from four different preset layouts for your product slider.

WooCommerce Product Carousel

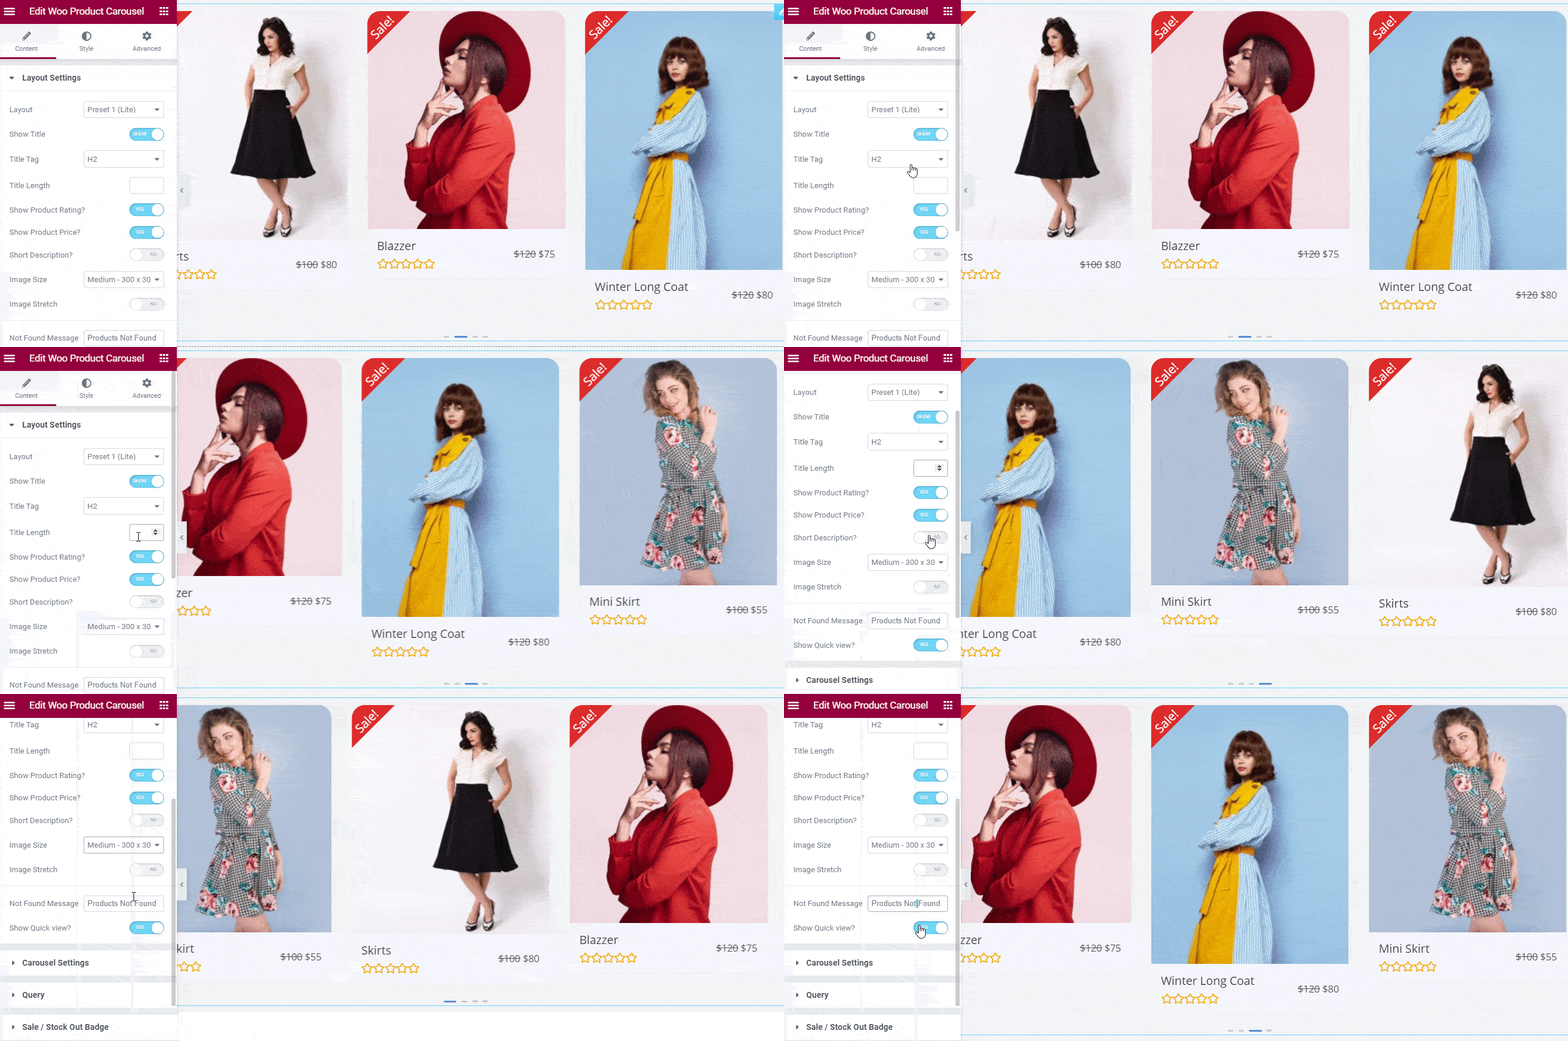
You can configure the options in the ‘Layout’ settings even more to change the titles in your product slider, show or hide the product ratings, price, description, adjust image size, and much more. 

WooCommerce Product Carousel

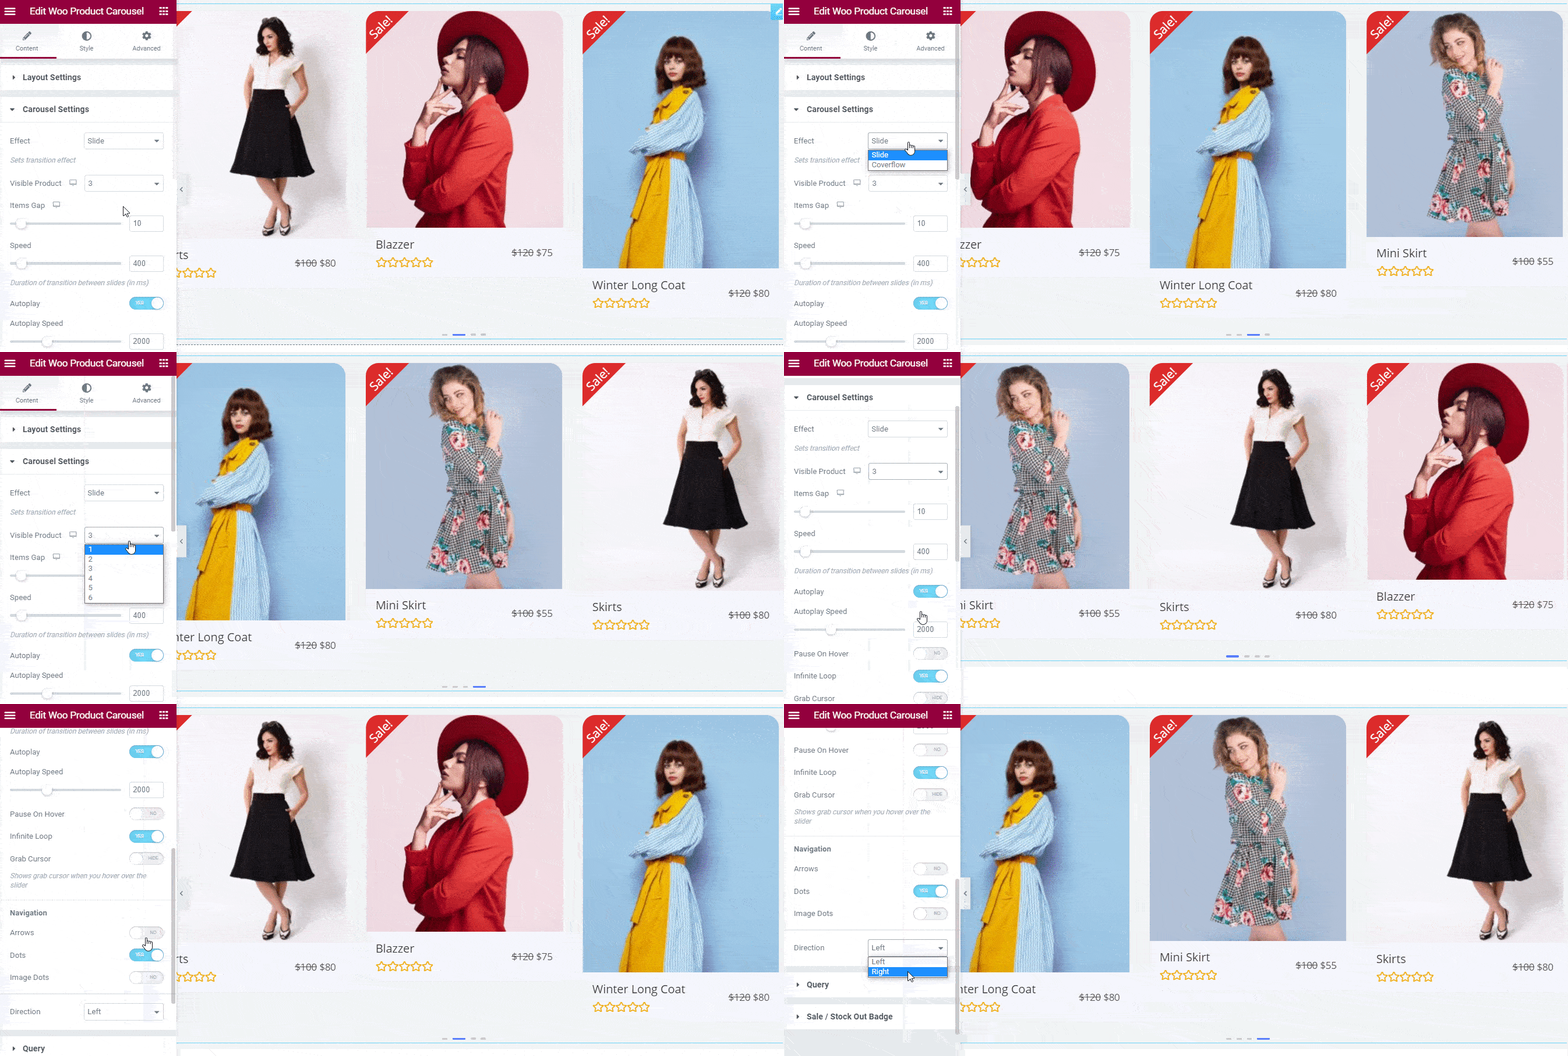
Next comes the ‘Carousel’ settings, which as the name suggests, lets you make changes such as customizing the slider effect, choose how many products to display, adjust the gap between each item, and other details.

At the moment, you can choose between a ‘Slide’ effect and a ‘Coverflow’ effect for your WooCommerce product carousel. You can also adjust the animation speed, and add navigation options by tweaking the settings of your EA Woo Product Carousel widget.

WooCommerce Product Carousel

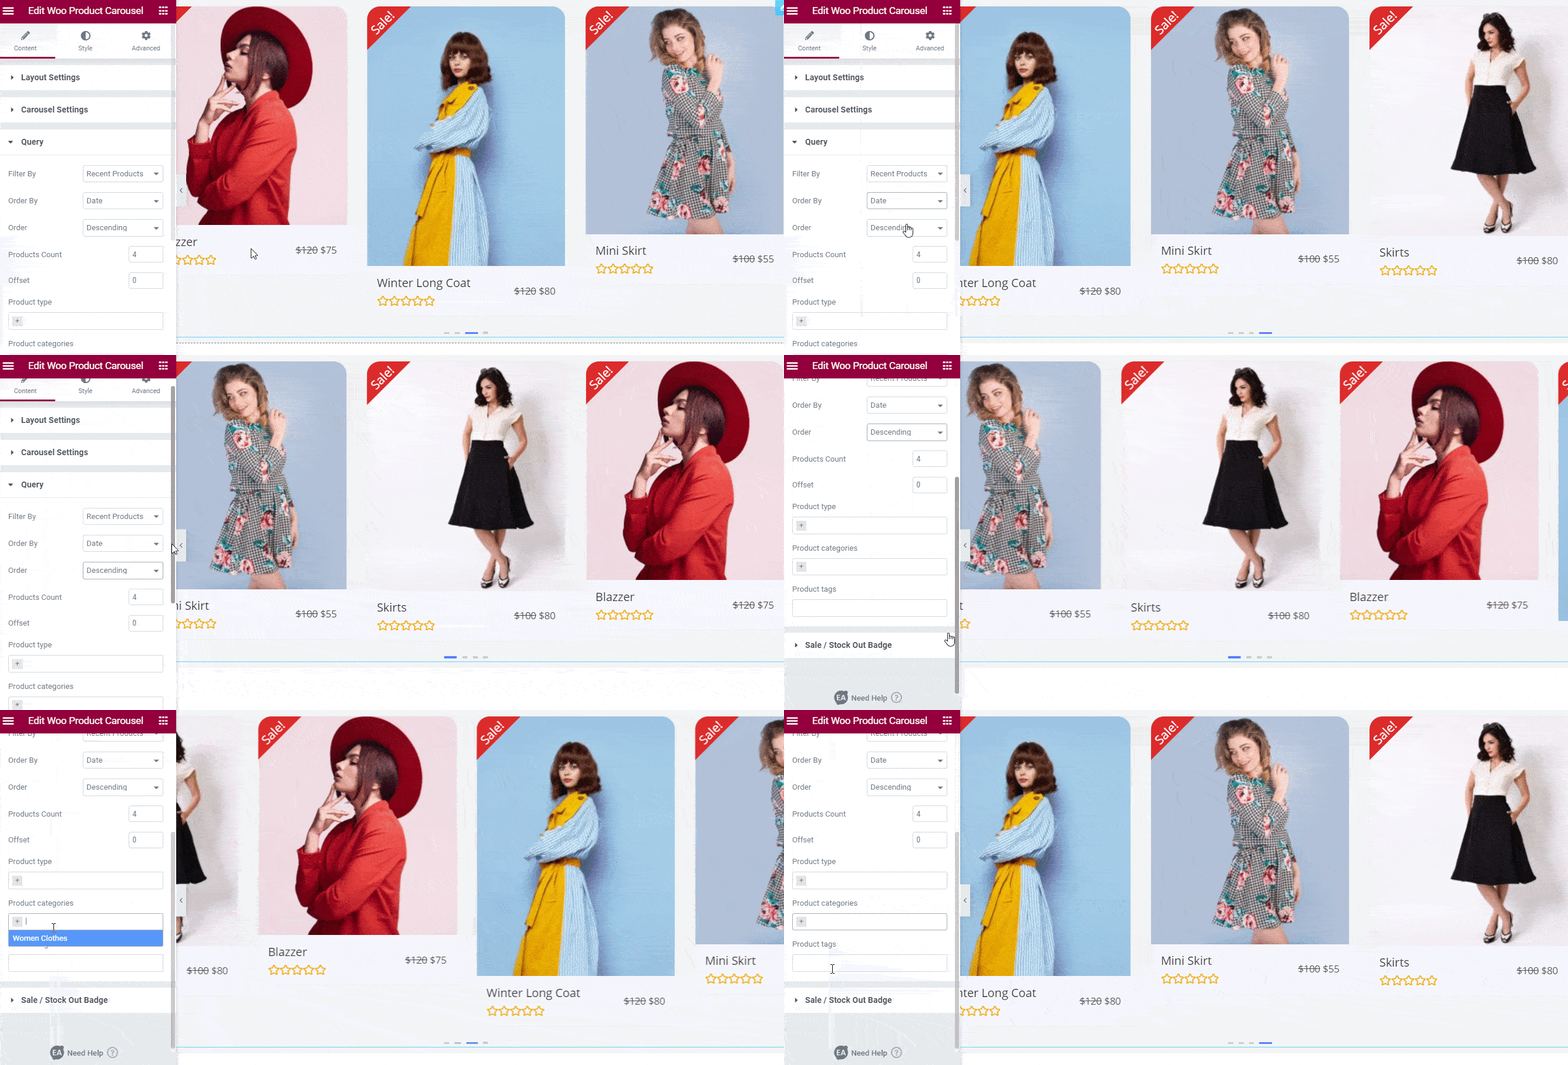
After the ‘Carousel’ settings, you get the ‘Query’ settings that lets you filter your products, change the order, and showcase them by tags or categories. In other words, the options under the ‘Query’ settings control which products should be displayed in your carousel to make the process easier for you.

WooCommerce Product Carousel

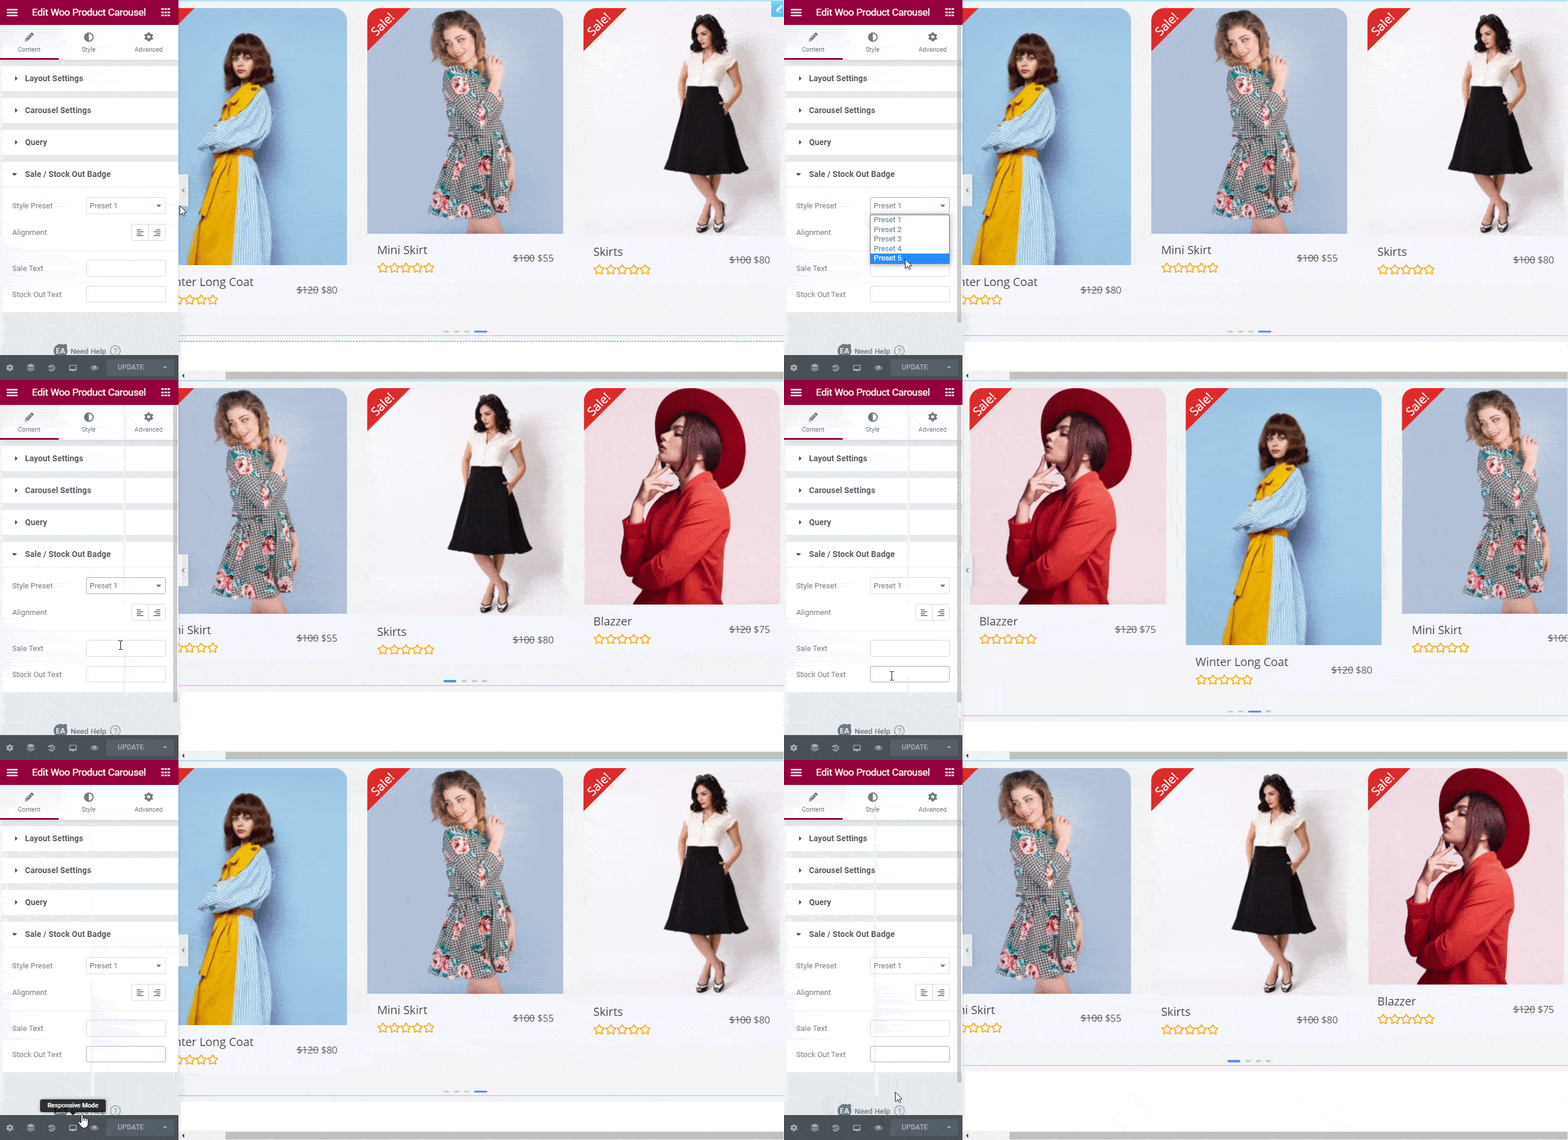
Besides this, if you want to let your customers know when a product has been sold out, or which products are on sale, you can configure the options under the ‘Sales/Stock Out Badge’ settings. From here, you can choose from 5 ready layouts for showing your out of stock products or your on sale products. You can also add your own custom text and change the alignment for the badge as you prefer.

WooCommerce Product Carousel

If you are done configuring the content for your EA Woo Product Carousel widget, then let’s move on to styling your product slider in Elementor.

Step 3: Style WooCommerce Product Carousel In Elementor

You can add your own personal touch to your WooCommerce product carousel in Elementor without coding by clicking on the ‘Style’ tab in Elementor Editor and changing the settings there.

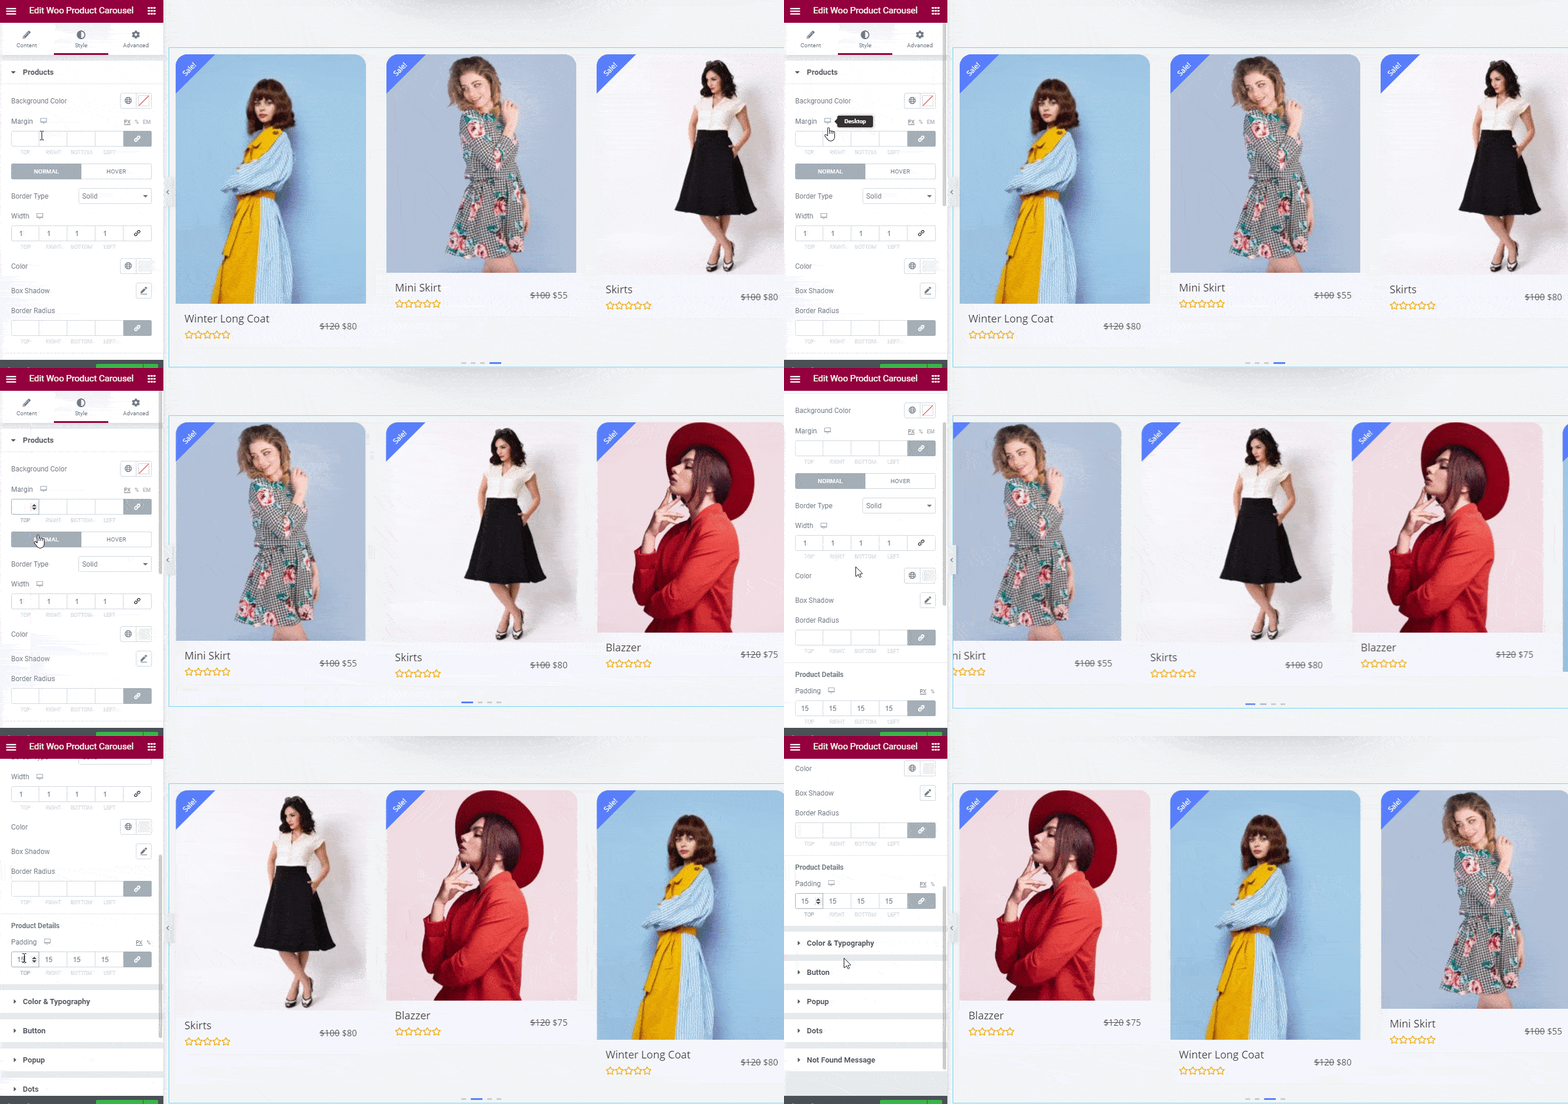
You will see several different options there. For instance, under the ‘Products’ settings, you will find options to change the background colors, border, margins, and even add box shadows to make your product slider pop out. 

WooCommerce Product Carousel

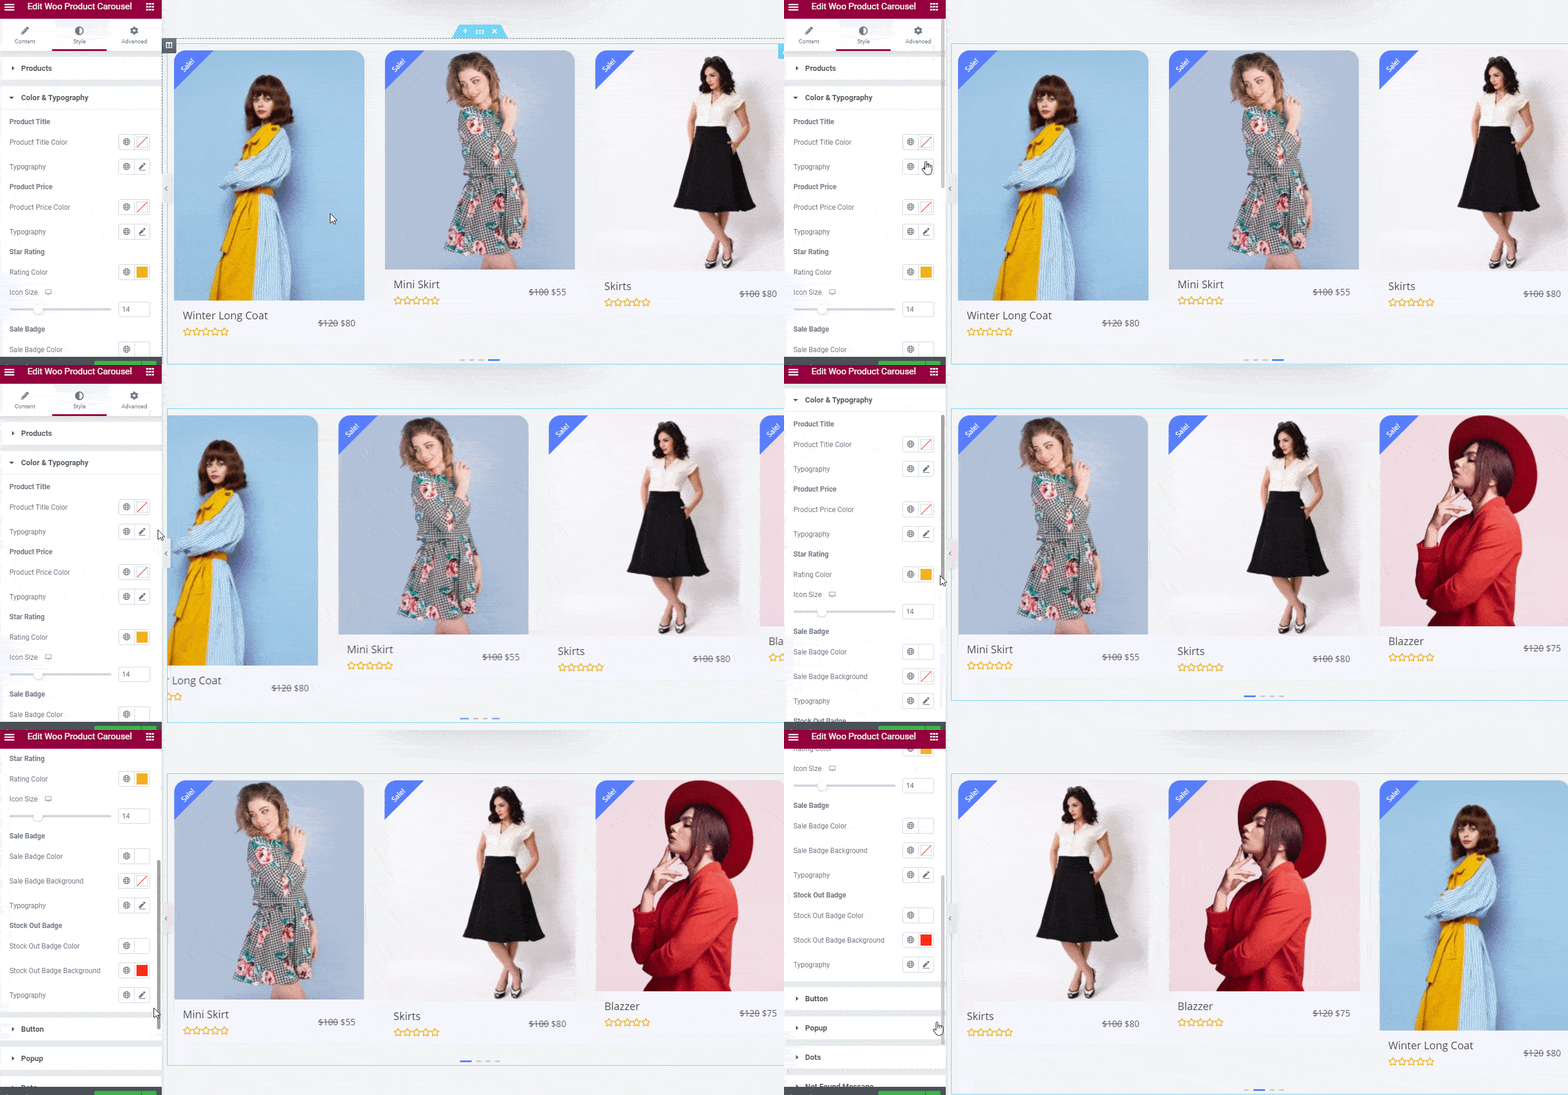
Similarly, under the ‘Colors & Typography’ section, you will find options to change the font styles and colors in your product titles, price, and ratings. You can also apply these changes to your sales or stock out badge.

WooCommerce Product Carousel

There are lots of more options to discover under the ‘Style’ tab with the EA Woo Product Carousel widget. You can customize the ‘Add To Cart’ buttons, the popup hovers animations, and much more. Feel free to experiment with these different options to your liking. If you need any help, then check out our detailed documentation here to learn how to style your EA Woo Product Carousel widget.

When you are finally done, you can publish your WooCommerce product carousel by simply saving your changes and then clicking on the ‘Publish’ button in Elementor. Take a look at the product carousel that we made in this tutorial.

WooCommerce Product Carousel

As you can see, it is now very easy to create a stunning WooCommerce product carousel in Elementor with the help of Essential Addons. In a matter of minutes, you can create an attractive product slider to engage your site visitors and boost eCommerce sales with the EA Woo Product Carousel widget.

Try it for yourself today and share your experience with us; we’d love to know your feedback. Don’t forget to subscribe to our blog for more fun tutorials, news, and updates.

If you have any questions, you can always reach out to our support team or join our friendly Facebook Community for further assistance.

Bonus: Build Your WooCommerce Store Instantly With FREE Elementor Template Packs

Want to build a beautiful WooCommerce store instantly without any coding? Then grab these exclusive, free Elementor template packs from Templately and create your online store with just a few clicks.

business consultancy service

How To Start Your Own Business Consultancy Service With A Ready Website

With your super analyzing skills and decision making abilities, starting your own business consultancy service can be the next step if you love taking on challenges. By starting your own business consultancy firm, you can help other organizations improve performance and make necessary changes to achieve success.

business consultancy service

To start your own business consultancy service, you need to first come up with a solid plan like you would do for helping any other organization. Let’s find out everything you need to know for starting your consultancy business.

Table of Contents

Based on statistics from the previous year, the global business consulting market was valued at around $132 billion. So a well established consultancy sector is an ideal place for you to grow your business consultancy service if you are confident about your experience and expertise.

To-Do List For Launching A Business Consultancy Service

Here we have created a complete checklist that you should take a look at before jumping into creating a consultancy business.

Research Your Industry & Find Your Target Market

When you are determined to establish your own business consultancy service, the first thing you have to find out is who will be your customer. It’s called selecting your target marekt.

How To Start Your Own Business Consultancy Service With A Ready Website 11

Before narrowing down your target market, the first thing you have to do is research the industry into which you wish to start your business consultancy service.

Gather knowledge and insight about the industry, who your competitors are, and what your customers want. After that, choose the niche customers. As a consultant, you can offer services to entrepreneurs, large businesses, or even both. Attending online and offline fairs, seminars, conferences, and so on is the best way to start.

Choose Specific Services & Plan The Pricing Model

How To Start Your Own Business Consultancy Service With A Ready Website 12

Now you have to come up with specific services you want to offer your clients. You need to find out which areas are your expertise and what kind of consultancy service you want to provide.

Once you know what kind of business consultancy service you want to provide, you have to come up with a pricing model. 

Most common pricing models involve charging customers depending on your working hours. Alternatively, you can also provide a monthly service or a project-based service.

Here are some basic ideas of services you can offer to your clients:

  • Be an expert in a specific market.
  • Identify clients business growth related problems.
  • Analyze client business status and provide innovative solutions.
  • Offer training and teaching to your client’s employees.
  • Help to revamp organization’s business strategy.
  • Create a scope for new business opportunities.

If you can plan these before starting your business, you can easily skyrocket your consultancy business service.

Establish A Legal Entity For Your Consultancy Business

A legal entity includes companies or organizations that have legal rights and responsibilities, such as having to file taxes. This lets your business be treated as a separate individual entity.

How To Start Your Own Business Consultancy Service With A Ready Website 13

It’s important to create a legal entity for your business, so that your own personal assets can be protected in case your business faces financial problems, goes bankrupt or is sued against. If you don’t create a legal entity for your business consultancy service, your personal assets may be held as collateral if you face legal or financial issues in the long run. 

Collect All Necessary Permits & Licenses

How To Start Your Own Business Consultancy Service With A Ready Website 14

This is another important task on your checklist. You should research which licenses are mandatory to run your consultancy business and how to collect them. If your business needs certificates and licenses from other organizations, then find a way to manage them.

Build Your Brand Identity

Your brand will express your service and specialty. So building your brand identity is essential. It takes a long time to build brand values.  

How To Start Your Own Business Consultancy Service With A Ready Website 15

To create your brand value, you have to provide services aligning with your brand, have logos, banners, and attend social events, and keep looking for more opportunities. These will help you to create brand value.

Create Your Online Presence

Online visibility is one of the primary factors of any business. You can easily find your niche, nurture them and build relationships with them easily with online channels.  

How To Start Your Own Business Consultancy Service With A Ready Website 16

There are so many ways to create and promote your online presence.  You have to research which social media platforms are suitable for your business consultancy service and start with those platforms right away. Also, you can go for a website for your consultancy business; it is one of your consulting firm’s most important ambassadors. If your business model is to provide services remotely, then websites can help you to grow your business.

Ensure that your consulting agency is truly represented by your website. Visitors should be able to understand who you are and what your brand is about as soon as they arrive at your site. Finally, a well-designed website imparts credibility and legitimacy to your business.

Get Ready With Domain & Hosting

How To Start Your Own Business Consultancy Service With A Ready Website 17

If you are planning to build your business consultancy service website, you will need to buy a domain name and select a hosting provider. From the best managed hosting providers, you can get both domain name and hosting service.

Also, if you build your website with WordPress, you will need to install and activate WordPress on your computer. a reputed hosting provider will give you this facility also. 

These are the essential requirements to start your own business consultancy service. Without these, no business can survive. If you already understand these vital things, then let’s learn why you will need a website and how to get one. 

How Can A Website Boost Your Consultancy Business?

Most of the time people want to avoid creating websites all by themselves because of the conventional idea to know coding and design before creating a website. But with Elementor website builder, you won’t need to create a website from scratch using coding. Moreover, a website will help your business consultancy firm to grow. Wondering how? Let’s find out. 

Represent Yourself & Your business From One Place

A website helps clients to have a complete idea about your business consultancy firm, services you offer, and much more. It’s easier to visit a website rather than going to your physical office and get brief about your consultancy business. 

Manage Your Appointments with Ease

When you have a website for your business consultancy service, you can manage appointments easily with your website. So that your clients can take a look at a glance when your appointment slots are free. Moreover, you can arrange your service payment in a more organized manner.

How To Start Your Own Business Consultancy Service With A Ready Website 18

Build Direct Communication with Customers

When you are running your consultancy business with a website, you can be open 24/7. Both you and your customers won’t need to wait for the full day to get a reply back from you. As mentioned above, to grow your business you must build communication with your customers. With your website’s Contacts Us page, you can easily do that without any hassle.

Measure & Analyze Your Business Growth

WordPress CRM Plugin

Measuring your consultancy business performance is another mandatory thing. When you are doing that manually, that is the most unproductive way as that will kill your time. 

With an analytics plugin integrated into your WordPress website, you can measure your website traffic, daily performance, site ranking, and so on. At the same time, you can track down your total consultancy business growth by integrating plugins like HubSpot. These will help you to grow your business in the future.

Create Your Website Instantly With Ready Elementor Templates

If you have already sketched out your plans to go for an online business consultancy service, then come up with the question, which platform to go for. If you are not a coding expert, then go with a flexible and easy-to-manage website platform like WordPress. We have outlined the benefits of using WordPress and Elementor. 

WordPress and its most popular website builder Elementor have made creating websites like a piece of cake. You won’t need others’ help to create one. 

How To Create A Business Consultancy Service Website

If you are looking for an easy solution to create a website for your business consultancy service, BizMentor  from Templately is the perfect option for you. This ready Elementor template pack is specially designed for business consultants, business coaches, advisors, financial planners, accountants, and anyone involved in the consulting business industry.

How To Start Your Own Business Consultancy Service With A Ready Website 19

Bizmentor Elementor template comes with a stunning design layout to attract your site visitors visually. Also, it has a captivating call to action button and is 100% responsive. All you have to do is, insert the template on your WordPress website, customize it and make your site live.

Before starting, you must first install & activate a few mandatory plugins to use  Bizmentor business consultant website template. 

Things You Need To Create A Business Consultancy Website

☑️ Elementor: As mentioned above, if you want to create your business consultancy service website without coding, you need to install and activate Elementor website builder. 

☑️ Essential Addons For Elementor: Most of the amazing sections of Bizmentor business consultant website template is created using Essential Addons For Elementor, which is the largest Elementor library with 70+ elements and 1 million+ active users. 

☑️ Templately: As the Bizmentor template is from Templately, you must have this plugin on your dashboard, otherwise can’t access the stunning business consultancy servite website template. Sign up in Templately and install the plugin as well. 

Are you done installing and activating these plugins? It’s time to start creating websites for your own business consultancy service. Follow these step by step guidelines to create your business consultancy website.

Step 1: Insert Business Consultant Website Template 

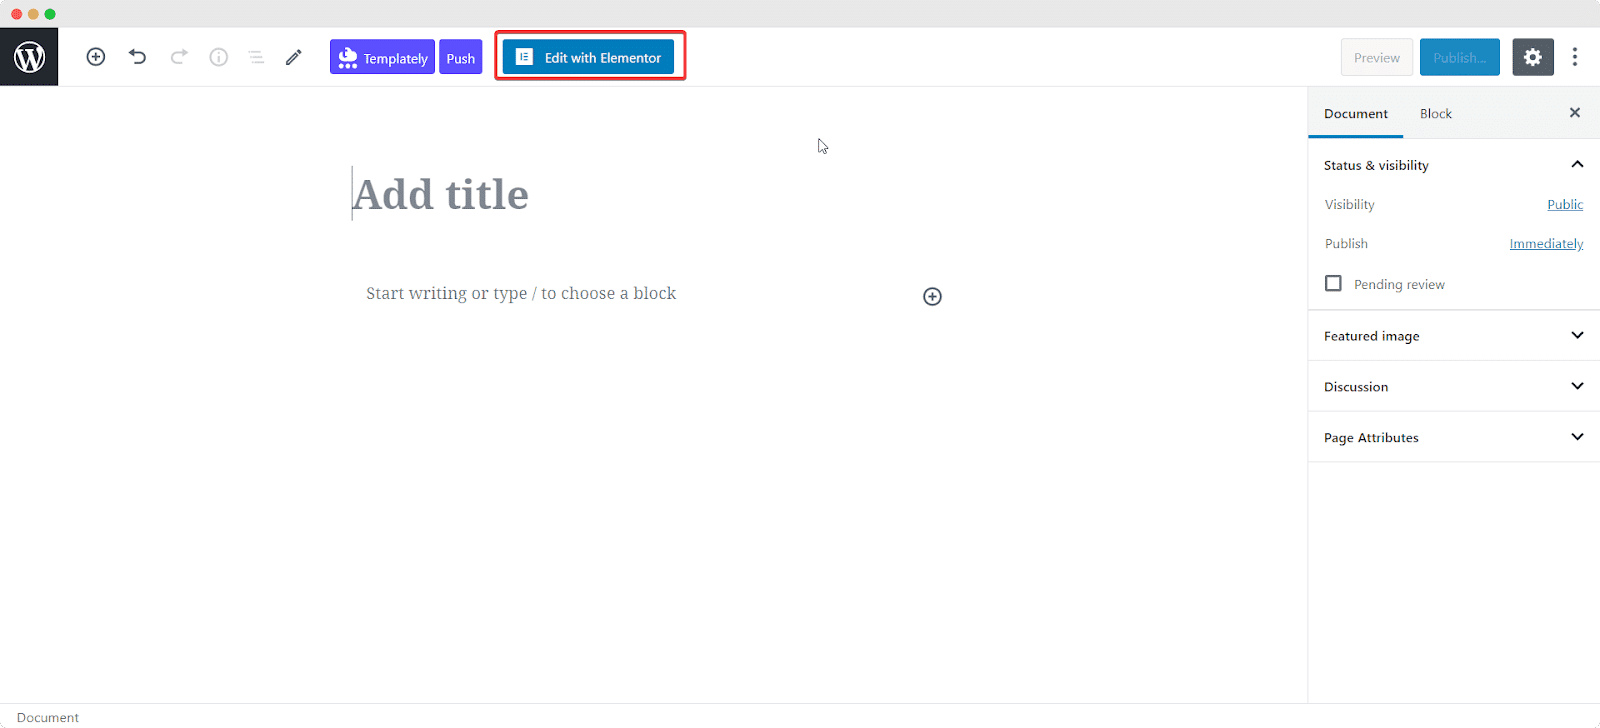
We’ll begin by creating a landing page for your business consultancy service. For that, go to your WordPress dashboard and create a new page. There you will find ‘Edit with Elementor’. Click it and it will take you to the Elementor editing panel.

online business

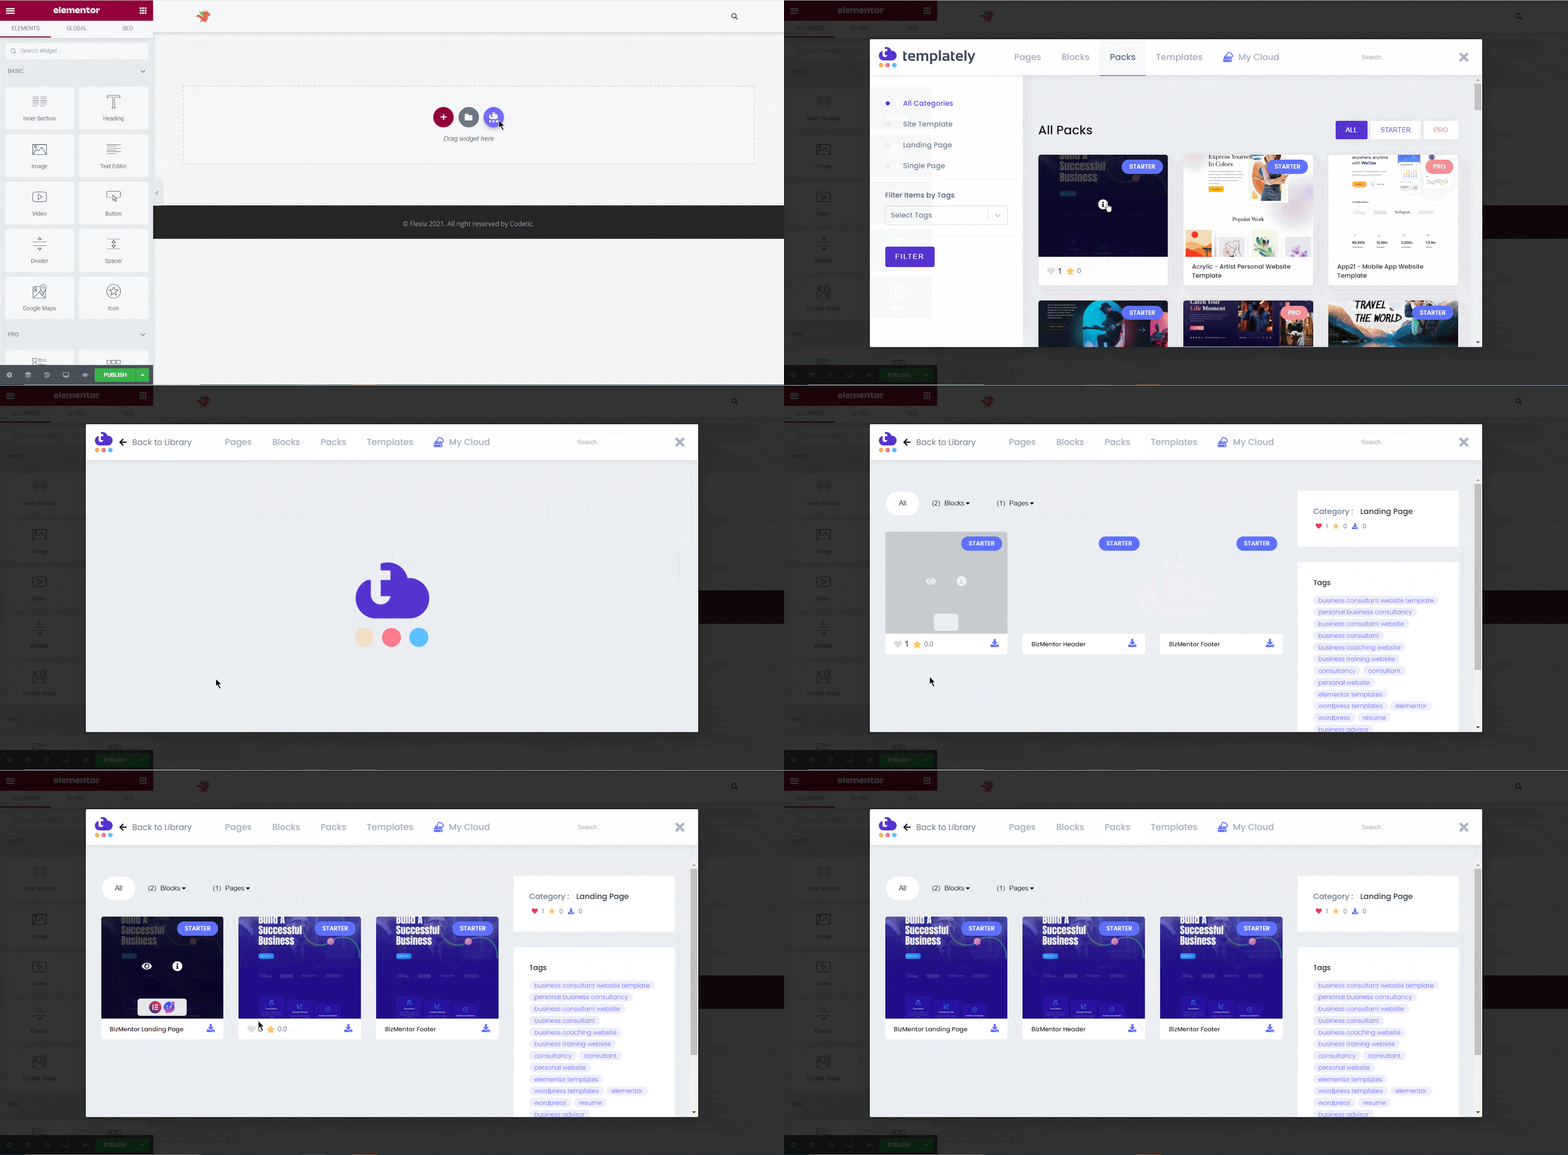
On the middle of your page, you will find the ‘Template blue’ icon. Click the icon and a popup will appear, search Bizmentor from there and insert it. For tutorial purposes, we are going for BizMentor Landing Page.

How To Start Your Own Business Consultancy Service With A Ready Website 20

It will take a few times to load the template. After loading this is how it will look on your Elementor pane.

How To Start Your Own Business Consultancy Service With A Ready Website 21

Step 2: Personalize Your Website Content  

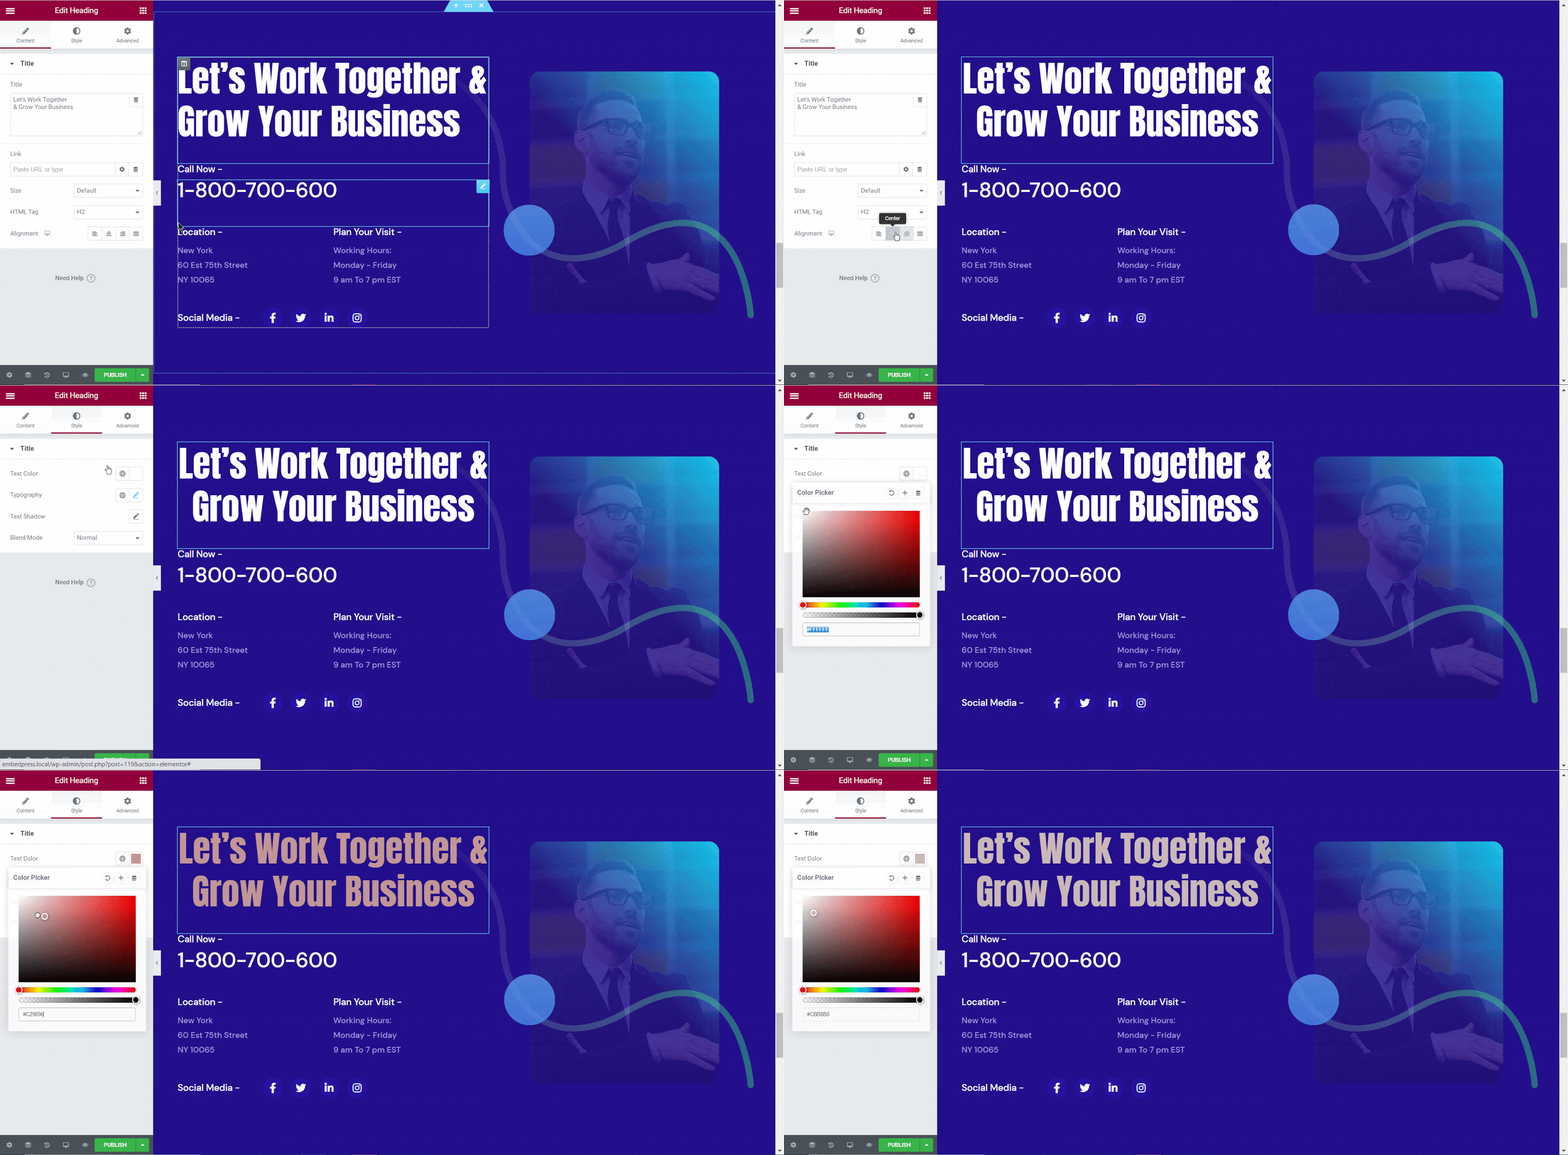
You can customize each section of the template to add your personalized touch. Add your clients images, reviews to build credibility and logo, banners to build brand identity. 

To customize any section, just click on that and that element editing option will be open. Explore all available options till you are happy with the outlook.

business consultancy service

Step 3: Time To Launch Your Business Consultancy Website

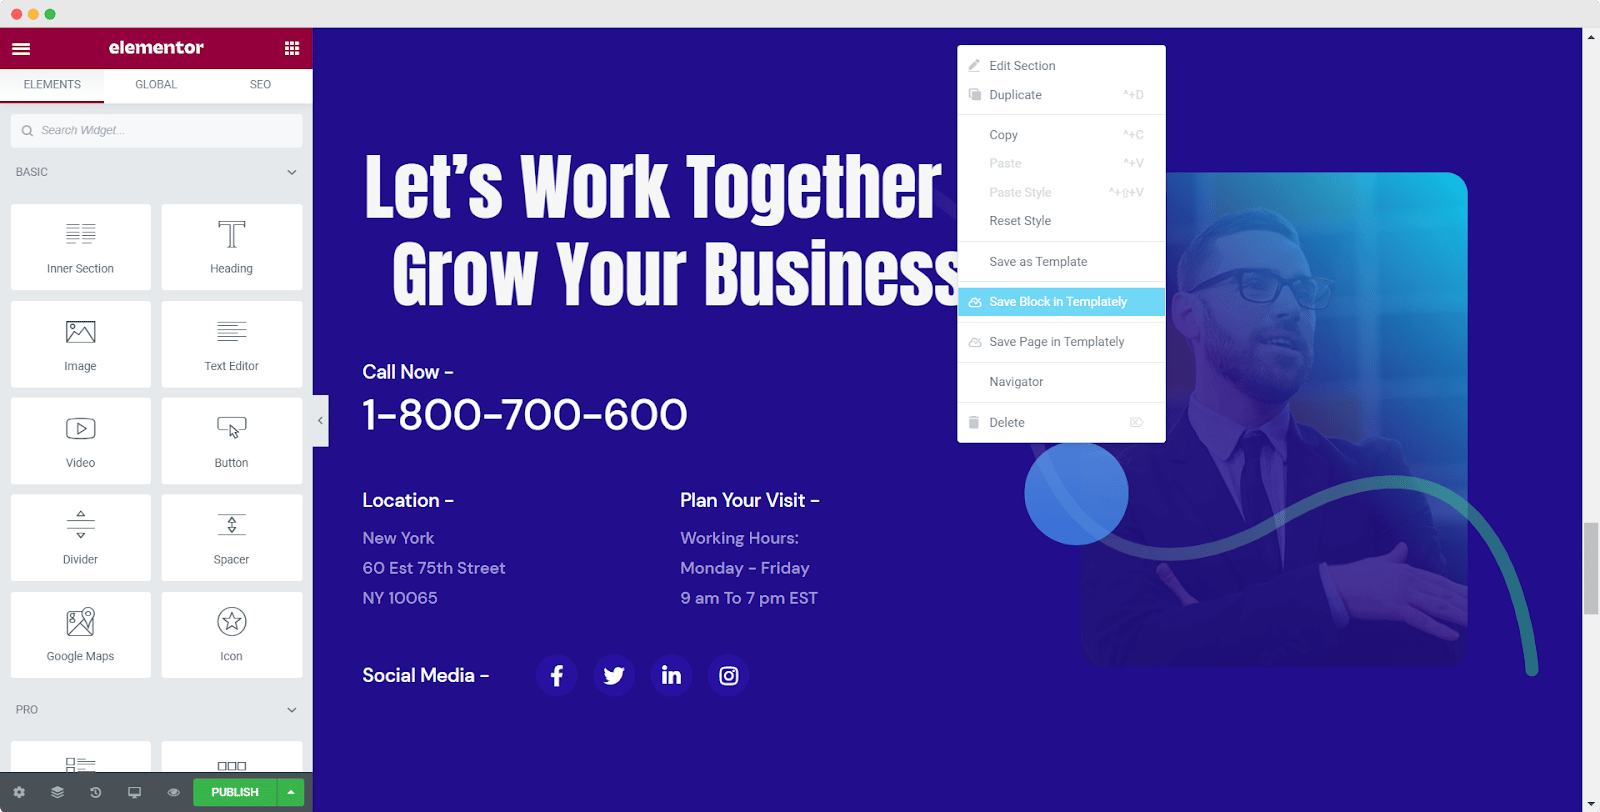
If you are done with customizations, then hit the ‘Preview’ button to find out how it will look on the live website. You can also store your customized designs for security and reuse with Templately’s exclusive feature, MyCloud. Right click on the section you want to store and select the ‘Save Block In Templately’. Your designs will be saved in Mycloud.

business consultancy service

You can also collaborate your stored templates with others via Templately’s another amazing feature, WorkSpace. This feature will save you from creating repetitive items in your website from scratch. 

Are you done following all the steps above one by one? Then click the ‘Publish’ button in the bottom-left corner. Congratulations! Your website for business consulting service has been created. Now make your website live and share it with everyone. Have a look at your freshly baked business consultancy service website with Bizmentor.

business consultancy service

Bonus Tips: Skyrocket Your Business Consultancy Service

After launching your beautiful website for business consultancy service, the next work is to increase your site engagement and boost your sales. Here we are mentioning some easy-to-implement tips so that you can skyrocket your consultancy business. 

Use Social Proof To Boost Engagement

The greatest challenge for new websites is building credibility and converting visitors into long-term customers. But with WordPress-built business consultancy service website you can install and activate amazing plugins to boost your engagement. 

NotificationXthe best FOMO & Social marketing solution is the most popular plugin to build trust and convert visitors. You can create stunning notification popups to display your happy customers, customers review, monthly sales performance, ongoing exclusive sales, and much more. This social proof strategy will help you to grab your visitors’ attention and boost your engagement. 

Increase Online Visibility With Social Platforms

One of the popular methods of increasing site engagement is promoting your website, skills, and services on social platforms. Besides giving regular posts about your business consultancy service, you can easily auto publish your website posts, case studies on Facebook, Twitter, LinkedIn, and many other social platforms. 

To manage all your scheduled posts from one place you can go for  SchedulePress plugin. It will help you to schedule your blog posts, publish them automatically on social media platforms, and many more. This plugin will help you to engage your audience on your site as well as increase your online visibility on multiple social platforms. 

business consultancy service

By implementing these simple tips and tricks, you can go a long way to help grow your business consultancy service.

Kickstart Your Business Consulting Service Today

Hopefully, you have got a clear idea on starting your business consultancy service from scratch. Are you ready for innovation with your business consultancy website? Start creating your own website with Bizmentor Elementor template, and contact our support team for any assistance. 

Stay subscribed to our blog to get more of these fun tutorials, insights, blogs, and don’t forget to share how your business consultancy service website looks like with other Templately users in our Facebook community.

WooCommerce Subscription Plugins

WooCommerce Subscriptions Plugin & 5 Alternative Solutions: Ultimate Guide

When your eCommerce business model is subscription-based, you can use WooCommerce Subscriptions plugin to easily manage your subscriptions and skyrocket your sales. This is one of the most popular choices for any eCommerce business. But if you want to keep your options open, then you can take a look at these other amazing alternatives to WooCommerce Subscriptions plugin. 

WooCommerce Subscription Plugins

Let’s start with what does WooCommerce subscriptions mean? WooCommerce subscriptions are a great way to generate recurring sales from your customers. Subscriptions are also an important part of setting up recurring billing for membership sites that sell digital products, magazines, subscription box businesses, podcasters, other content creators, etc.

Table of Contents

Top 6 Advantages Of Using WooCommerce Subscriptions

Before jumping into a comparison of WooCommerce Subscriptions plugin and their alternatives, let’s check out the benefits of having this plugin. The WooCommerce Subscriptions plugin has a variety of options which makes it the ideal option for subscription-based businesses. We have mentioned the top advantages here for you. 

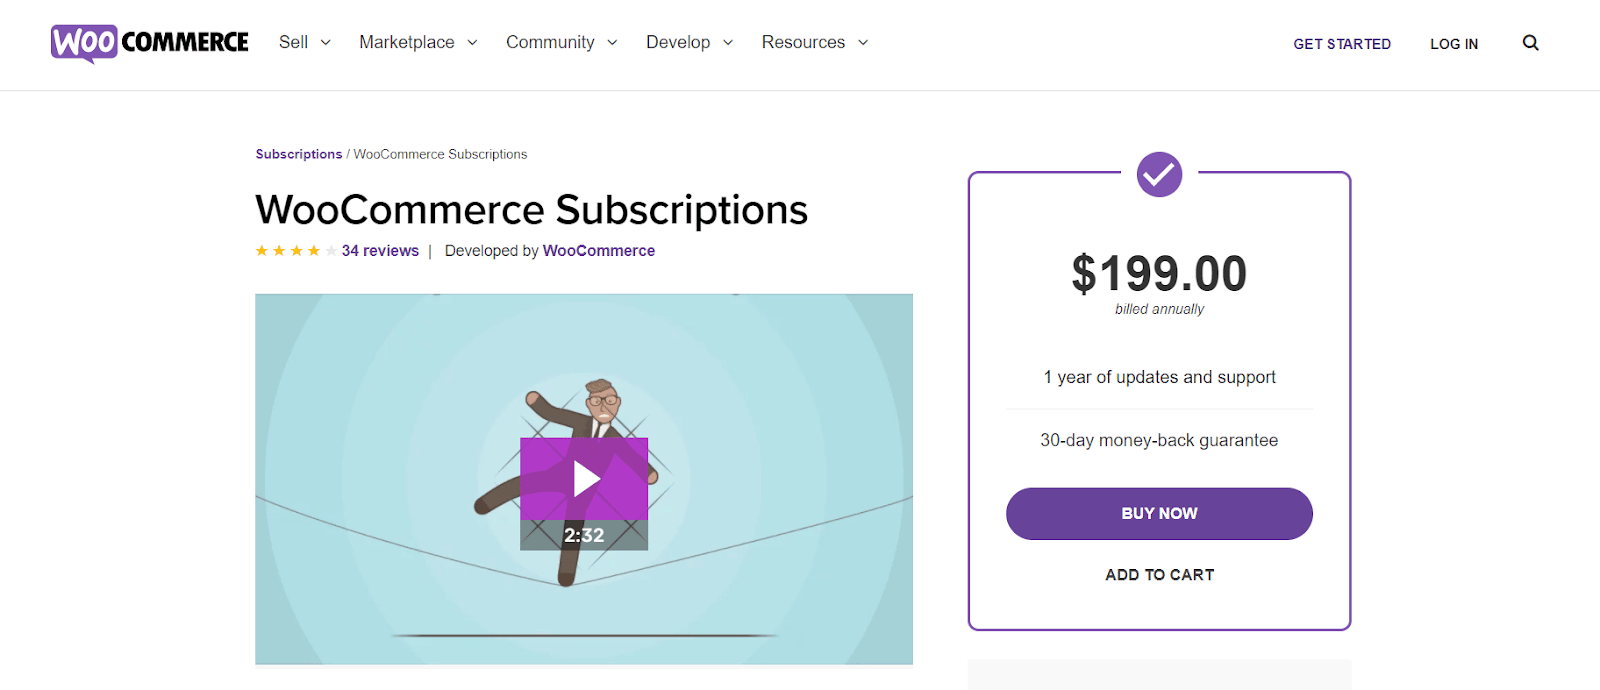
WooCommerce Subscriptions Plugin

Able To Create Multiple Packages & Subscription Plans

The extension allows you to create as many subscription packages as you need each time you want to make recurring payments for your business. A custom billing schedule is also provided to allow customers to choose one that meets their needs. You can also offer a free trial, which allows your potential customers to try your subscription product or service before they purchase, as well as specify the duration of the trial.

Handling Customers with Exclusive Options

WooCommerce Subscriptions Plugin

In practice, almost all sorts of payment issues will arise. Some customers may decide to get a free trial, only to run out of time and request an extension. 

With WooCommerce Subscriptions, you get advanced features to handle all of these  common customer payment issues, such as auto-rebilling features for cases of failed subscription payment issues and many more.

Schedule Your WooCommerce Subscriptions With Flexibility

In WooCommerce Subscriptions plugin, you can begin the subscription schedule immediately after a subscriber has made a payment. 

In some cases, you can offer the products to all subscribers on the same day. This is usually practiced by eCommerce businesses that sell subscription boxes to their customers, such as FairyLoot and OwlCrate.

 If you are running a similar business, you can use WooCommerce Subscription plugin and its flexible subscription scheduling feature to make sure that all customers are billed on the same date.

Boost Conversions Using Fully Customizable Coupons & Discounts

WooCommerce Subscriptions Plugin

You can easily boost your subscriptions by creating time-limited coupons and discounts. You can implement this on your WooCommerce store by providing exclusive coupons on various occasions. With WooCommerce Subscriptions plugin, coupons for recurring payments and signup can be easily managed.

Reduce Customer's Payment Gateway Fees With Multiple Plans

In certain circumstances, your customers may want to purchase more than one product at the same time. This is because most payment gateways add a percentage fee to each transaction, resulting in a significant increase in fees.

Also, when your customers make separate payments for each purchase, you have to think about logistics and renewals for each purchase, besides having to pay for the payment gateway separately. Subscription products provide a unique opportunity to address this problem. 

WooCommerce Subscriptions offers a unique solution to address the issue when the customer chooses two separate “packs”. The extension will help you organize similar items and reduce fees for your business.

Manage And Customize Email Notifications For Subscriptions

WooCommerce Subscriptions Plugin & 5 Alternative Solutions: Ultimate Guide 23

Transactional notification is great for eCommerce sites, but ensuring consistency across all communications with your clients means using your brand’s tone of voice. The WooCommerce Subscriptions plugin allows for full email notification support for both admins and customers. 

5 Top Alternatives To WooCommerce Subscriptions Plugin

We will now mention several WooCommerce Subscription plugin alternatives that would help you set up and automate recurring sales-focused subscriptions at your stores.

1. YITH WooCommerce Subscription: Most Popular Alternative

WooCommerce Subscriptions Plugin & 5 Alternative Solutions: Ultimate Guide 24

YITH WooCommerce Subscription allows you to create subscriptions for your products and make them available for a particular period of time to the subscribers. If you want to offer your subscribers reviews, videos, learning courses, podcasts, hosting, and anything else in installments, creating subscription plans for such services is now very easy. This will ensure a steady income from your site and more control over your sales volume.

Exclusive Features of YITH WooCommerce Subscription 

☑️ YITH WooCommerce Subscription plugin allows you to create unlimited subscription plans for physical products, virtual downloadable products, and so on.

☑️ Your subscribers can directly stop their subscriptions from Paypal accounts. 

☑️ For each product, you can set different types of renewals, whether monthly or daily. 

☑️ You can automate your subscribers to ensure constant and scheduled revenue to your site. 

2. Subscriptions for WooCommerce by WebToffee

WooCommerce Subscriptions Plugin & 5 Alternative Solutions: Ultimate Guide 25

WebToffee for WooCommerce subscriptions is another great plugin that you can use for setting up and managing recurring payments and billing at your store. This WooCommerce Subscriptions alternative plugin is a paid plugin, but you will get the chance to explore a free trial before purchasing it.

Main Features To Check Out In WebToffee

☑️ From simple subscription plans to multi-layer plans, you can create different types of plans for your customers.

☑️ This plugin gives you such flexibility that you can set the renewal interval time to daily, monthly, or yearly.

☑️ Another good thing is this plugin supports multilingualism. So it can provide service to your wide range of customers.

☑️ The plugin offers email services to its users. Auto-generated emails will ease your burden of keeping in touch with customers manually.

3. Subscriptio: Premium WooCommerce Subscription Plugin

WooCommerce Subscriptions Plugin & 5 Alternative Solutions: Ultimate Guide 26

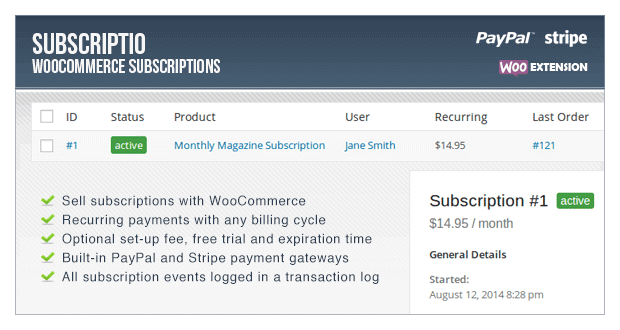
Subscriptio is a premium subscription plugin for WooCommerce that can be used to sell products such as online memberships, e-learning packages, magazine subscriptions, and many more. Just right after your customers’ purchases any subscription, Subscriptio started tracking every activity of your users to give you insights about your customers. 

Exclusive Features Available With This Plugin

☑️ This plugin will help you in processing automated payments for your subscribers.

☑️ You will get full control over your customers’ subscriptions. You can turn off renewal at any time.

☑️ With Subscriptio you will get management tools to handle your subscribers more efficiently.

☑️ This plugin is seamlessly integrated with Paypal and Stripe payment gateways.

4. SUMO Subscriptions: Popular WooCommerce Subscription System

WooCommerce Subscriptions Plugin & 5 Alternative Solutions: Ultimate Guide 27

SUMO Subscriptions is an all-in-one subscription solution for managing subscriptions of your WooCommerce online store. This plugin allows you to set up simple, variable, and grouped subscriptions to products. Furthermore, subscription products can be created and sold from a WooCommerce store.

Key Features Of Sumo Subscription

☑️ With SUMO Subscriptions, you can create simple, variable, or group subscription plans for your customers.

☑️ This plugin gives its users the utmost flexibility to select the subscription duration and number of renewals for each order.

☑️ You can add the option of manual subscription using any WooCommerce supported Payment Gateway.

☑️ Sumo Subscriptions always make sure their recent version is updated with WooCommerce and WordPress updates.

5. MemberPress: An All-Inclusive Membership Plugin

WooCommerce Subscriptions Plugin & 5 Alternative Solutions: Ultimate Guide 28

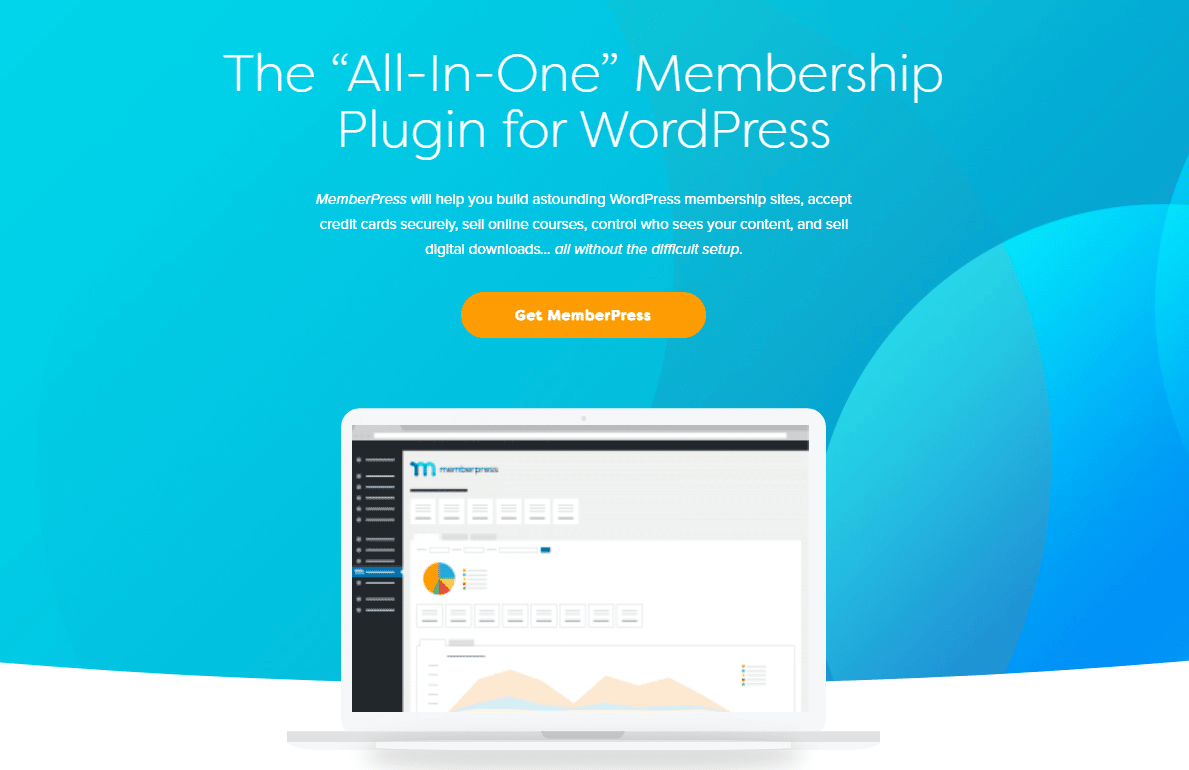
MemberPress is one of the popular WooCommerce subscription alternatives for those wanting to create a membership site that does not require a WooCommerce store. This is an excellent membership plugin that comes with so many exclusive features that are hard to find in any plugin that exists as an extension to WooCommerce.

This WooCommerce alternative lets your members create, update, and cancel subscriptions directly from their member area. By utilizing an automated billing system, there’s no complex setup. MemberPress automatically grants or revokes access to members based on the payments.

Exclusive MemberPress Features

☑️ Just following simple steps, you can set up MemberPress into your WordPress dashboard to manage your online store subscription.

☑️ One of the exclusive features of MemberPress is content dripping and content access expiration.

☑️ Membership allows you to restrict access to almost any file in your WordPress installation, including posts, pages, categories, tags, and widgets.

☑️ This plugin generates day-to-day reports to all your subscriptions, it will help you in making future decisions, improving conversions, and many more.

Tips & Tricks For Creating A Successful WooCommerce Subscriptions Model

There is no single formula for building a successful business model. It’s a continuous process of following established strategies that are maintained by others. Take a look at the best practices suggested by industry leaders.

Choose A Reasonable Pricing To Cover Most Targets

When you plan to offer a subscription service for your WooCommerce store, one of your primary concerns would be how to price it.

You can design a pricing strategy based on the functionalities or usage levels of your products. 

WooCommerce Subscriptions Plugin & 5 Alternative Solutions: Ultimate Guide 29

Acquire Customers By Investing In Multi-Channel Solutions

WooCommerce Subscriptions Plugin & 5 Alternative Solutions: Ultimate Guide 30

When setting up a subscription business you must focus on customer acquisition. This is especially relevant now that more customers are using their mobile devices to do their online shopping. If your site is not optimized to offer a seamless experience across all devices, you may lose out on potential sales. Luckily, WooCommerce has a range of responsive themes that ensure subscriptions are handled smoothly.

Handle Billing & Invoicing Professionally

Invoicing your customers accurately and providing professional invoices is essential no matter what business model or eCommerce platform you use. Your subscription management solution should be able to handle all these different scenarios.

WooCommerce Subscriptions Plugin & 5 Alternative Solutions: Ultimate Guide 31

 If you don’t include creative and thoughtful branding elements on your invoices, you are missing out on great marketing opportunities. However, there is great flexibility in WooCommerce to customize invoices and other documents for regular products. 

Acquire Customers By Investing In Multi-Channel Solutions

Collecting subscription payments from subscribers is another important aspect of the business model. You can go for automatic recurring billing to stay hassle-free by integrating with different payment gateways for WooCommerce stores.

WooCommerce Subscriptions Plugin & 5 Alternative Solutions: Ultimate Guide 32

Additionally, payment gateways are geographically limited. When choosing a gateway for your subscription business, you should take this into concern as well. You need to know which payment gateways work in specific areas if you are trying to reach international customers. You should also make sure your WooCommerce Checkout page is fully functional and responsive on all devices. In this way, you can develop a process that covers your entire subscriber base.

Embrace The Importance Of Customer Relationships

WooCommerce Subscriptions Plugin & 5 Alternative Solutions: Ultimate Guide 33

Renewals, upgrades, suspensions, etc. might be part of common customer queries in a subscription business. If you want to manage your subscription business, you need a professional customer relationship management tool. Fortunately, if you run a store that is powered by WooCommerce, you have plenty of options.

Final Thoughts

A great way to boost sales from your online store is by adding subscriptions. The fact that they bring in recurring revenue is appealing. Furthermore, the subscription business model provides a better chance to understand your customers, which enables you to create more customer-friendly products and bundles. 

WooCommerce Subscriptions plugin is one of the best available options when it comes to trying to offer subscriptions on your store. By focusing on your target audience and staying loyal to your customers, you can easily build a great subscription model.

Do you agree with us? Join our Facebook Community and share your views. Also, subscribe to our blog to stay updated with new tutorials, insights, and these types of resourceful blogs.

WordPress CRM Plugin

Top 5 Best WordPress CRM Plugins Compared To Fuel Up Your Business

Do you want to make your business sustainable by improving relationships with customers? If your website is WordPress built, then try WordPress CRM plugins & start managing your customer relationships directly from your dashboard. Let’s find out which WordPress CRM plugins are the best for you.

WordPress CRM Plugin

When you are using a CRM solution for your business, you can collect and maintain related customer data; that will allow you to find the key opportunities and look for ways to enhance your customer experience.

Why Should You Go For WordPress CRM Plugins?

The full form of CRM is Customer Relationship Management. This solution was introduced for business professionals to manage their business more efficiently and effectively. CRM solutions will help you with contact management, marketing campaigns, and multiple platform integrations to create communication bridges with your customers and maintain them fruitfully.

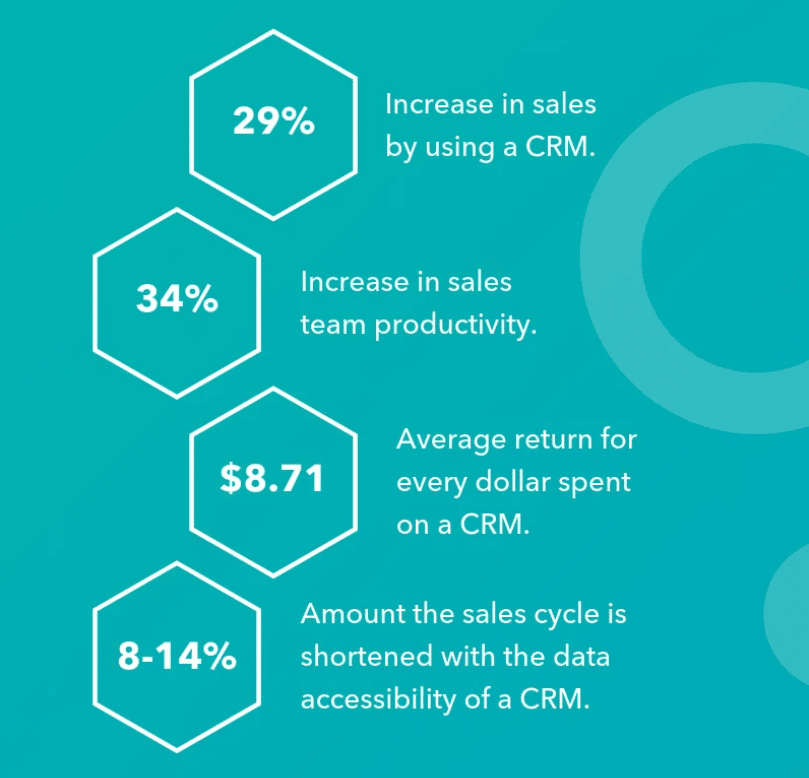
In fact, research from HubSpot has shown that when a business uses any CRM solution, their sales may increase by 29%

WordPress CRM Plugin

What To Check Before Choosing The Best CRM Plugins

For WordPress users, there are tons of popular, advanced WordPress CRM plugins available to help with your business growth. But before you can choose the best WordPress CRM plugin for you, here are some features you should keep in mind.

Able To Manage All Of Your Contacts Easily

One of the main purposes of using CRM is for collecting potential and present customer contacts in detail, segmenting them, organizing them, and managing them.

So that you can convert potential customers into your regular customers and maintain relationships with them for a lifetime. Contact management is a vital feature of CRM. When you are looking for the best CRM plugin, make sure you can manage your contacts efficiently with the plugin.

Integrated Marketing Automation Tools

WordPress CRM Plugin

To reach your potential customers and sustain present customers you need to communicate with them, try to find their pain point, and build relationships with them.

To do these tasks, you will need marketing automation platforms that provide tools like a live chatbot, email campaigns, analyzing tools to measure campaign performances, and so on. Make sure your CRM has all of these important marketing tools. 

Seamless Integration With Multiple Platforms

When you are using a WordPress CRM solution on your website, you want it to be compatible with other WordPress plugins too. For example, you might have to check that your CRM plugin is compatible with page builders like Gutenberg or Elementor. For marketing purposes, you will need to integrate Zapier, Mailchimp, and so on. Don’t forget to check the platform integration list of your CRM plugin.

Able To Analyze Performance

You not only  want to run marketing campaigns, you want to measure the success rate of your campaigns too. You want to find a way to improve your campaign performances, check out whether your tactics are working properly or not.

So when you are planning to activate any WordPress CRM plugin, check out if it has any feature of analytics on it or not.

5 Best WordPress CRM Plugins Worth Checking Out

Here we have listed down the best WordPress CRM plugins and their features in brief. So that you will get a clear idea in picking the best one among other WordPress CRM plugins.

HubSpot CRM: Most Popular WordPress CRM Solution

WordPress CRM Plugin HubSpot

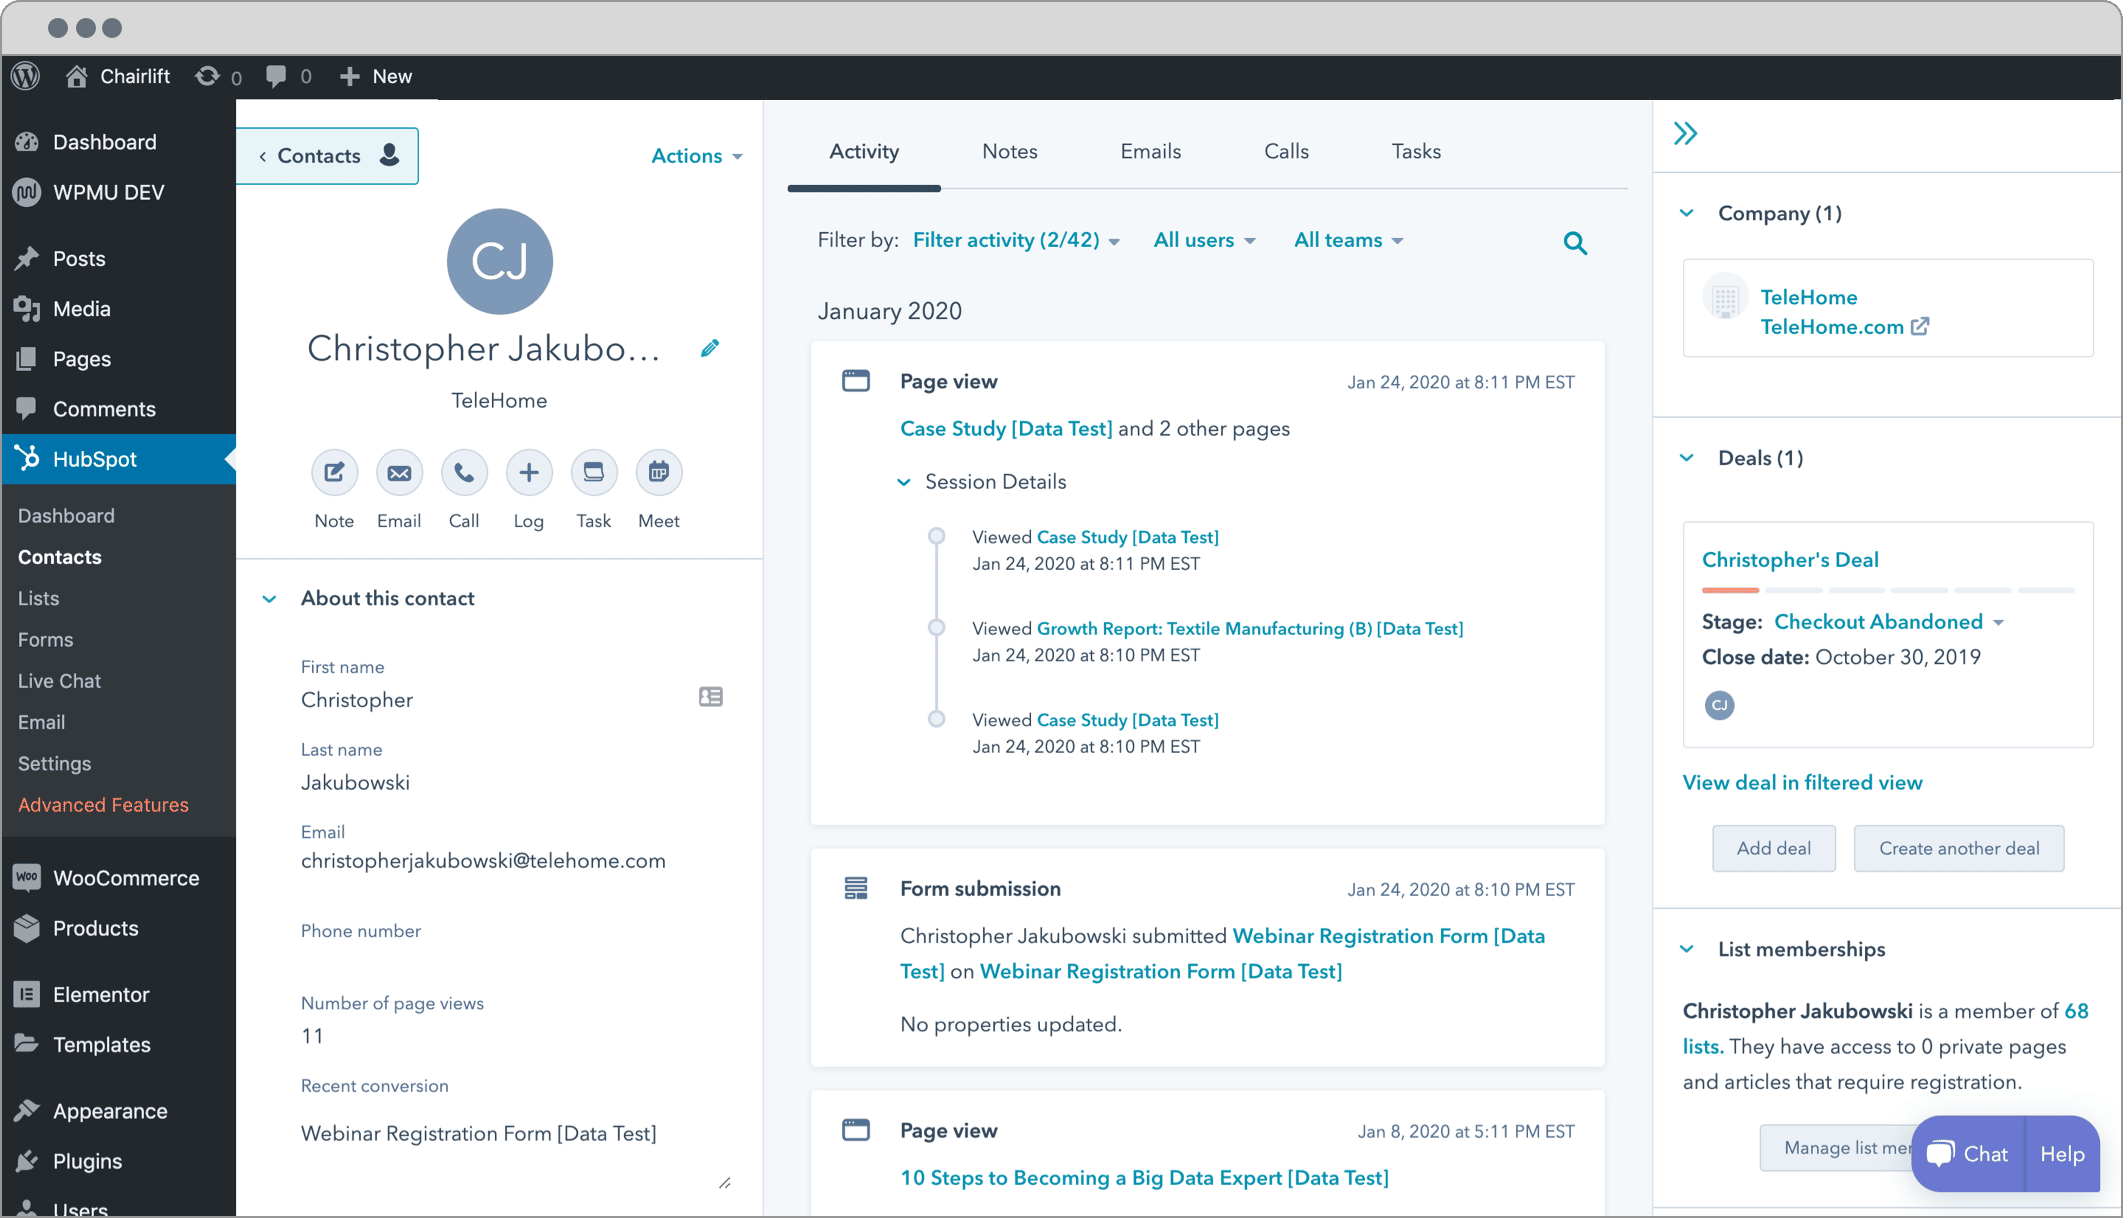
As a CRM tool, HubSpot is a renowned SaaS solution. In the WordPress plugin version, they keep all the same features, so you can use this plugin to nurture your leads, organize them, keep track and convert them. HubSpot CRM will take a few minutes to activate on your dashboard. You can manage our customers efficiently with this plugin.

With the free version of HubSpot CRM, you will get almost all the essential features for your company. Let’s check out what you can do with their plugin version. 

Manage Your Contacts Efficiently And With Ease

HubSpot CRM has all the essential features of content management. You will get a dashboard to keep track of contacts, change their status, set goals and so on. It will create a live page view for each contact, from there you can communicate with them easily. 

Have Access To Advanced Marketing Automation Tools

WordPress CRM Plugin

You will have a separate page to integrate and manage your marketing tools and will be able to utilize them properly. You will get drag and drop email builder with the plugin and 20+ email templates for email campaigns. You can run A/B testing for your email campaigns easily. You can also integrate live chat and chatbots to chat instantly with customers. 

WordPress CRM Plugin

Measure Campaign Performance With Insightful Analytics 

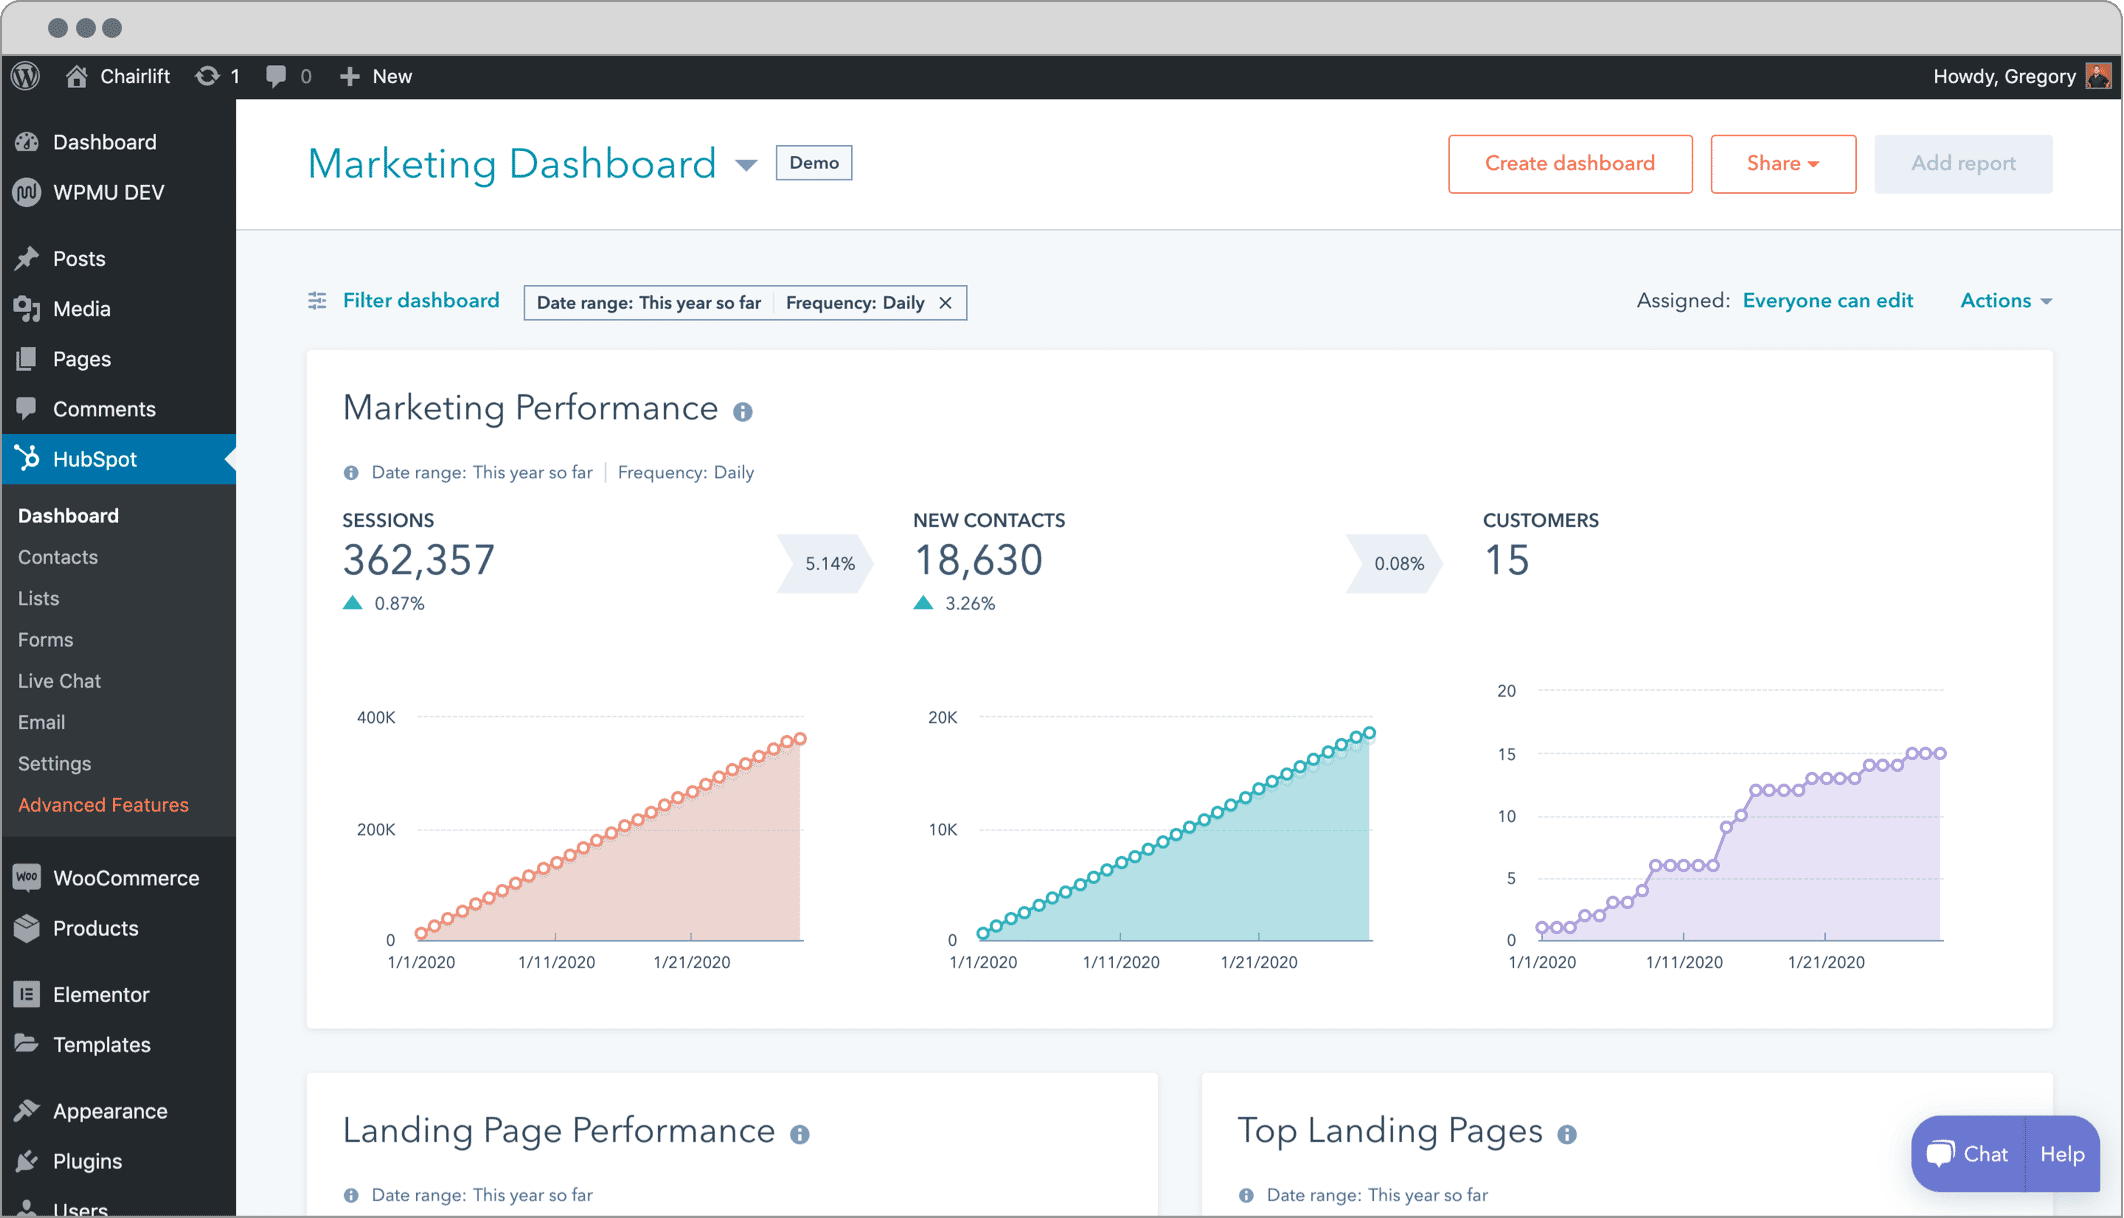
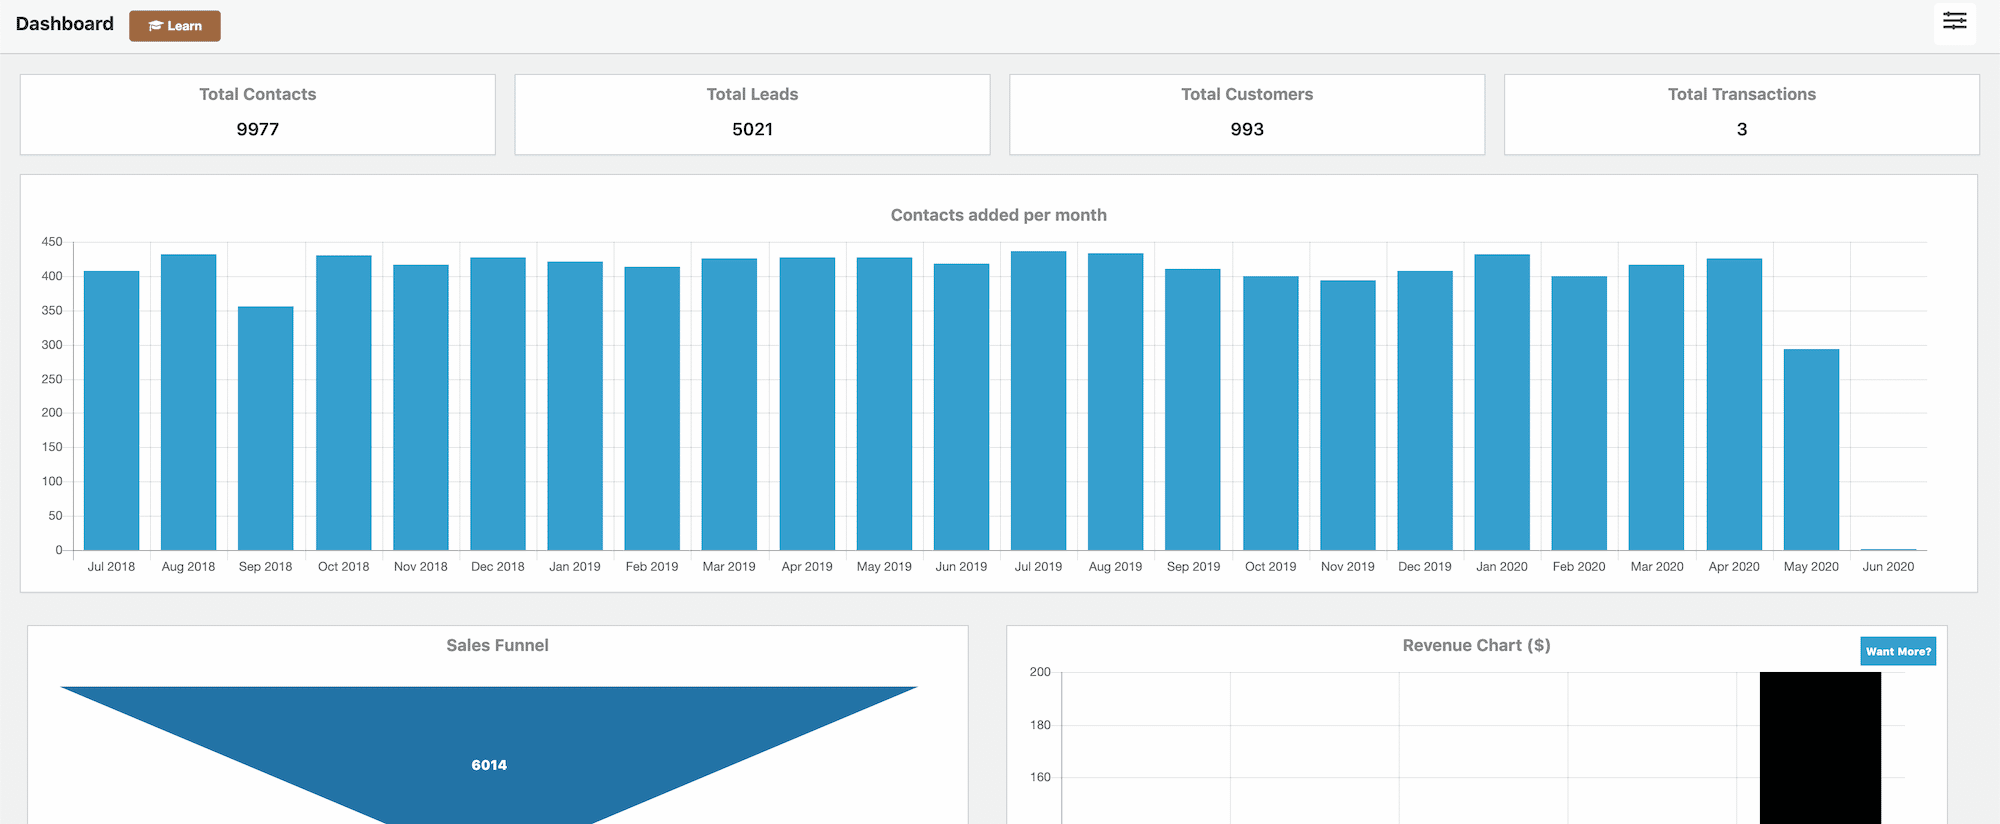
HubSpot plugin offers you built-in analytics on your dashboard. At a glance, you can check out how your campaigns are performing, and take steps for future campaigns. You can track down every detail like how your forms and popups are performing, how much instant chatting is affecting your sales, etc. 

WordPress CRM Plugin

Integrate All Of Your Important Platforms With HubSpot CRM

You can integrate more than 400+ platforms with your HubSpot CRM plugin. You can integrate analytical, marketing, payments, forms, social media, etc platforms. These integrations will make your CRM more resourceful and easily manageable. 

As you can see, with HubSpot CRM plugin you can manage your business smoothly and nicely. Though there are some limitations in the free version, it is okay for small businesses. 

FluentCRM: Email Marketing Automation & CRM Solution

Top 5 Best WordPress CRM Plugins Compared To Fuel Up Your Business 34

FluentCRM plugin will help you to run email marketing and also works as a content management tool. With this plugin, you can easily maintain your customer relationships, nurture leads and run successful campaigns. FluentCRM will also help you in increasing conversion rates.

Here we have mentioned the core features of FluentCRM so that you can decide whether it is the best CRM plugin for your business.  

Manage Customers More Productively With Contact Management

You can collect contacts from different sources and import them in your dashboard, and store all information in the same place. This plugin will help you to analyze every contact as well as can track all contacts status by email marketing. You can segment your contact list and add additional short notes, tags, etc with each contact. FluentCRM will help you to convert your leads into customers.

A Handy Tool For Managing Email Marketing

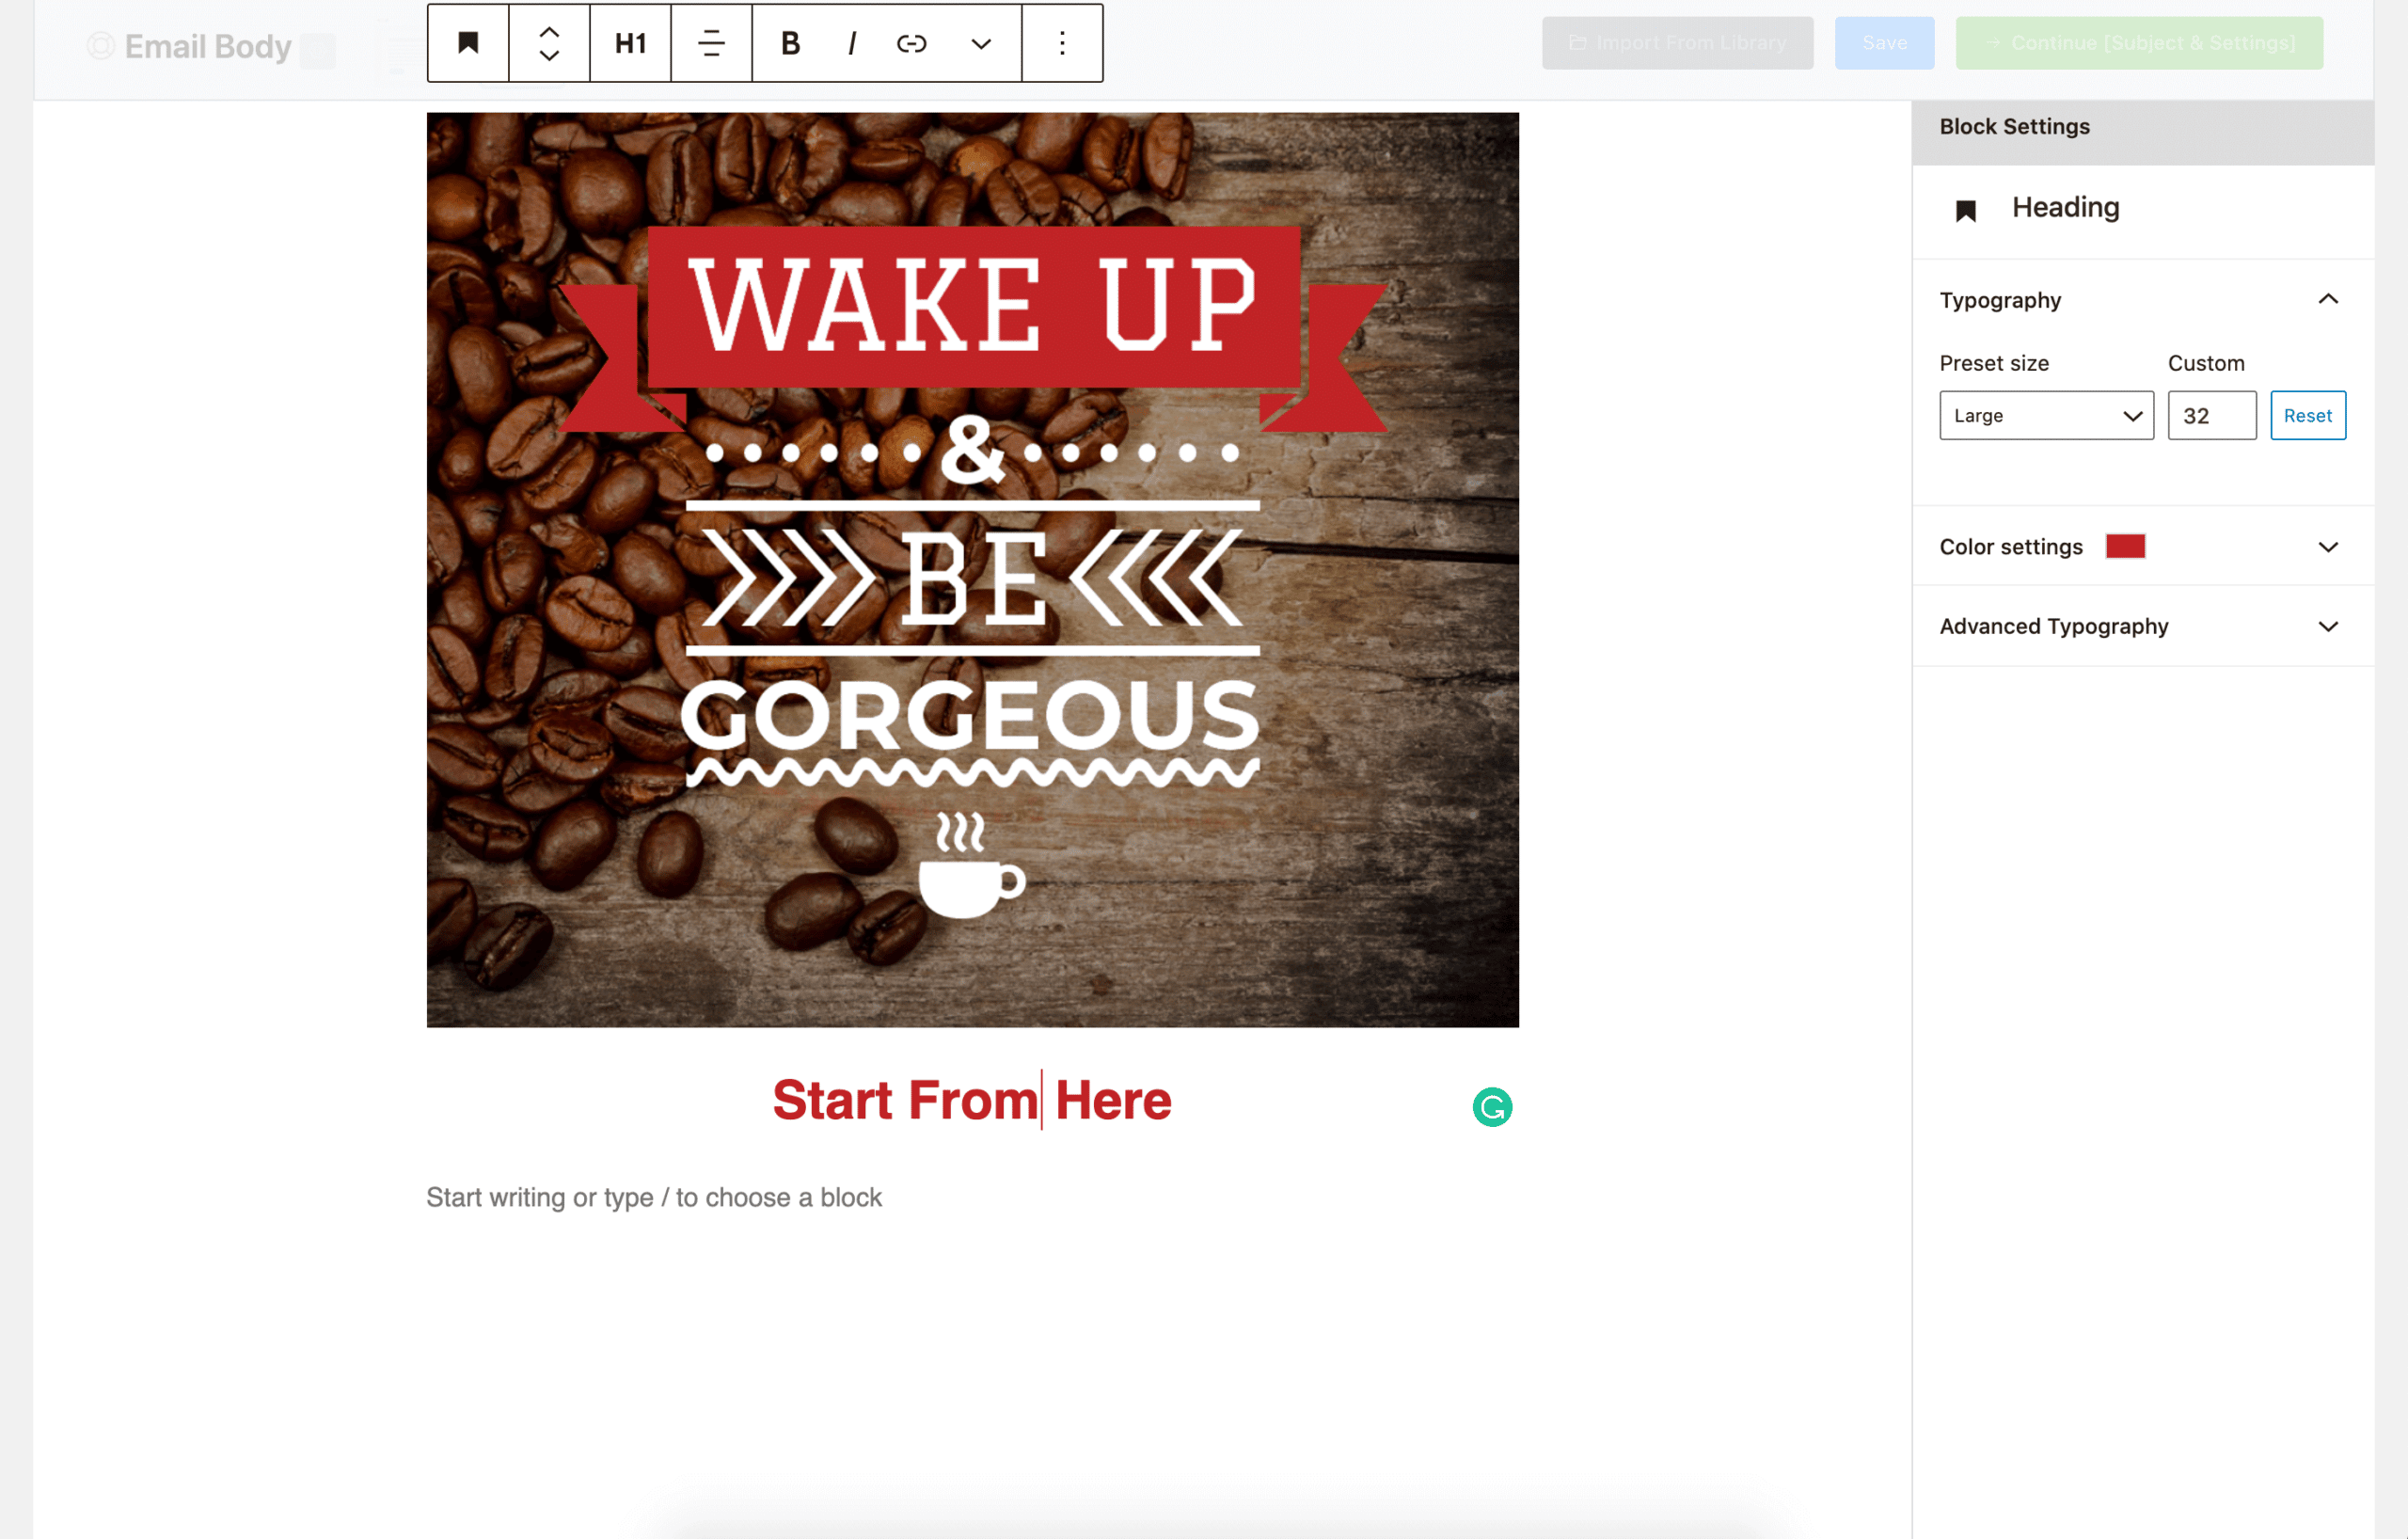
FluentCRM offers pre-built email templates with reader attractive contents. It will save both your time and effort. After creating dynamic emails you can send them to unlimited contacts, analyze every email campaign’s performance, and generate an analyzing report after every campaign by this plugin.

WordPress CRM Plugin

Able To Analyze Every Performance From The Dashboard

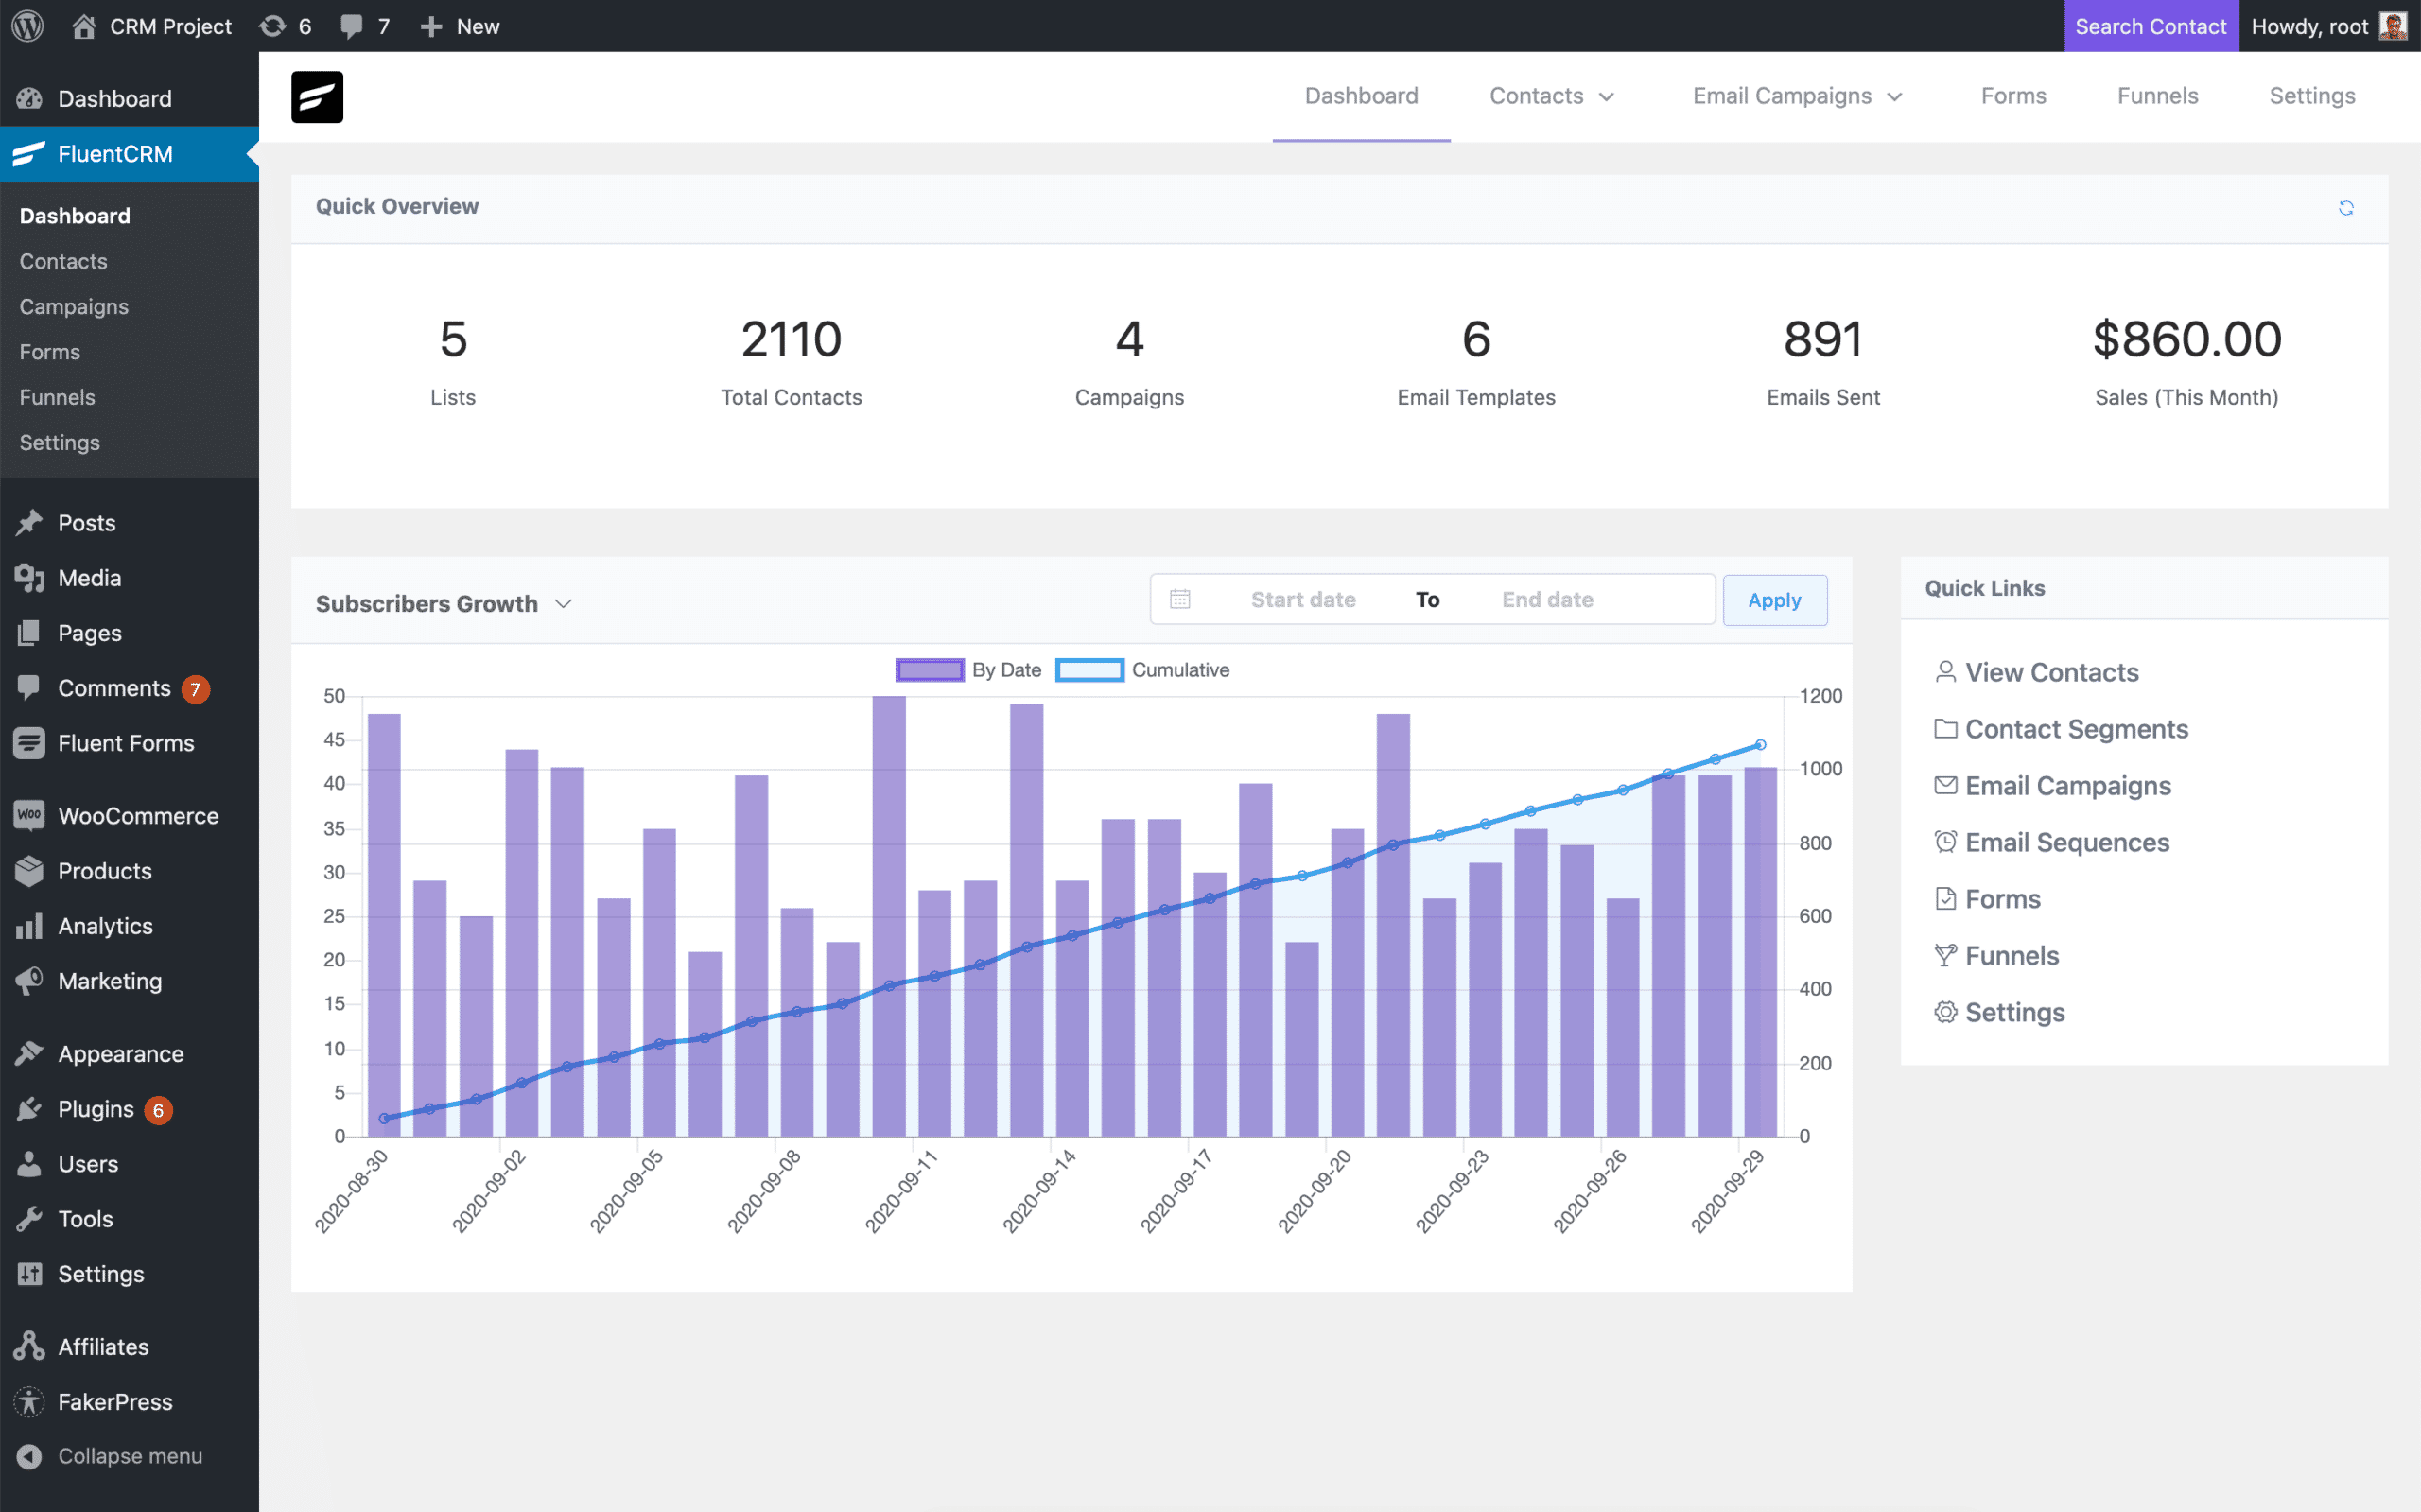
Whether you are managing contacts efficiently or your marketing campaigns are working effectively, with FluentCRM you can see it all at a glance from its built-in analytics tools available on the dashboard. This feature will help you to improvise your business tactics and improve more in the future. 

WordPress CRM Plugin

FluentCRM is compatible with WordPress page builders like Elementor and allows you to integrate multiple platforms. This plugin is getting popular among WordPress CRM plugins day by day.

Jetpack CRM

Top 5 Best WordPress CRM Plugins Compared To Fuel Up Your Business 35

Jetpack CRM has all simple and easy yet powerful features to make your business more profitable. With its free version available in WordPress, you run small and medium businesses fruitfully. Its flexibility makes it popular among non-profit organizations, agencies, and freelancers also.

Jetpack CRM provides all engagement boosting features that will help you to nurture leads and make them your long time customers. Let’s find out what you will get with the Jetpack CRM plugin.

Setup Wizard For Getting Started Easily

All WordPress CRM plugins come with so many features that sometimes it becomes puzzling to find out a way to start. To help you out, Jetpack CRM provides a setup wizard that will give you a complete tour about the CRM. This feature is always available in the dashboard, so if you are stuck in any middle way, you can take a look from it.

Get Detailed Insights Of Your Business From Your Dashboard

WordPress CRM Plugin

You will get all the statistics about your conversion progress, improvements, etc at a glance from the analytics tool available on the dashboard. It will help you scale up your business and never let you miss a lead.

Improvise & Nurture Your Leads With Contact Centric CRM

Jetpack CRM plugin makes it sure your contacts are being evaluated and converted. You will get a client profile page for every single client, including social platforms, add files, track all stages, analyze activities and so on. 

This plugin has other basic features of WordPress CRM plugins too, like integrating multiple platforms, running email marketing campaigns, and so on. 

Groundhogg: Email Marketing & CRM Solution For WordPress

WordPress CRM Plugin

Groundhogg is an easy-to-use and flexible WordPress CRM plugin and email marketing automation tool to help you in managing contacts, store all data and give you multiple ways to utilize those efficiently. 

Here are some amazing features of this plugin to help you get an overview of this WordPress CRM plugin.

Create Sales Funnels And Segment Your Contacts

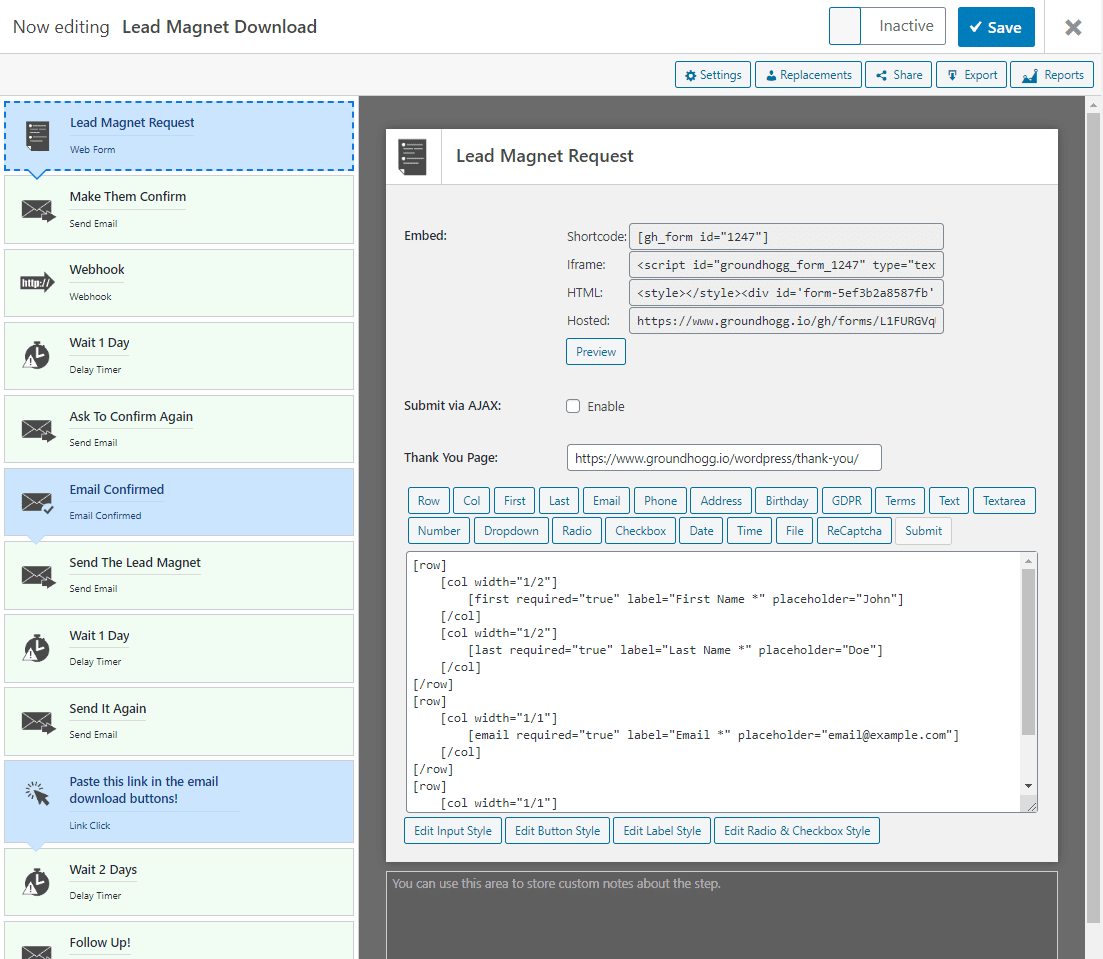
Groundhogg comes with a unique sales funnel builder with which you can create a series of templates for new subscribes to your emailing list, or for communicating easily with customers who have abandoned their carts, and even for requesting feedback from previous users and customers.

WordPress CRM Plugin 

Advanced Mailing System For Email Marketing Efficiency

You can easily send automated emails to people on your contact lists using Groundhogg and its advanced emailing system. It even comes with a drag-and-drop email builder so you can create beautiful emails to truly engage your contacts.

This plugin offers several more handy features like export all info from your database, create sales funnels for multisite networks, integrations with other popular WordPress plugins, and much more.

Contact Form 7 Zoho: Manage Form Submissions To CRM Platforms

WordPress CRM Plugin

Contact Form 7 Zoho is a WordPress CRM plugin that automatically submits data from popular WordPress contact form plugins straight to Zoho CRM, which is another popular CRM solution.

The reason why Contact Form 7 Zoho is popular, is because while there are many form plugins out there, not all of them can send data to CRM platforms like Zoho.

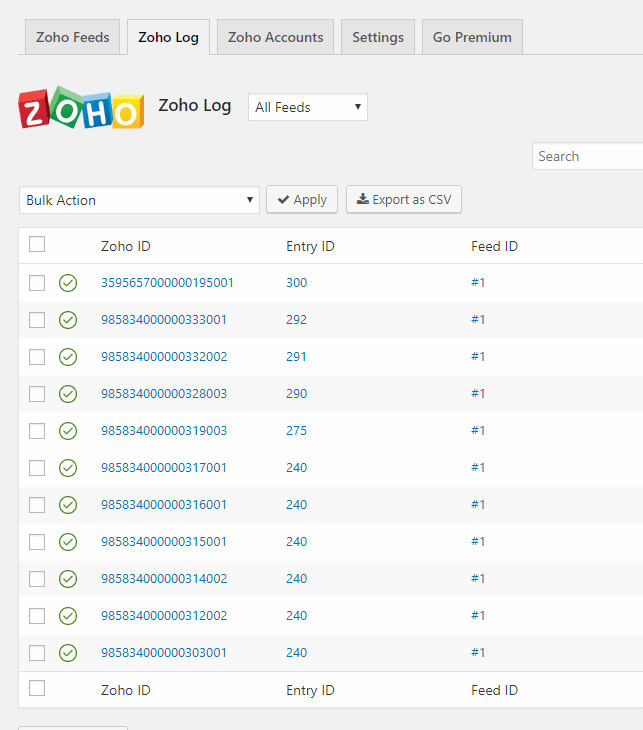
Whenever someone submits a form on your website, Contact Form 7 Zoho will send the data to your Zoho CRM. This plugin also lets you view detailed logs for every submitted form so you can check the data that has been sent to your Zoho CRM.

WordPress CRM Plugin

Skyrocket Your Growth With WordPress CRM Plugins

Hopefully, you now have a clear idea of all the best WordPress CRM plugins that you can use to grow your business. All of these WordPress CRM plugins are here to make your business generate more revenues and maintain valuable relationships with your customers. Whichever WordPress CRM plugin you choose, make sure it has all the basic features in it and helps you to scale up your business. 

If you have found this article useful, then don’t forget to share with others. You can get more guidelines, tutorials or new WordPress updates by subscribing to our blog and get connected with our Facebook community.

Templately Ready Elementor Template

Templately Hits 20,000 Happy Users With 1000+ Ready Elementor Templates

We’re so thrilled to announce that Templately has reached an incredible milestone of 20,000 active installations on WordPress within a few months and published 1000+ ready Elementor templates to help web creators like you to build stunning websites faster than ever.

Templately Ready Elementor Template

We are truly grateful to the community for showing so much love and support for Templately

So what makes Templately stand out? Well, keep reading to know why more than 20,000 WordPress website creators are choosing Templately, and take your chance to grab an exciting, exclusive limited time offer.

Table of Contents

Templately: More Than An Elementor Templates Resource

Backed by WPDeveloper, the same trusted team behind Essential Addons For Elementor, Templately was launched last year to take page building experience to the next level, even for those who don’t have any coding experience!

And since building website requires a huge team effort, we introduced unique, seamless cloud collaboration features with Templately. That’s why Templately is not just an Elementor templates library, rather it is game changer for WordPress web developer for collaborating with team using Templately Cloud feature.  Now, with the help of Templately, web creators like you can get their entire team on board and collaborate together to create breathtaking websites without coding, from anywhere around the world.

Templately Hits 20,000 Happy Users With 1000+ Ready Elementor Templates 36

More Than 1000 Ready Elementor Templates & Counting

Since our initial launch, we have been working hard to introduce as advanced ready Elementor templates so you can create any kind of website instantly with a single click.

You will be surprised to know that we have more than 1000 ready Elementor templates and blocks, and will be adding even more in near future.

Whether you are an entrepreneur, a freelancer, a website designer, or part of an agency, Templately has something for all who want to quickly create stunning web pages with Elementor and WordPress.

Build Stunning Websites For Agencies, Freelancers, & More

If you want to create an agency website on WordPress, you will find tons of beautifully designed ready Elementor template packs to do just that on Templately. Whether you want to create websites for a digital marketing agency or an SEO agency, Templately has you covered. 

That’s not all. You can also create websites for freelancers, or personal websites for travelling, fitness training, motivational coach, mobile apps, and much more. Take a look at some of them below.

Unigency: A Flexible, Multipurpose Agency Website Template Pack

Templately Hits 20,000 Happy Users With 1000+ Ready Elementor Templates 37

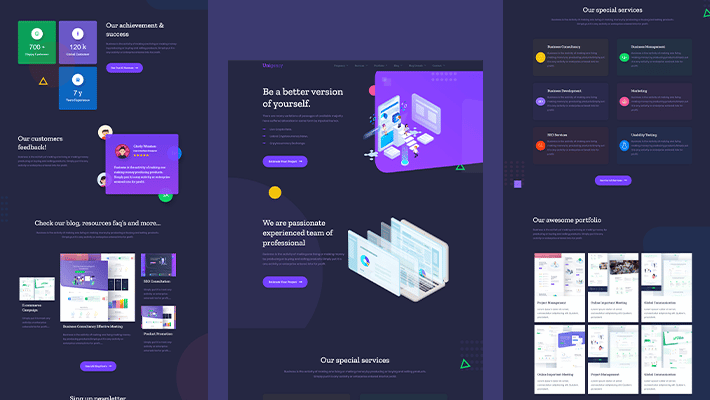
For those looking for a versatile agency website template, Unigency can be a great choice. This is one of the most popular ready Elementor template packs on Templately, because it comes with a very flexible interactive design, and comes in both Light and Dark modes.

With this template pack, you get a total of 14 pre-designed pages and 39 ready-to-use blocks, along with several animated counters, testimonial widgets, and much more.

Ready WooCommerce Templates For Online Stores

Ready Elementor templates for WooCommerce are some of the most popular templates you will find in Templately. From template packs for creating your jewelry website, or an online shoe store website, or even an electronics store website, you will find tons of ready Elementor template packs to create websites for any kind of online or e-Commerce business. 

What’s more, many of these WooCommerce templates from Templately come with premade WooCommerce Checkout pages, so you don’t have to worry about creating your checkout page from scratch. You can simply insert the Checkout page template on your website for your WooCommerce store. Let’s take a look at some of the most trending WooCommerce templates from Templately that you can use.

EleGift: A Multipurpose Website Template For Gift Shops

Templately Hits 20,000 Happy Users With 1000+ Ready Elementor Templates 38

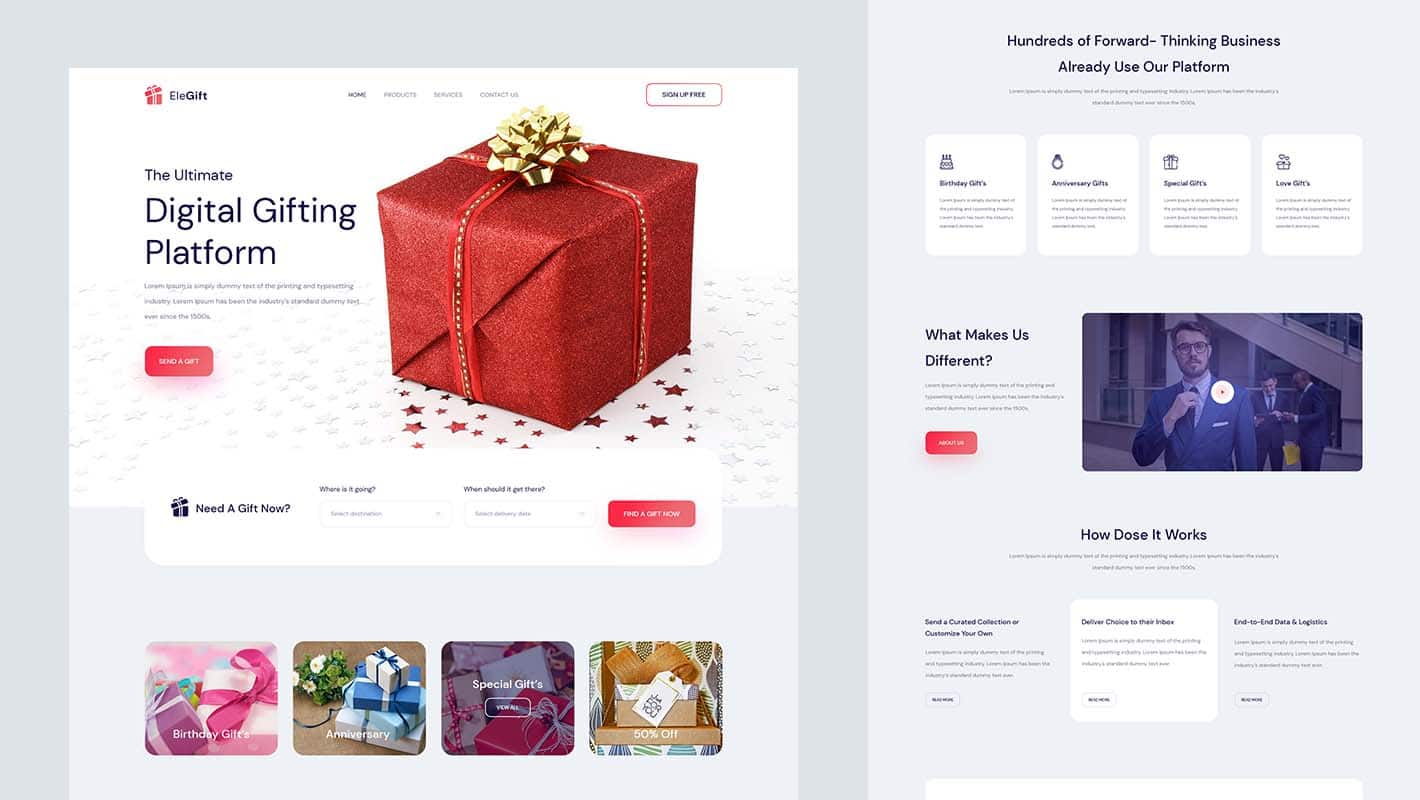
If you need to create a website for your online gift store, then you can give EleGift a try. This is an attractive, stunning ready Elementor template pack that you can use to create websites for any kind of e-Commerce website, be it a gift shop, an accessories store, or even a souvenir shop.

EleShoply: E-Commerce Website Template For Clothing Stores

Templately Hits 20,000 Happy Users With 1000+ Ready Elementor Templates 39

Jewelry stores are not the only ones who see a rise in sales during the month of February. Clothing stores also see a chance to boost their sales during this season. So if you are running a fashion or clothing business, then you can definitely increase your sales by creating your online clothing store website with EleShoply. This ready Elementor template pack comes with a clean, minimalist look and is fully customizable without any coding.

These are just a few of the beautifully designed and fully responsive WordPress website template packs that you can get from Templately. There are more than a thousand ready Elementor templates for you to explore.

And to help make the entire website creation process easier for you, Templately comes with its unique cloud collaboration feature so you can build websites faster.

Create Websites Faster With Cloud Storage & Collaboration

While Elementor has empowered people without any technical knowledge to become website creators, more often than not, website design and creation is a team effort. 

For instance, you might need someone with marketing skills to research what the target audience will want to see in your website. You might need someone with great content writing skills to add the content for your website. And of course, you need someone with creativity to decide the right look, feel and design for your pages.

Templately Hits 20,000 Happy Users With 1000+ Ready Elementor Templates 40

Grab Exclusive Limited Time Offer

In other words, website design and creation often requires several people to get on board and work together, and that’s why cloud collaboration is more important than ever. 

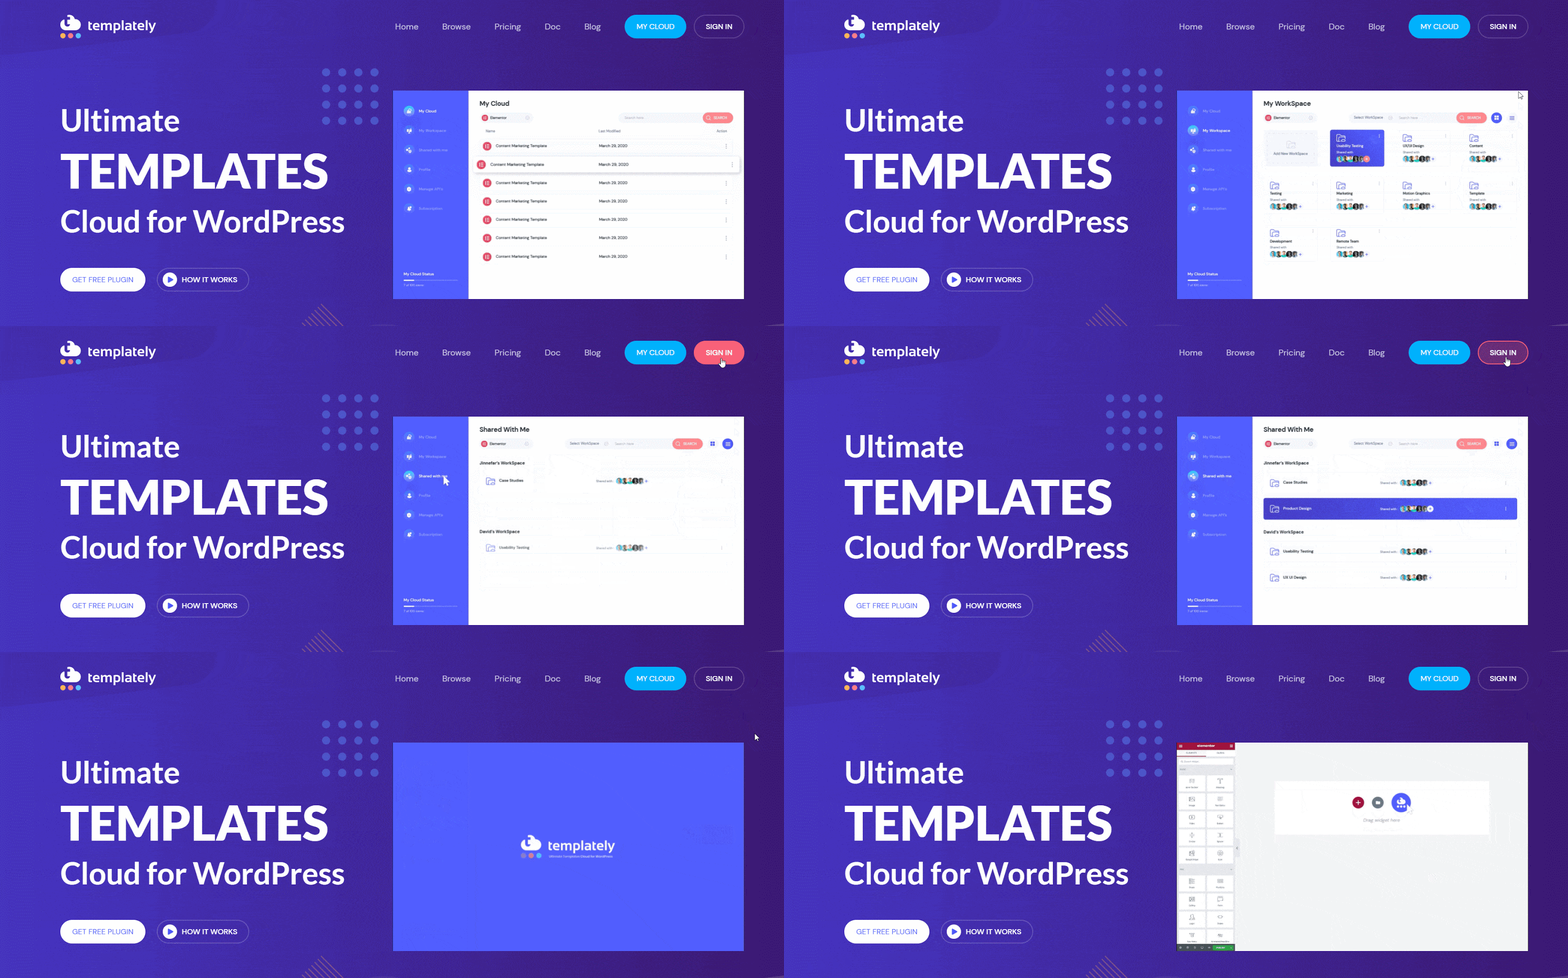
This is where Templately comes in. With Templately’s MyCloud storage, you can save your designs on cloud as backup and access them anytime from anywhere when you need it. Moreover, you can create a Templately WorkSpace, and add your team members to your WorkSpace to share your designs and collaborate together from any location.

Save And Add Your Template Designs To MyCloud Storage

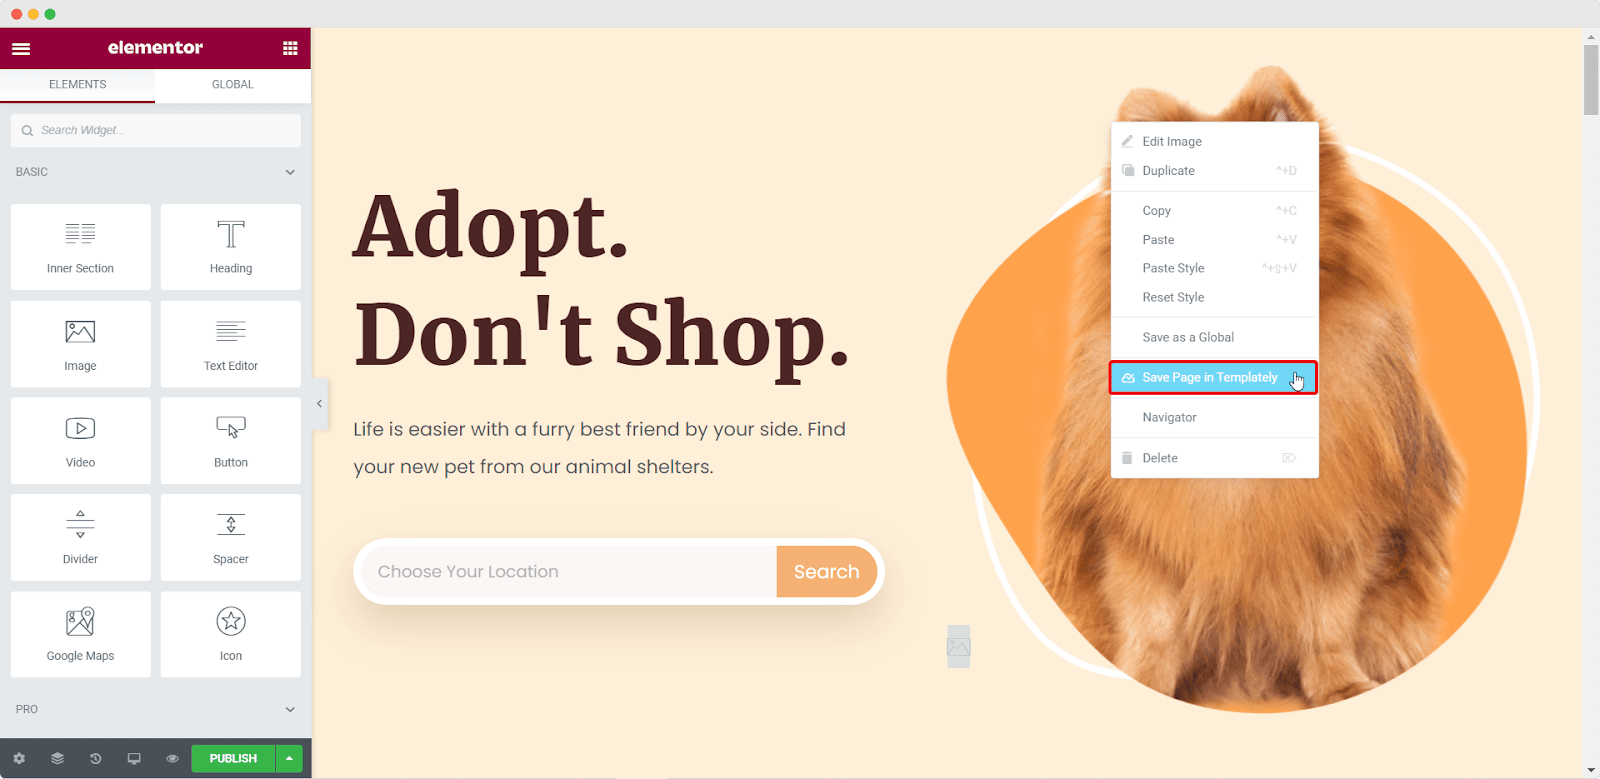
Saving your template designs to MyCloud takes only a single click. After inserting a ready Elementor template from Templately, and customizing it to your preferences, you can save your design to cloud storage. Just click anywhere on your page and then choose the ‘Save Page to Templately’ option.

Templately Hits 20,000 Happy Users With 1000+ Ready Elementor Templates 41

The best part? You can save unlimited number of items in your MyCloud storage space with Templately Pro. This means you can create backups of all of your page designs without any worries. But if you want to start small with just the free version of Templately, you can still save up to 100 items in your MyCloud storage space and re-use your designs anytime.

Share Your Designs With Your Team Using Templately Workspace

After saving your page to Templately, you can easily share your designs with your team by creating a Templately WorkSpace. Just log in to your Templately account and click on ‘My WorkSpace’. From there, click on the ‘Add New WorkSpace’ option.

At the moment, you can only have one WorkSpace with the free version of Templately. But if you have Templately Pro, you can create unlimited number of WorkSpaces for your team.

With these advanced features, Templately stands out as more than just another Elementor templates resource. And if you want to unlock all that Templately has to offer, then we have an exciting offer for you. For a limited time only, you can save $700 on Lifetime Access for Templately Pro to get access to all Pro templates, unlimited MyCloud storage items, unlimited WorkSpaces, and upcoming premium features.

What’s Next For Templately?

Although we are thrilled to reach an important milestone in such a short time, our work on Templately is far from over. We are constantly trying to make your pagebuilding experience better than before, and will be bringing new templates and features to enhance your web designing experience. If you have any feedback or feature suggestions, let us know in the comments below or reach out to our support team.

WooCommerce Product Compare

Introducing EA WooCommerce Product Compare Widget For Elementor

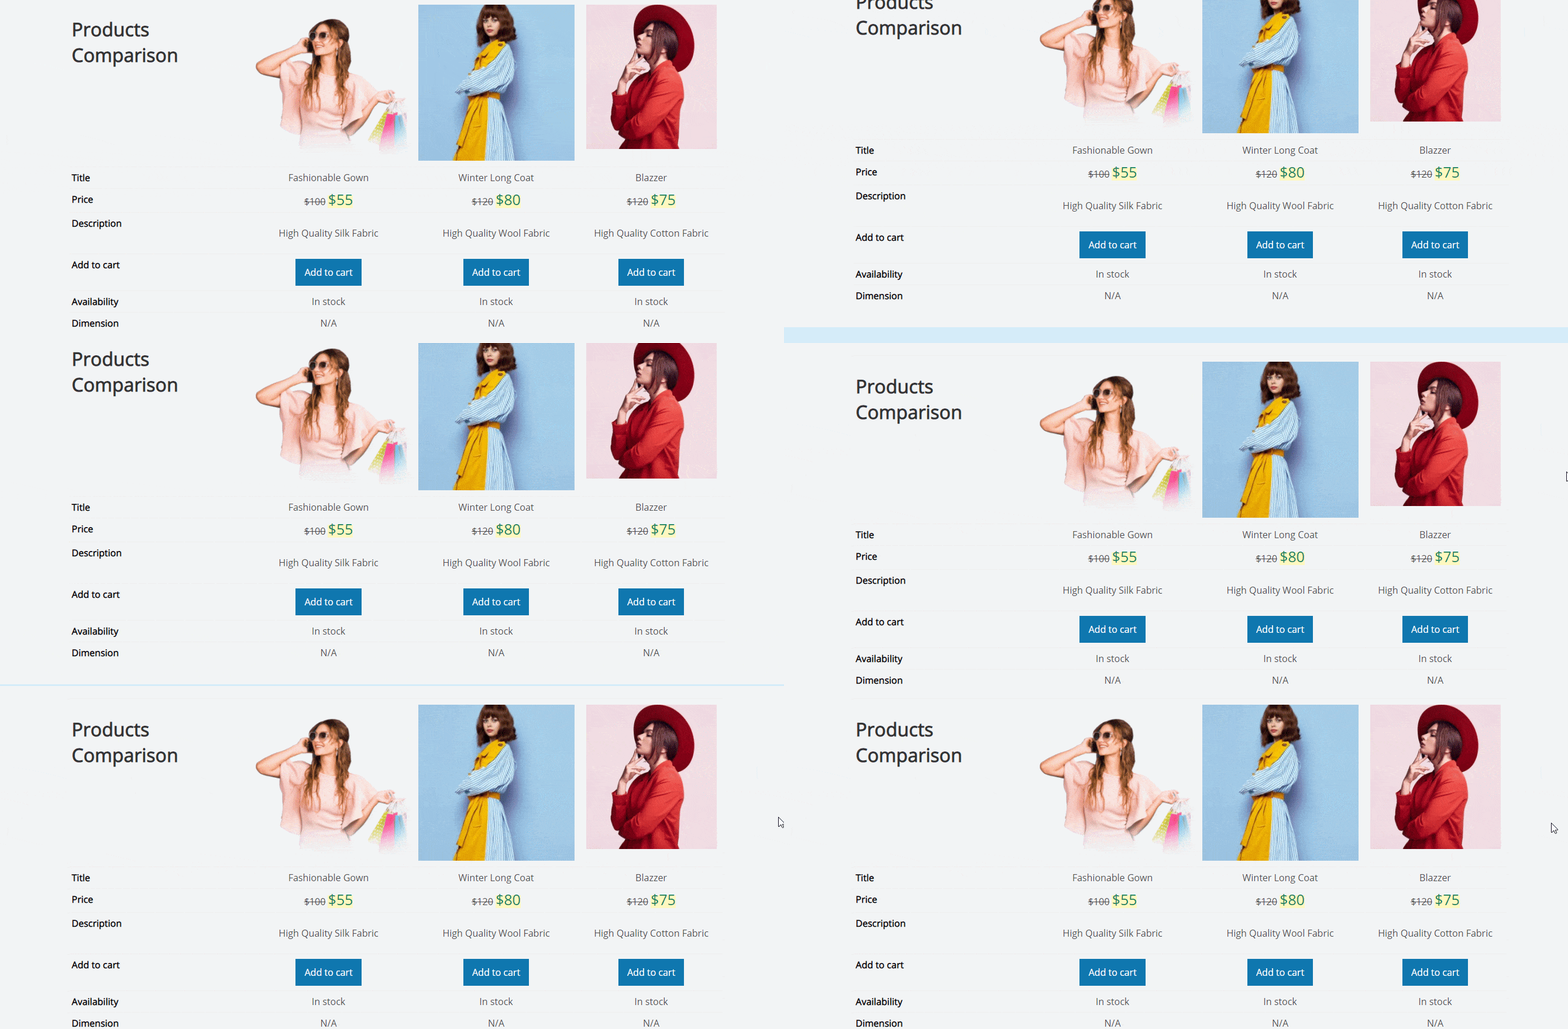
If you have similar types of products on your WooCommerce store, your customers may want to compare them to decide which one they want to purchase. But creating a product comparison within Elementor might be tricky, until now! Introducing EA WooCommerce Product Compare widget to let you create comparison without any coding.

WooCommerce Product Compare

With this advanced widget from Essential Addons for Elementor, you can instantly create attractive product comparison tables or charts for your WooCommerce store right from Elementor Page Builder.

Table of Contents

How Can You Improve User’s Shopping Experience With WooCommerce Product Compare?

Online shoppers often want to compare the prices and features of similar products because they want to purchase the one that is just right for them. Whether it’s a jewelry store or an online electronics store, customers will want to compare your products to decide which one is the best one for them. When they cannot figure out which specific product they should choose, your customers may feel frustrated and decide not to purchase at all. 

To prevent this from happening, you can improve your site visitor’s shopping experience by creating a product comparison table or chart for your WooCommerce store. And the easiest way to do this is by using Elementor.

Introducing EA WooCommerce Product Compare Widget

Essential Addons for Elementor has handful WooCommerce widgets to help you build your eCommerce store with ease using Elementor. From helping you design beautiful WooCommerce Checkout pages, to displaying your product collections, you can make a fully functional online shopping website without any coding by using Elementor and Essential Addons.

Now, with the introduction of EA WooCommerce Product Compare widget for Elementor, you don’t have to create an entire feature list or comparison table for your products manually. This advanced element from Essential Addons for Elementor lets you add three or more products at once, and style them just the way you want.

WooCommerce Product Compare

How To Use WooCommerce Product Compare In Elementor?

Using EA WooCommerce Product Compare element is very easy, especially if you are already familiar with Elementor page builder. All you have to do is drag and drop the element anywhere on your website, add your products and you are good to go. But before you can get started, you have to make sure you have all the essential things to use the EA WooCommerce Product Compare element.

Things You’ll Need:

👉 Elementor: This will seem obvious, but if you want to create a product comparison chart or table for your WooCommerce store without coding, you will need to make sure to install and activate Elementor on your website.

👉 WooCommerce: Since this tutorial is specifically for WooCommerce website, you have to make sure that you have the WooCommerce plugin for WordPress installed and, then set up your store following the on-screen instructions.

👉 Essential Addons for Elementor: EA WooCommerce Product Compare widget is an element from Essential Addons for Elementor, so you need to install and activate Essential Addons on your website. 

If you already have these essential plugins, then you are ready to get started. Follow the step-by-step instructions given below to find out how to use the EA Woo Product Compare widget in Elementor.

Step 1: Activate EA Woo Product Compare Widget In Elementor

The first thing you need to do is activate the WooCommerce Product Compare element. To do this, first head over to your WordPress dashboard and navigate to Essential Addons→ Elements as shown below. Scroll down the page and make sure that the ‘Woo Product Compare’ element is enabled. If it is not, simply toggle to enable the element and click on the ‘Save Settings’ button.

WooCommerce Product Compare

Once this step is complete, you can go back to the page where you want to display a product comparison table. When you edit the page with Elementor, look for the ‘Woo Product Compare’ element in the ‘ELEMENTS’ tab. Simply drag and drop the element anywhere on your page to activate it on your website.

WooCommerce Product Compare

Step 2: Modify The Content For WooCommerce Product Compare

Your product comparison table will not be visible right away, as you have to first choose which products you want to display with the Woo Product Compare element. You can do this by clicking on the ‘Product Compare’ option under the ‘Content’ tab. Here, you can type in the name of your WooCommerce products to add them to your product comparison table.

WooCommerce Product Compare

Next, you can choose the theme for your comparison table. This lets you decide the overall design of your comparison table, which you can style in more detail later on. At the moment, there are six ready made themes available with Woo Product Compare element. Among these, ‘Theme 3’ and ‘Theme 4’ comes with an option to highlight a specific product.

WooCommerce Product Compare

Once you have added the products you want to display on your product comparison table, you need to modify the content that you want to show on the table. You can do this easily with Woo Product Compare element. From the ‘Content’ tab, click on the ‘Compare Table Settings’ option. From here, you can change the title of your table as well as the title tag. 

In addition to this, you can also choose which features to display from the ‘Fields To Show’ settings. By default, Woo Product Compare element displays 11 different fields including ‘Image’, ‘Price’, ‘Title’, ‘Description’, ‘Add To Cart’, ‘Availability’,’ ‘Weight’, ‘Color’, and much more.

WooCommerce Product Compare

If you want to remove any field, just click on the ‘X’ icon next to the name field name. If you want to add a new field or feature, simply click on the ‘+ Add Item’ button as shown below. When you add a new field, you can choose the type of field and its label as well.

In addition to these, you also have the option to repeat certain fields that may be important for your store. For instance, you can choose to repeat the ‘Price’ field or ‘Add To Cart’ field near the end of your table as shown below. You can also choose to make your product images clickable so that your site visitors are redirected to the product details page when they click on the image.

Finally, you can also add icons to be displayed for each field. From the ‘Compare Table Settings’ option, there is an option for you to set an icon for your product fields.

WooCommerce Product Compare

Step 3: Customize Your WooCommerce Product Comparison Table

If you are done adding the content for your WooCommerce Product Compare widget, it’s time to customize it. You can style your product comparison table in any way you want with the Elementor Editor.

To do this, click on your Woo Product Compare element and then head over to the ‘Style’ tab. Here you will see tons of different options to customize your product comparison table. For instance, from the ‘Compare Table General’ section, you will have to get several options to style the table. You can change the margin, width, and padding, customize the background colors, and much more.

WooCommerce Product Compare

Similarly, from the ‘Table Style’ section, you have the flexibility to customize each and every aspect of your product comparison table. You can even choose to customize the content column separately by toggling to enable the ‘Style Content Column Separately’ option. You can customize header columns, product columns, table title styles, field icons, price styles, and much more using the Woo Product Compare element. 

Make sure to check out our detailed documentation on Woo Product Compare element here to find out more information about how to customize your product comparison table.

WooCommerce Product Compare

Finally, when you are done, this is how your product comparison table will be displayed for your WooCommerce store.

WooCommerce Product Compare

As you can see, it’s quite easy to create a product comparison table with the help of the WooCommerce Product Compare element from Essential Addons for Elementor. Now, you can improve your site visitor’s shopping experience on your WooCommerce website and help them make a purchase decision more quickly with this useful widget. 

Try it out for yourself today, and share your thoughts with us. We’d love to know your feedback and enhance your page building experience with Elementor. If you face any issues or have any questions, you can reach out to our support team or join our friendly Facebook Community for further assistance.

Bonus: Grab FREE WooCommerce Templates For Elementor

Want to create stunning WooCommerce websites in Elementor without any coding? Then head over to Templately and check out these stunning ready Elementor template packs for WooCommerce.

Christmas Landing Page

How To Create Stunning Christmas Landing Page in WordPress [FREE Elementor Template]

As Christmas is knocking on your door, this is the time to spend the holidays with friends and families, exchange gifts and merry greetings. If you are running any eCommerce businesses, then this is the perfect time to create a stunning Christmas landing page for your customers and let them know about your exclusive Christmas offers.

Christmas Landing Page

Every business owner wants to  boost their sales before the end of the year, and Christmas Eve is one of the best occasions to do it. Creating a stunning, Christmas landing page can help you to grab your customers’ interest right away. You can highlight your special offers, latest products, featured deals, Christmas discounts, and more in one organized place. 

Read till the end to find out how you can design an eye-catching and interactive Christmas landing page in WordPress.

We will also show you how you can use and get access to free Elementor templates to create your Christmas landing page. Let’s get started!

Table of Contents

5 Reason Why You Should Create A Christmas Landing Page On WordPress

Christmas comes with lots of offers, discounts, and provides the biggest sales of the year. During this time almost every business can earn huge revenues by selling products and services. In fact, according to research from Deloitte Insights, 27% of holiday shoppers are expected to spend an average of $1,652 this year, despite concerns about the spread of COVID-19.  Most of these shoppers are excited to purchase clothing, accessories, toys, electronics and other kinds of products that can be given as Christmas presents.

Christmas Landing Page

As you can see, there is a huge opportunity for you to boost your sales this Christmas. So you should definitely create a Christmas landing page on WordPress. Here are some ways that a Christmas page can help you get more sales during this holiday shopping season. 

👉 To get your site visitors excited about Christmas shopping, you can create a festive spirit on your website using cute Christmas illustrations, animated snowfall effect and much more. There is no need to waste time giving your whole website a complete makeover; you can just create a single landing page for displaying your Christmas offers and redirect your visitors there. 

Christmas Landing Page

👉 If you want to give sales on specific products only at Christmas, you can display them separately on the landing page. 

👉 To run Christmas promotions and campaigns, it’s easier to display what you are offering on a single landing page. By only sharing the landing page URL, your customers can get a glance at your offers, and discounts. 

👉 Ecommerce growth increases by almost 63% during Christmas holiday sales. So, you can easily measure your eCommerce site’s performance, with a separate landing page.

How To Get Stunning, Free Ready Christmas Landing Page Templates For Elementor

There are tons of resources out there where you can find beautifully designed Christmas landing page templates for WordPress. If you are a fan of the most beloved drag-and-drop page builder Elementor, then you can check out Templately, the ultimate templates cloud for Elementor and WordPress.

Christmas Landing Page

With Templately, you can get access to more than 900 ready Elementor templates to build any kind of website without coding, and an amazing cloud collaboration feature that lets you instantly save and share your design with your team to build websites faster than ever.

Christmas Landing Page

If you want access to a beautifully designed, free, ready Elementor template for creating your Christmas page, then you should definitely check out the ChristmasLy template pack from Templately.

This template pack is designed to display special Christmas sales, offers and discounts, in an eye-catching way to instantly grab your potential buyer’s interest. It features an interactive layout, stunning Call To Action buttons, animated snowfall effect and is perfect for creating a festive, Christmas vibe on your website.

With this ChristmasLy ready Elementor template pack, you will get two different styles of landing page templates. You can use any of them depending on what kind of business you are running. 

Landing Page Style #1

The first landing page style for ChristmasLy has a clean, modern, and responsive design. It is more flexible and versatile. You can display all your products and offers with a stunning gallery, boost your engagement rates with Call To Action buttons, and use an animated countdown timer to create urgency about your Christmas offers.

Landing Page Style #2

This second version of ChristmasLy landing page template features a special section where you can beautifully display and highlight your Christmas sales offers and products. This landing page style is also very attractive, and can be used by any kind of online business.

Another stunning free, ready Christmas template from Templately is Jingles. This beautiful template also features attractive Call To Action buttons, animated countdown timers, snowfall effects and is completely compatible with WooCommerce, one of the most popular eCommerce solutions for WordPress.

Things You Need To Create A Christmas Landing Page With Ready Elementor Templates

To create your Christmas landing page in WordPress, you will need to install some essential plugins on your WordPress website. These are:

✔️ Elementor: Elementor page builder helps you to create beautiful landing pages without any coding. So you should install and activate it on your website if you want to create your Christmas page quickly on WordPress.

✔️ Essential Addons For Elementor:  This is the largest and one of the most popular elements library for Elementor. It has more than 70+ cool widgets and is beloved by more than 800,000 happy users. Make sure to install and activate Essential Addons on your website to get an enhanced page building experience with Elementor.

✔️ Templately: Since both Jingles and ChristmasLy are only available with Templately, you need to  first sign up for a free account and install the Templately WordPress plugin to use these templates on your website.

Step By Step Guide: How To Create A Christmas Landing Page On WordPress

If you have installed and activated the essential plugins listed above, it’s time to start creating your Christmas landing page. You can use any of these beautiful templates mentioned here.

In this tutorial, we will be using ChristmasLy.

Step 1: Select ‘ChristmasLy’ Ready Template From Templately

First, go to your WordPress dashboard and create a new page by navigating to Pages–> Add New. Afterwards, click on the blue ‘Edit with Elementor’  button to design your landing page with Elementor Editor.


Christmas Landing Page

Once the Elementor Editor is done loading, click on the blue ‘Templately’ icon as shown below. It will take you to Templately’s template library where you can see tons of ready Elementor templates. Enter ‘Christmas’ in the search box to find the Christmas templates available in Templately.

How To Create Stunning Christmas Landing Page in WordPress [FREE Elementor Template] 45

Choose the template you want to use and click on the ‘Insert’ button. Once the template is done loading, this is how it will appear on your website.

For this tutorial, we are using ChristmasLy Landing Page Version #2.

Step 2: Customize Your Template Design

Now the fun part begins. Using the Elementor Editor, you can  customize each and every part of this Christmas template in any way you want.

Change the font styles, colors, button styles and more to make your Christmas landing page unique and add your personal touch to it.

How To Create Stunning Christmas Landing Page in WordPress [FREE Elementor Template] 46

Step 3: Save Your Christmas Template Design On Cloud

If you are done with all your editing and customization, hit the ‘Preview’ button to see how it would when your page is live. If you are happy with the results,  you can save your Christmas template design on MyCloud, which is Templately’s own cloud storage. Just right click anywhere on your page and select the ‘Save To Templately’ option as shown below. If you want, you can also save any block by choosing the ‘Save Block In Templately’ option.

Christmas Landing Page

You can also share your work with team using Templately WorkSpace, a cloud collaboration feature from Templately. Read this guide here to find out more about how it works.

Final Outcome: Have A Look At Your Stunning Christmas Landing Page

If you are done customizing your Christmas template, then congratulations! Your Christmas landing page is now ready to be shared with the world. Click on the ‘Publish’ button and check out your beautiful Christmas page on WordPress. 

Christmas Landing Page

That brings us to the end of this tutorial. As you can see, you don’t need to spend a fortune or hire professional web designers to create your Christmas landing page on WordPress. You can do it all by yourself with a single click using the ready Elementor templates from Templately.

Let us know what you think in the comments below. For more fun tutorials, tips and tricks, updates and more, subscribe to our blog or join our friendly Facebook Community.

Halloween Website

How To Create A Spooky Halloween Website With 1 Click Using Elementor Ready Template [Freebies]

Halloween Website

This year on All Hallow’s Eve, get ready to create a spooky Halloween website without having to spend a fortune or touch a line of code. After all, Halloween is one of the most festive celebrations of the year. In fact, research shows that more than 35% of customers perform online searches for Halloween costumes, decorations and entertainment. So this makes it the perfect occasion for creating a Halloween website and offering special sales promotions from your business. Let’s find out how you can create your Halloween website with a single click!

Table of Contents

4 Tips For Creating A Terrifying Halloween Website

No matter what kind of business you are running, you can always take part in the spooky spirit and boost up sales on Halloween. For example, if you own a restaurant, then you can offer special Halloween themed food. If you are running an online clothing store, then you can drive sales with special Halloween costumes. Similarly, if you are running an event organizing business, then you can host Halloween parties.

But how will your customers know what you are offering on Halloween? The best way to do this is by creating a Halloween website or page. Since customers spend a lot of time researching online to find the best Halloween deals, creating a website can help them find your products easily. 

To do that though, you need to make sure that your Halloween website immediately grabs their attention. Here are some tips to help you.

Create A Killer Landing Page

Halloween Website

Your landing page is the first page that your visitor will see when they click anywhere on your website. Unlike a home page, which is used to help visitors explore your website, landing pages are used for specific campaigns or offers. That’s why it is important to create an attractive landing page for your Halloween website.

Serve Up Frightening Fonts 

If you want to add a spooky touch to your Halloween website, then change the typography and add Halloween themed fonts. But don’t use special spooky fonts everywhere; your website will actually look better if you pair Halloween themed fonts with regular fonts. After all, nothing is scarier than having customers complain that they cannot read your website content.

For example, you can use fonts like Creepster for your headers, and for the body text you can use a simple font like Open Sans. This type of pairing will make your website content easy to read. 

Use Haunting ‘Call To Action’ Buttons

How To Create A Spooky Halloween Website With 1 Click Using Elementor Ready Template [Freebies] 47

Getting your visitors to make a purchase, or take any kind of action, can be done easily with eye-catching Call To Action buttons. You can use traditional Halloween colors like orange or purple to make your Call To Action buttons pop out. You can use these buttons to influence your visitors to subscribe to your newsletter, submit forms, purchase products or visit other pages. 

Add A Terrifying ‘Team Members’ Section

When purchasing online, customers often want to know a little more about the people in your business. So, you can add a Halloween themed ‘Team Members’ section to your website to help your customers get to know more about your business.

How To Create A Spooky Halloween Website With 1 Click Using Elementor Ready Template [Freebies] 48

Best Elementor Ready Templates For Your Halloween Website

Now that you know what makes a good Halloween website, you might be wondering how you can start creating your website without coding or hiring professional website designers. Don’t worry, with the help of the pagebuilder Elementor, you can instantly create beautiful websites on WordPress. All you have to do is use the ‘drag and drop’ editor to place widgets on your page and then customize it to your preference.

For the best Elementor experience, you can also use Essential Addons For Elementor. This is the most popular Elementor addon with over 1 million happy users and more than 70 amazing widgets. 

Using Elementor ready templates, you can create your Halloween website with a single click. You can find some amazing, fun Halloween templates for Elementor on Templately. This is one of the best template libraries for Elementor with over 1500+ free and premium templates. You can also get access to bonus features like seamless cloud collaboration and cloud storage.

Let’s take a look at the Halloween template pack for Elementor from Templately. This template pack comes with 3 different styles of Halloween landing pages as shown below.

Landing Page #1: Monster Mash Halloween Template For Elementor

With the Monster Mash template, you can create a stunning Halloween website in Elementor instantly. This template features dark colors, gorgeous illustrations and attractive Call To Action buttons. If you want to go for a dark Halloween themed website, then this template is the perfect one for you.

Landing Page #2: Wickedly Elementor Template For Halloween

If you want to go for a template with a lighter color scheme while keeping the Halloween theme, then you can try the Wickedly Elementor ready template from Templately. This template is bright, colorful and has a very festive appearance.

Landing Page #3: ScareScream Halloween Website Template 

Are you a fan of haunted houses and creepy spiders? Then you can try the ScareScream Elementor ready template to create your Halloween website. This one comes with animated countdowns, horrifying illustrations and much more.

Watch The Video Tutorial

How To Create A Halloween Website With 1 Click

To start using these Halloween templates, make sure you have signed up for an account on Templately and installed both Elementor and Essential Addons on your WordPress website. Once that’s done, you are ready to get started. Just follow the steps given below to create your Halloween website instantly with Elementor and Templately.

Step 1: Insert Halloween Website Template

First, create a new page in your WordPress dashboard by navigating to Pages→ Add New. Once your page has been created, click on the Edit With Elementor button at the  top. This will load the Elementor Editor for you.

Halloween Website

Once the Elementor Editor is done loading, all you have to do is click on the blue Templately icon. You should see a pop-up window open up from where you can search for the Halloween website templates. Choose any of the one of the templates you like and simply insert them into your site.

How To Create A Spooky Halloween Website With 1 Click Using Elementor Ready Template [Freebies] 50

For this tutorial, we are going to use the Monster Mash template. When the page template is inserted, this is how it will show up in your website.

Halloween Website

Keep adding more pages until you are happy with your content marketing agency website. Once you are done adding the pages you want, it’s time to add your personal touch.

Step 2: Customize Your Halloween Website Template

If you want to, you can customize your Halloween page template in any way you want. To do this, simply use the Elementor Editor on your left hand side and play around the options in the ‘Content’ and ‘Style’ tabs. Change the colors, images, typography and more until you are happy with the look.

Halloween Website

You can also choose to keep the default style of the template and just add your own content. When you are done making any change, remember to click on the ‘Save Draft’ button to save your changes.

Step 3: Preview Your Halloween Website

When you are happy with your Halloween website, you can save design on Templately’s cloud storage. This way, you will have a backup of your website design and can reuse them again next year. Just right click on anywhere on the page and click on ‘Save Page To Templately’ if you want to save your Halloween website design on MyCloud.

How To Create A Spooky Halloween Website With 1 Click Using Elementor Ready Template [Freebies] 51

With these three easy steps, you have created your own spooky Halloween website in less than 5 minutes. Great job!

Plan Your Halloween Marketing Campaigns

Now that you are done creating your Halloween website, it’s time for you to plan your Halloween promotional campaigns. Here are some great marketing campaign ideas to help you get started.

Give Your Products A Spooky Touch

It’s surprisingly easy to change your product styles to match a particular theme. As we mentioned earlier, restaurant owners can add Halloween themed food. Clothing stores can offer Halloween special costumes. The possibilities are endless. Just do a bit of research, and try to come up with creative ways to add a spooky touch to your products.

Halloween Website

Run Terrific Contests On Your Halloween Website

Besides offering Halloween themed products, you can also run special contests or giveaways on your Halloween website. For example, you can host a pumpkin carving contest or even a costume contest on your website by asking participants to share pictures and videos.

If you want, you can also host a spin the wheel contest where your visitors can try their luck to win prizes. This can be a great way to get traffic to your website and boost your engagement as well. Check out this Halloween special prize wheel template from EasyPromos for ideas.

Halloween Website

Host Online Trick-Or-Treat Events And Scavenger Hunts

Online trick-or-treat events or scavenger hunts can be super fun and allow your site visitors to participate in the festivities from the comfort of their home. If you want, you can host a similar online trick-or-treat game, or a scavenger hunt game on your Halloween website. Your site visitors will enjoy a fun, festive experience while browsing your website, and you will be able to increase your engagement rates.

For ideas, check out how the chocolates giant Mars Wrigley is hosting a virtual trick-or-treat event.

Halloween Website

Spread The Word On Social Media

Social media platforms are a great way to turn your Halloween campaigns into engagement and interaction with customers. Ask your customers to share their favorite Halloween stories, costumes and more. Customers love communicating with brands, and celebrating spooky spirit on Halloween is the perfect way to engage them.

Halloween Website

Use Halloween Templates For Email Marketing

Email marketing is an essential strategy for any promotional offer. Thankfully, there are tons of fun, spooky Halloween templates available that you can use for sending emails to your customers. Here are some Halloween templates for email marketing from Moosend templates library to inspire you. 

This brings us to the end of today’s tutorial. Let us know your thoughts in the comments below, and don’t forget to subscribe to our blog for more fun updates, news and tutorials. Or, share your Halloween website design with us by joining our Facebook Community.

Duplicate Elementor Post Page

How To Duplicate Elementor Post, Page, Or Template

No matter what kind of website you are running, you may occasionally feel the need to duplicate Elementor post, page or template. Perhaps you have created a page that has many important content that you need to reuse for different pages on your website. Or maybe you want to improve and expand on an existing post on your website. Instead of painstakingly copying and pasting each content, you could duplicate them. 

Duplicate Elementor Post Page

Today, we are going to show you how to duplicate Elementor post, page or template with just a few clicks. Keep reading if you want to save yourself time and effort copying posts and pages for your website.

Table of Contents

Reasons Why You Want To Duplicate An Elementor Post, Page & Template

At a glance, having the option to duplicate an Elementor post and page may not seem too important. But, when you have a lot of content that you often need to re-use, you will eventually feel frustrated copying and pasting the same thing over and over again. Here are 3 reasons why you might want to duplicate an Elementor  post, page or template.

✔️ You Can Instantly Use The Same Post Or Page Layout: Most websites use a consistent look and feel throughout their site. This involves using the same layout, colors and font styles for each post or page. You can do this easily by duplicating Elementor posts or pages to use the same layout everywhere.
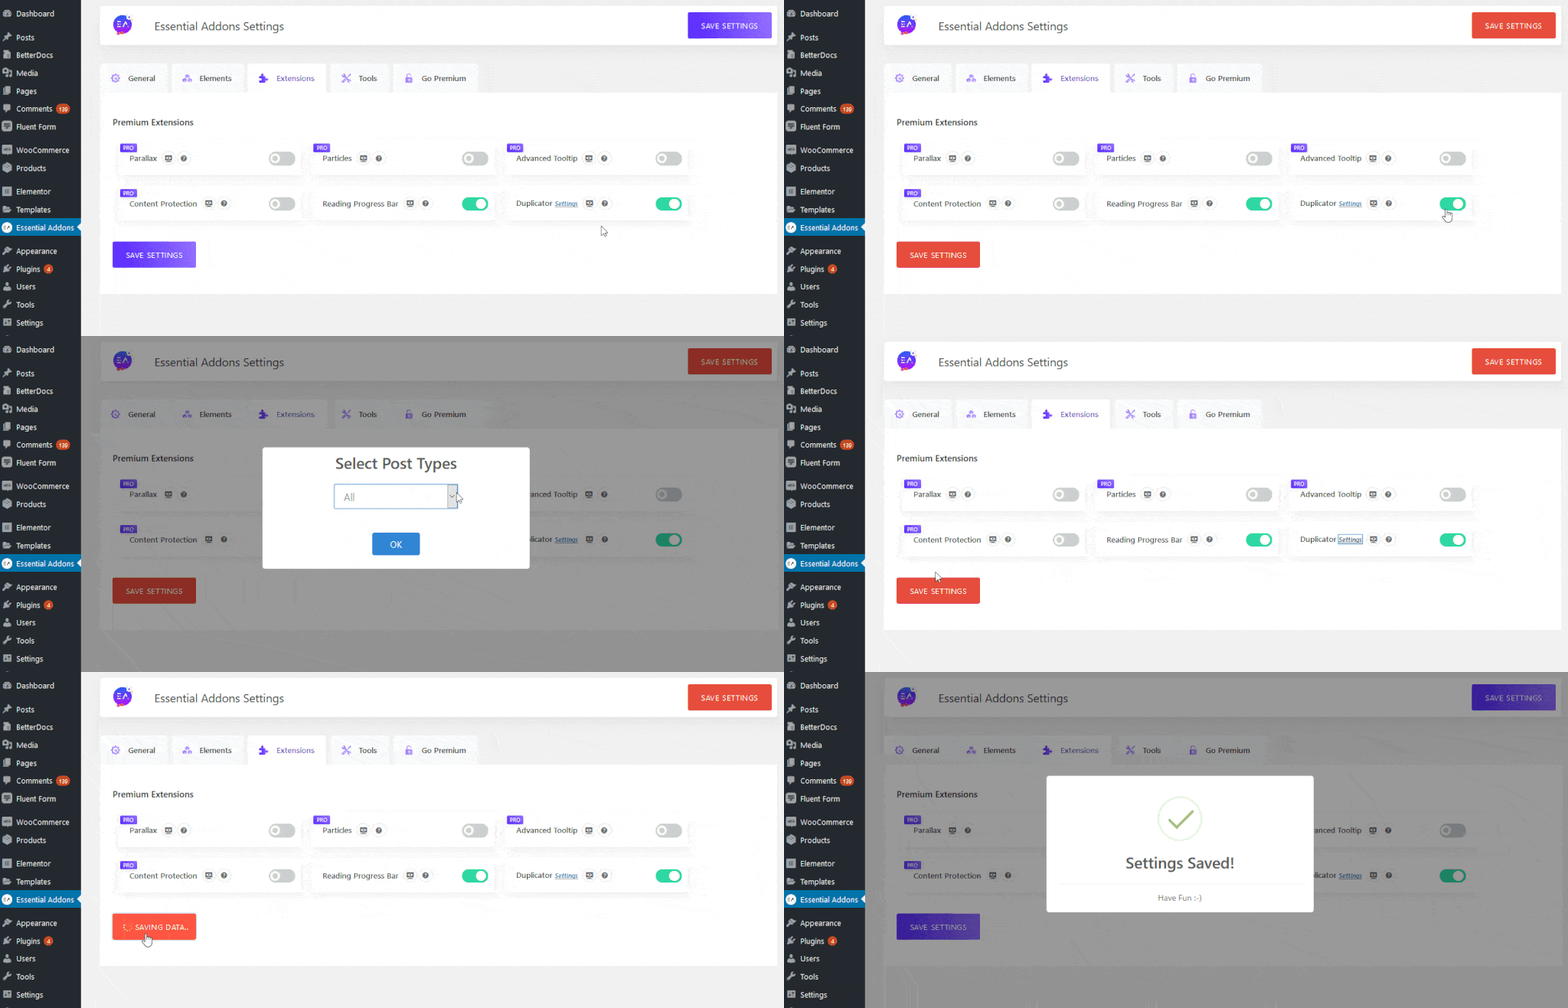
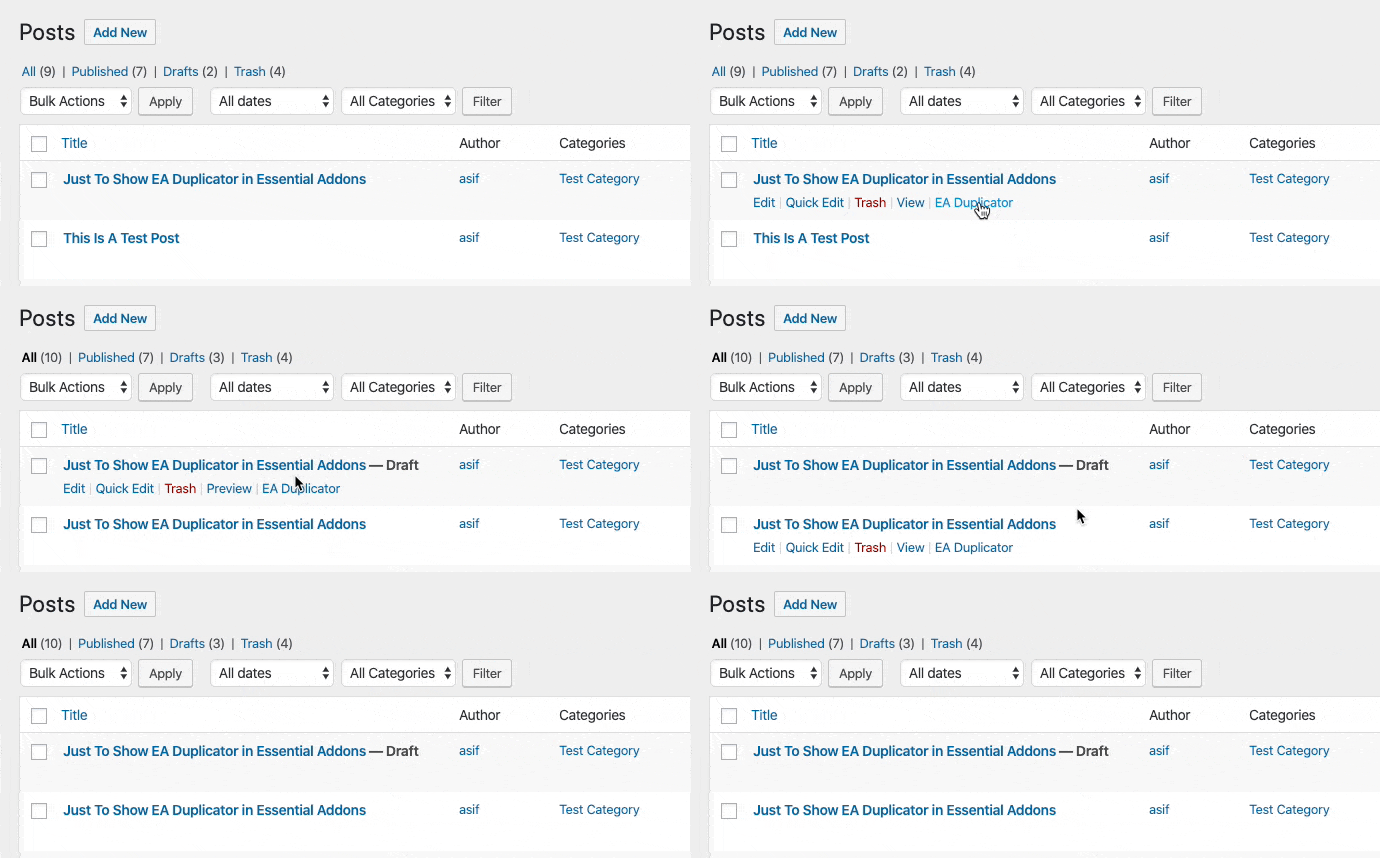
✔️ You Can Create A Backup Of Your Elementor Posts: If you want to create a backup of a particular post or page, then being able to duplicate your content quickly can come in handy. This way, you will be able to keep backups for particular, individual Elementor posts or pages.

✔️ You Can Get All The Settings: With an easy option to duplicate an Elementor post, you will be able to copy SEO, images, meta data and more. You will get an exact copy of all of these content with just a single click. 

How To Duplicate Elementor Posts Or Pages Instantly

Now let’s find out how you can duplicate an Elementor post or page instantly. There are several WordPress plugins designed to help you do this, such as the Yoast Duplicate Post. But, in this post, we are going to use Essential Addons for Elementor. Why? Because with Essential Addons, you can duplicate your Elementor posts with a single click. You also get access to 70+ amazing widgets to enhance your Elementor experience. 

So, to get started with this tutorial, install and activate Essential Addons for Elementor on your website. Then, follow these simple steps below to duplicate an Elementor post or page instantly.

Step 1: Enable The EA Duplicator Extension In Elementor

To duplicate an Elementor post or page, you will need to enable the EA Duplicator extension first. From your WordPress dashboard, head over to Essential Addons→ Extensions. Look for the Duplicator extension and toggle to enable it. You can click on the ‘Settings’ option to choose which Elementor post type you want to duplicate.

duplicate an Elementor post

Step 2: Duplicate Any Post Or Page With EA Duplicator

Once the above step is complete, head over to any posts or pages that you have edited with Elementor Editor. When you hover your cursor over the titles, you should see an option called ‘EA Duplicator’. Now all you have to do is click on that option. Your Elementor posts or pages will be instantly duplicated. You will get an exact clone including all media files, tags, categories, SEO and more

How To Duplicate Elementor Post, Page, Or Template 52

Just like that, you have duplicated an Elementor post using the EA Duplicator extension. Wasn’t that easy?.

Watch The Video Tutorial Here

How To Duplicate Elementor Templates In Less Than 5 Minutes

You can duplicate any Elementor template in less than 5 minutes. For example, if you have created a single page template in Elementor, you get the option to ‘Save as Template’ when editing with Elementor. You can click on this option to instantly save an exact copy of your Elementor template and reuse it later.

duplicate an Elementor post

You can also duplicate any section in Elementor by right clicking on any section and clicking on ‘Duplicate’ from the list of options

duplicate an Elementor post

Want to duplicate Elementor templates and then easily share them with your team for collaboration? Then you can try Templately. This is a templates library for Elementor that comes with beautifully designed template packs, a cloud storage feature known as MyCloud and cloud collaboration known as Templately WorkSpace.

With Templately, you can duplicate any Elementor templates by right clicking on the page and choosing ‘Save to Templately’ from the list of options. This will save a copy of your Elementor Template on MyCloud.

How To Duplicate Elementor Post, Page, Or Template 53

You can later share your duplicated Elementor template with your team using Templately WorkSpace and enjoy seamless cloud collaboration.

Now you have learned how to duplicate an Elementor post, page or template with just a few clicks. We hope you have found this tutorial helpful and easy to follow. Try out the EA Duplicator from Essential Addons and get access to 70+ elements to design webpages in Elementor. 

For any difficulties, feel free to contact our support team. Don’t forget to join our Facebook community to connect with other Elementor enthusiasts as well.

Wait… Before You Leave

Enter 2025 with BIG savings & a boost to your business.

  • 00Days
  • 00Hours
  • 00Mins
  • 00Secs