You built a section you are proud of. Six feature cards, each one with an icon, a heading, a short paragraph and a button. On desktop, it looks fine. Then you scroll on mobile and it turns into a wall. Six cards stacked one after another, and a visitor has to scroll past all of them to reach the next part of the page.
So you start looking for a fix. Maybe a slider widget, so the cards move sideways instead of down. But the slider widgets you find want a specific kind of content. One takes only images. One takes only testimonials. None of them takes the exact section you already designed.
That is the gap the EA Advanced Slider extension was built to close. It lets you turn Elementor sections into a slider by flipping a single toggle. No rebuilding. No shortcodes. No custom JavaScript to write.
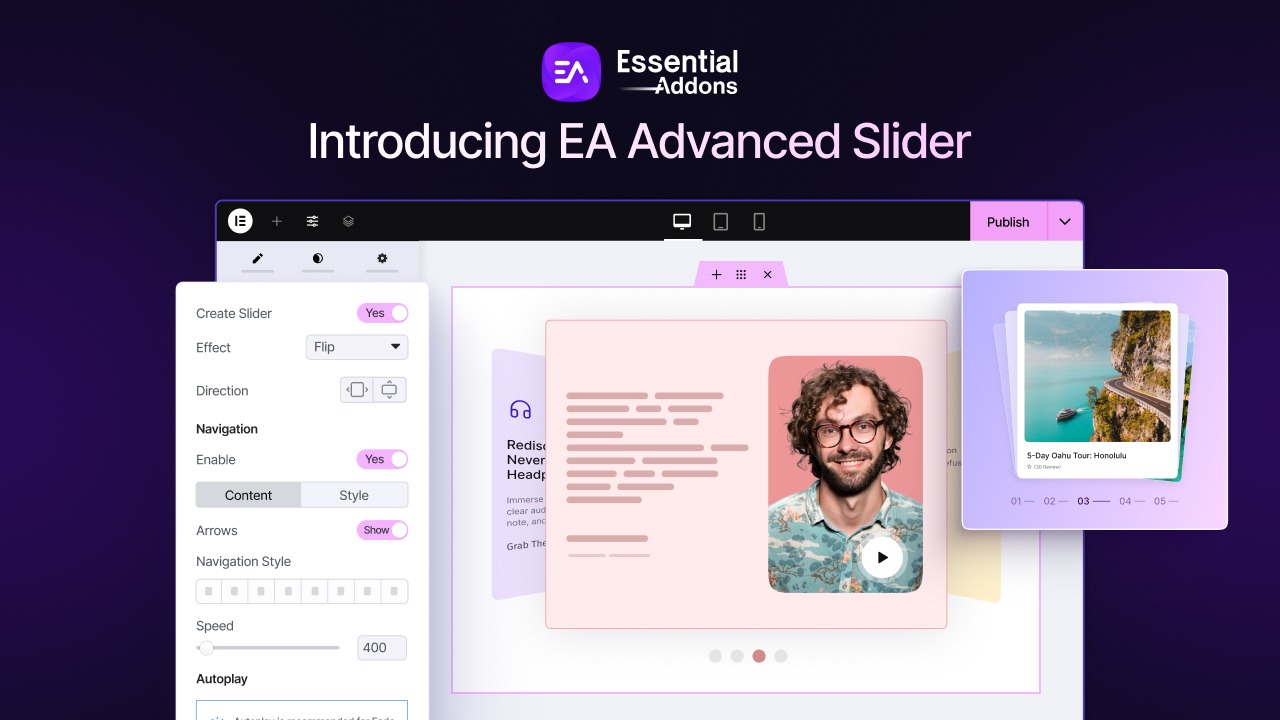
What Essential Addons Advanced Slider Actually Is
This is the part worth slowing down for, because Advanced Slider does not work the way most slider tools do.
Most sliders are widgets. You drag a slider widget onto the canvas, and then you fill it using the settings panel of that widget. You get a repeater field, you add slide one, slide two, slide three, and you style them inside a small settings area. The widget owns the content, and the widget decides what kind of content is allowed.
Advanced Slider is not a widget. It is an extension that attaches to a container.
Here is the mental model:
- You have a parent container.
- Inside that parent, you have child containers. Maybe three, maybe eight.
- You turn Advanced Slider on for the parent.
- Every direct child container becomes a slide.
That is the whole concept. The parent becomes the slider frame, and the children become the slides.
Why does that matter? Because a child container can hold anything Elementor can hold. A heading. An icon box. A form. A video. A pricing table. A star rating. A countdown timer. More than one widget stacked together with a background image behind them. If you can build it in Elementor, it can be a slide.
You are not filling in a slider. You are designing normally, and then telling a section you already built to behave like a slider.
You can also do it the other way around. Take any section that’s already on your site, select the parent container, and turn on the slider option. Instantly, it becomes a slider—without rebuilding the design, changing the layout, or moving it into a separate slider editor.
Note: Advanced Slider currently works with Flexbox containers, which is the default container type in current versions of Elementor. Grid container support is on the way.
Where a Widget Ends And This Extension Begins
Essential Addons already ships plenty of sliders and carousels. There is a Testimonial Slider. There is a Pricing Slider. There are Post Carousel and Logo Carousel. So it would not be honest to say that sliders only handle images, because that is not true, and it is not true of our own widgets either.
The real limitation is narrower and more specific than that: a purpose-built widget is shaped around one type of content.
A testimonial slider expects a quote, a name, a role and a photo. That is exactly what makes it good. You get a clean interface, sensible defaults and a layout that is already designed for testimonials. If you are building testimonials, use the Testimonial Slider. It will be faster and better than building it yourself.
The problem appears when your content does not match any of those shapes.
- A three-step onboarding flow where each step has a video, a checklist and a button.
- A comparison block where each slide holds a full pricing table plus a custom badge.
- A story section where each slide is a different background image with text placed in a different position.
- A case study block where each slide has a client logo, three metric counters and a link.
None of those fit neatly into an existing widget. Before, the answer was to build it vertically and accept the long scroll, or to write custom code. Advanced Slider gives you a third answer.
So the way to think about it is:
| Situation | Best tool |
| Content matches a known pattern (testimonials, logos, posts, products) | Use the dedicated EA widget |
| Content is custom, mixed or unique to this page | Use Advanced Slider on the container |
| You already built the section and just want it to scroll sideways | Use Advanced Slider on the container |
However, plenty of dedicated slider plugins are excellent, and if you need advanced slide level animation timelines or a slide library shared across many sites, a specialist tool may be the right call. The argument is about workflow. And speaking about enhancing workflow, you can rely on Essential Addons for Elementor (a solution used by 2million+ users).
If Essential Addons is already installed on the site, Advanced Slider means you stay inside the Elementor canvas, you use the same style controls you already know, and you do not have to learn a second interface or manage a second set of settings for one section of one page.
What You Get in Essential Addons Advanced Slider
The moment you enable Advanced Slider, your static container becomes an interactive slider—without disrupting your design or your workflow. No extra widgets. No separate slider builder. No need to recreate sections from scratch.
Everything stays exactly where you built it. The only difference is that your container now comes with a powerful set of slider controls.
This means you can focus on fine-tuning how your content behaves rather than rebuilding it. Want smooth transitions? Easy navigation? Autoplay? Responsive settings? They’re all just a few clicks away.
Here is what you get with Advanced Slider:
1. Five Slide Effects for Smooth Transitions
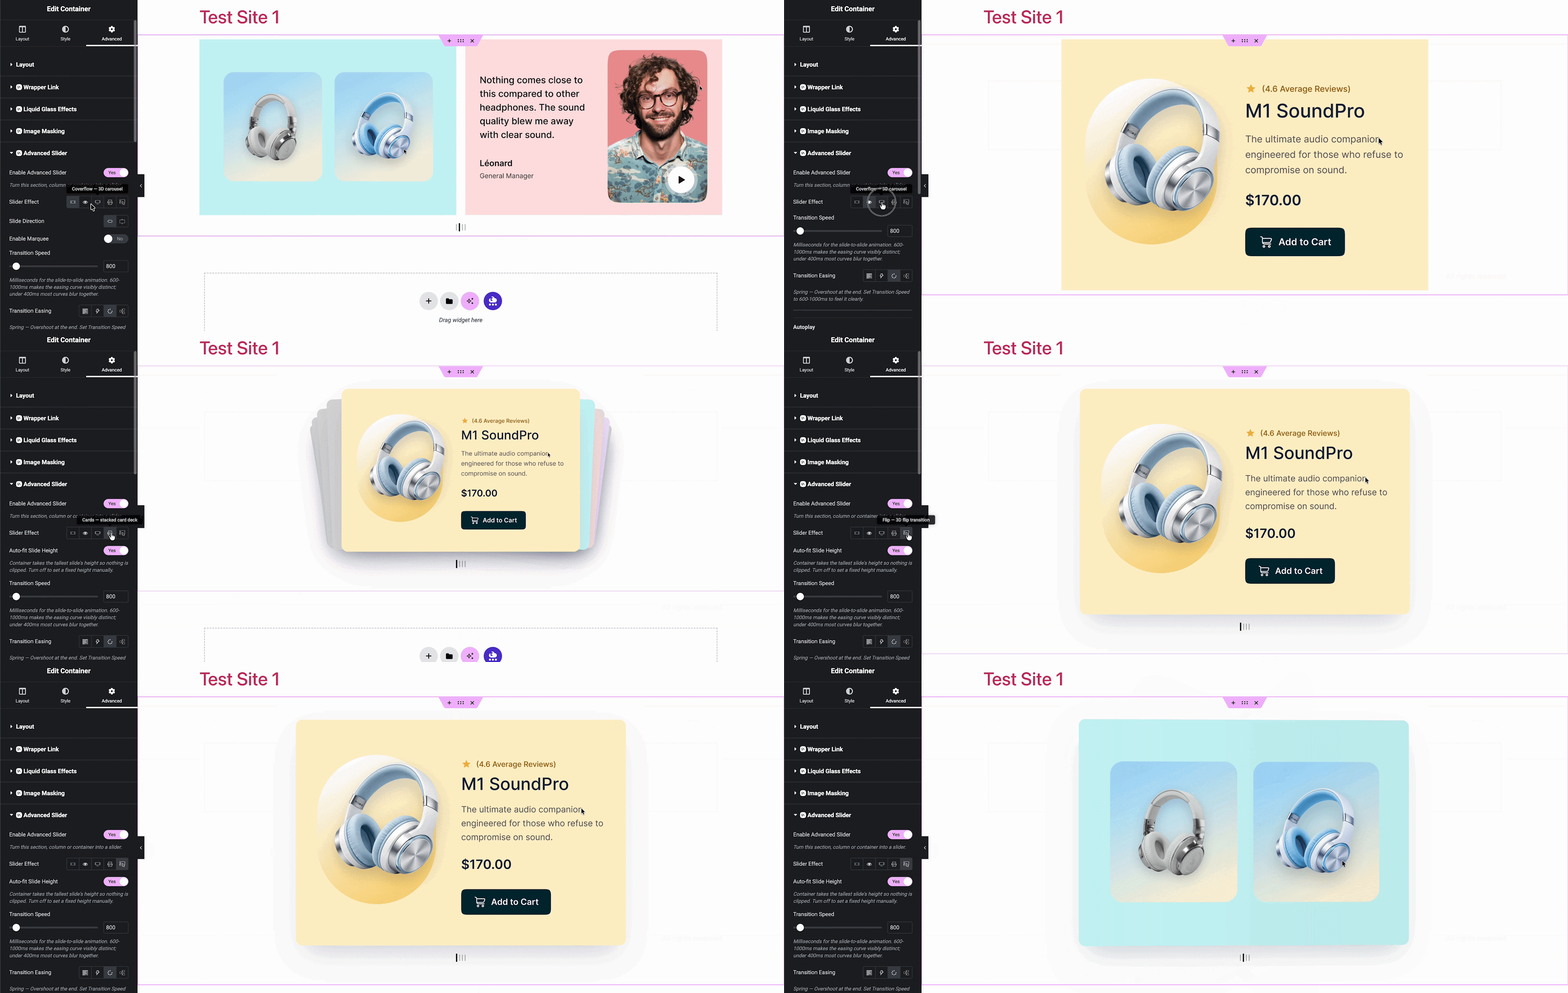
Choose from five built-in slide effects to create the right experience for your visitors. If you prefer a clean, familiar transition, Slide and Fade are perfect for hero banners, promotional sections, and business websites. Looking for something more dynamic?
Coverflow adds a three-dimensional carousel effect that naturally draws attention, while Cards creates a layered, stacked appearance that works beautifully for portfolios, testimonials, and featured content.
For a more dramatic interaction, Flip rotates each slide like turning a card, making it ideal for highlighting a single key message or focal section without overwhelming the rest of the page.
2. Motion Controls for a More Immersive Experience
A great slider is not just about how it looks; it is about how it moves. Essential Addons Advanced Slider gives you precise control over every transition, helping you create anything from subtle, elegant animations to bold, eye-catching effects.
- Rotation and Depth to fine-tune how strong the three-dimensional effects feel.
- Stretch to add breathing room or deliberate overlap between slides.
- Transition Speed and Easing so the movement matches the rest of the motion on your site.
- Items Per Slide and Items Gap to control how many slides are visible at once and how far apart they sit.
Items Per Slide is the setting people may overlook. Set it to three on desktop, two on tablet and one on mobile, and a six card feature row stops being a scrolling wall on phones without any change to the design.
3. Height Handling
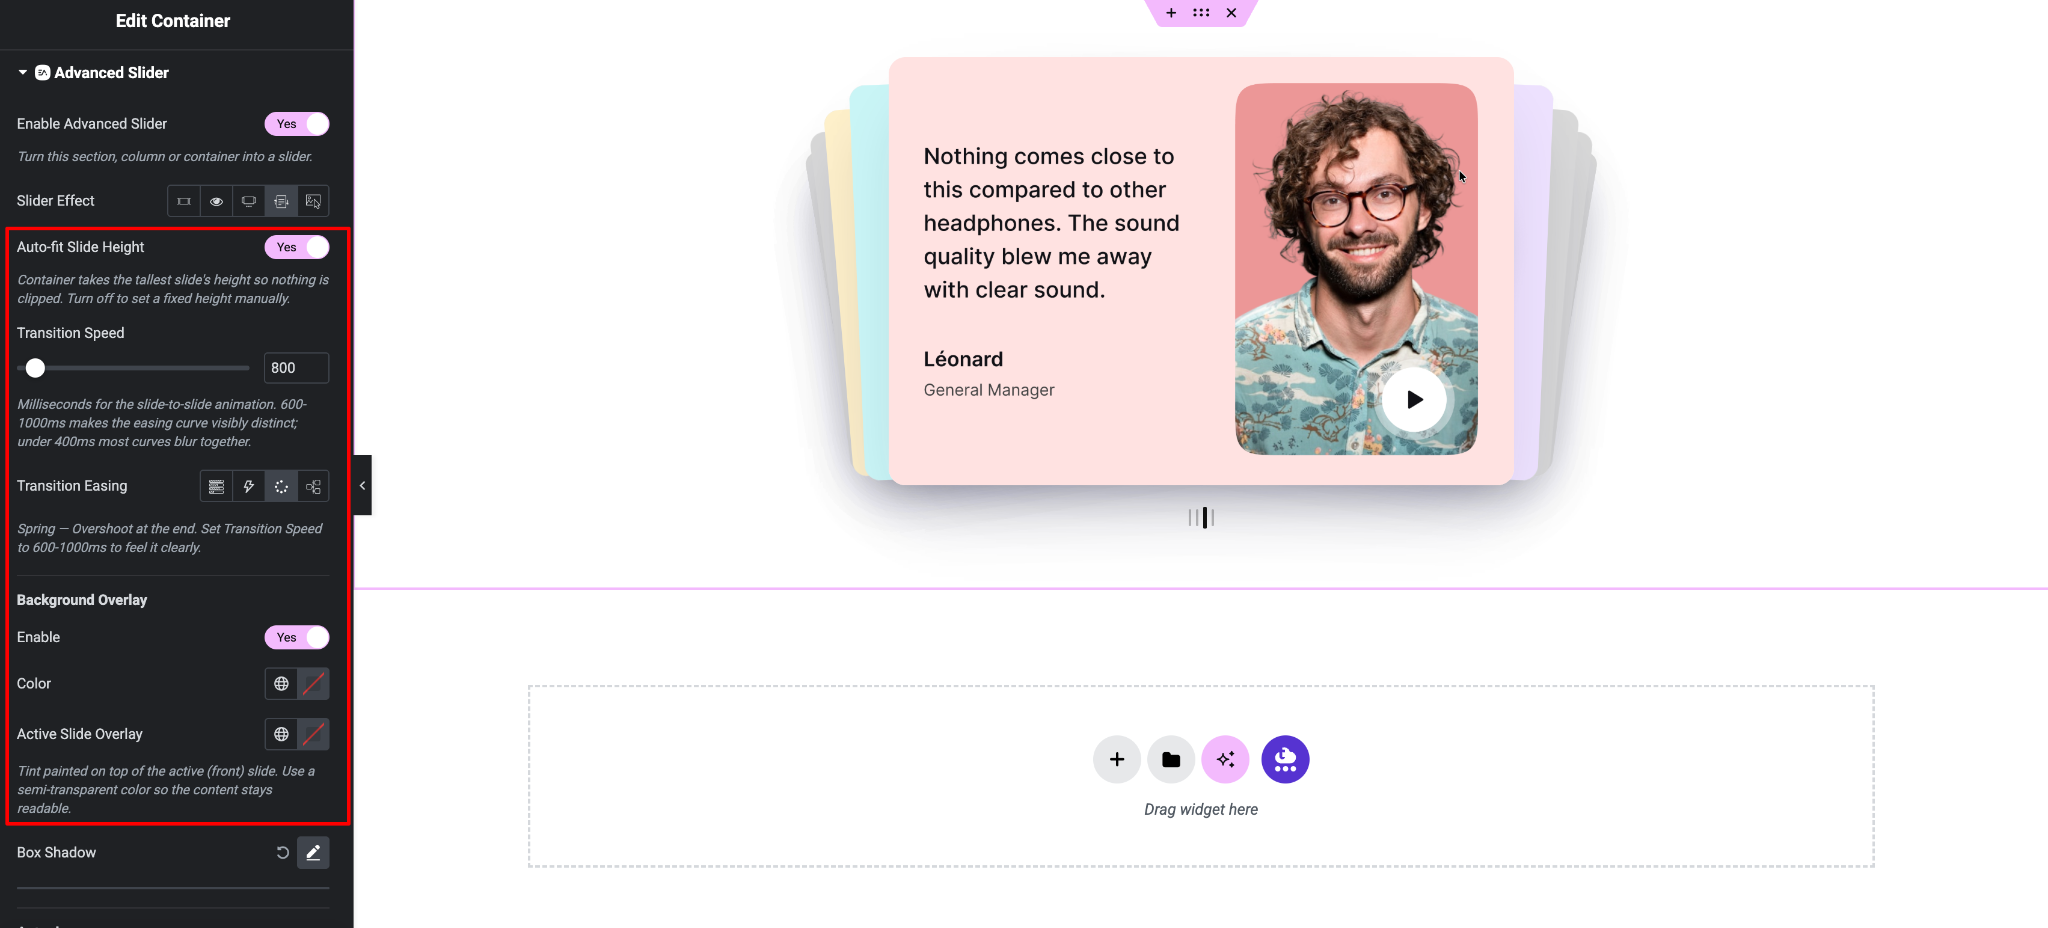
Set the slider to auto fit to the tallest slide, or lock a fixed height when you need every section on the site to line up. Auto fit is the safer default when slide content varies in length, because it removes the guesswork of picking a pixel value and hoping nothing overflows.
4. Visual Polish
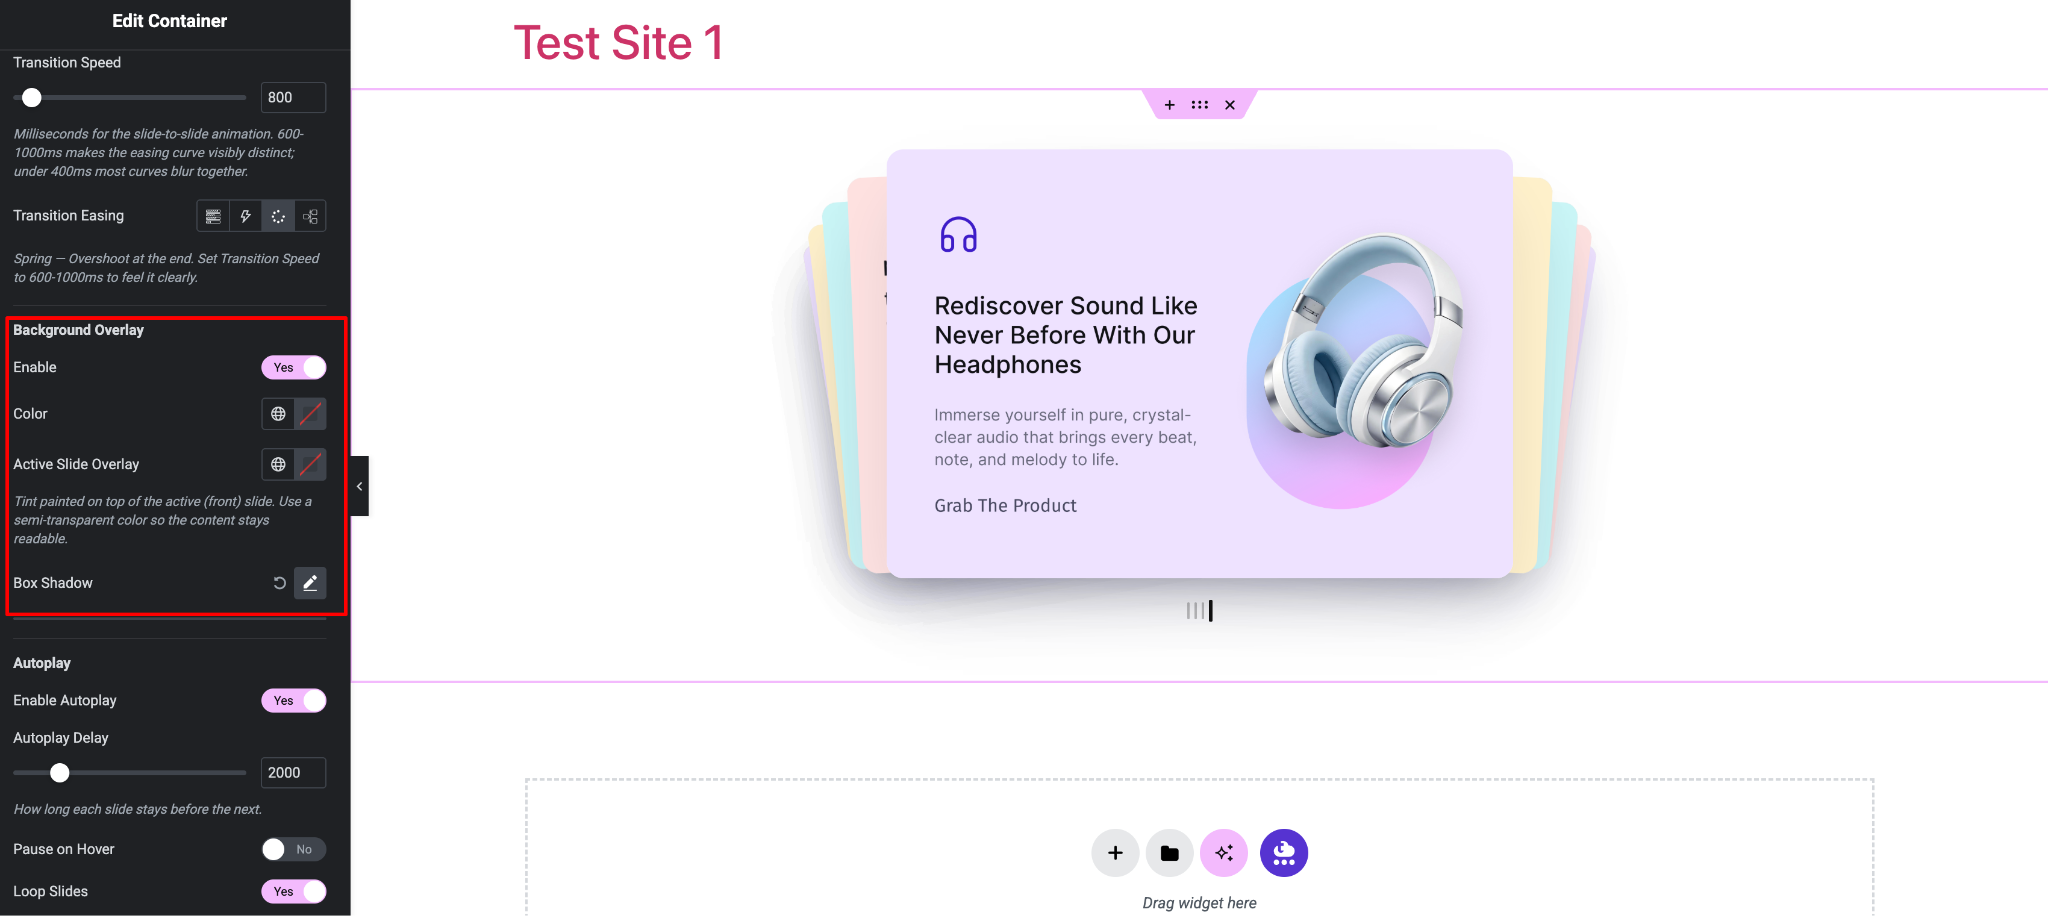
A Background Overlay lets you place a color layer over each slide so text stays readable on top of photography. You can also set a separate overlay for the active slide, which is a small detail that does a lot of work. Dim the inactive slides slightly and the current one reads as the focus without any extra styling.
Add a Box Shadow and the slider lifts away from the page background instead of blending into it.
5. Autoplay and Navigation
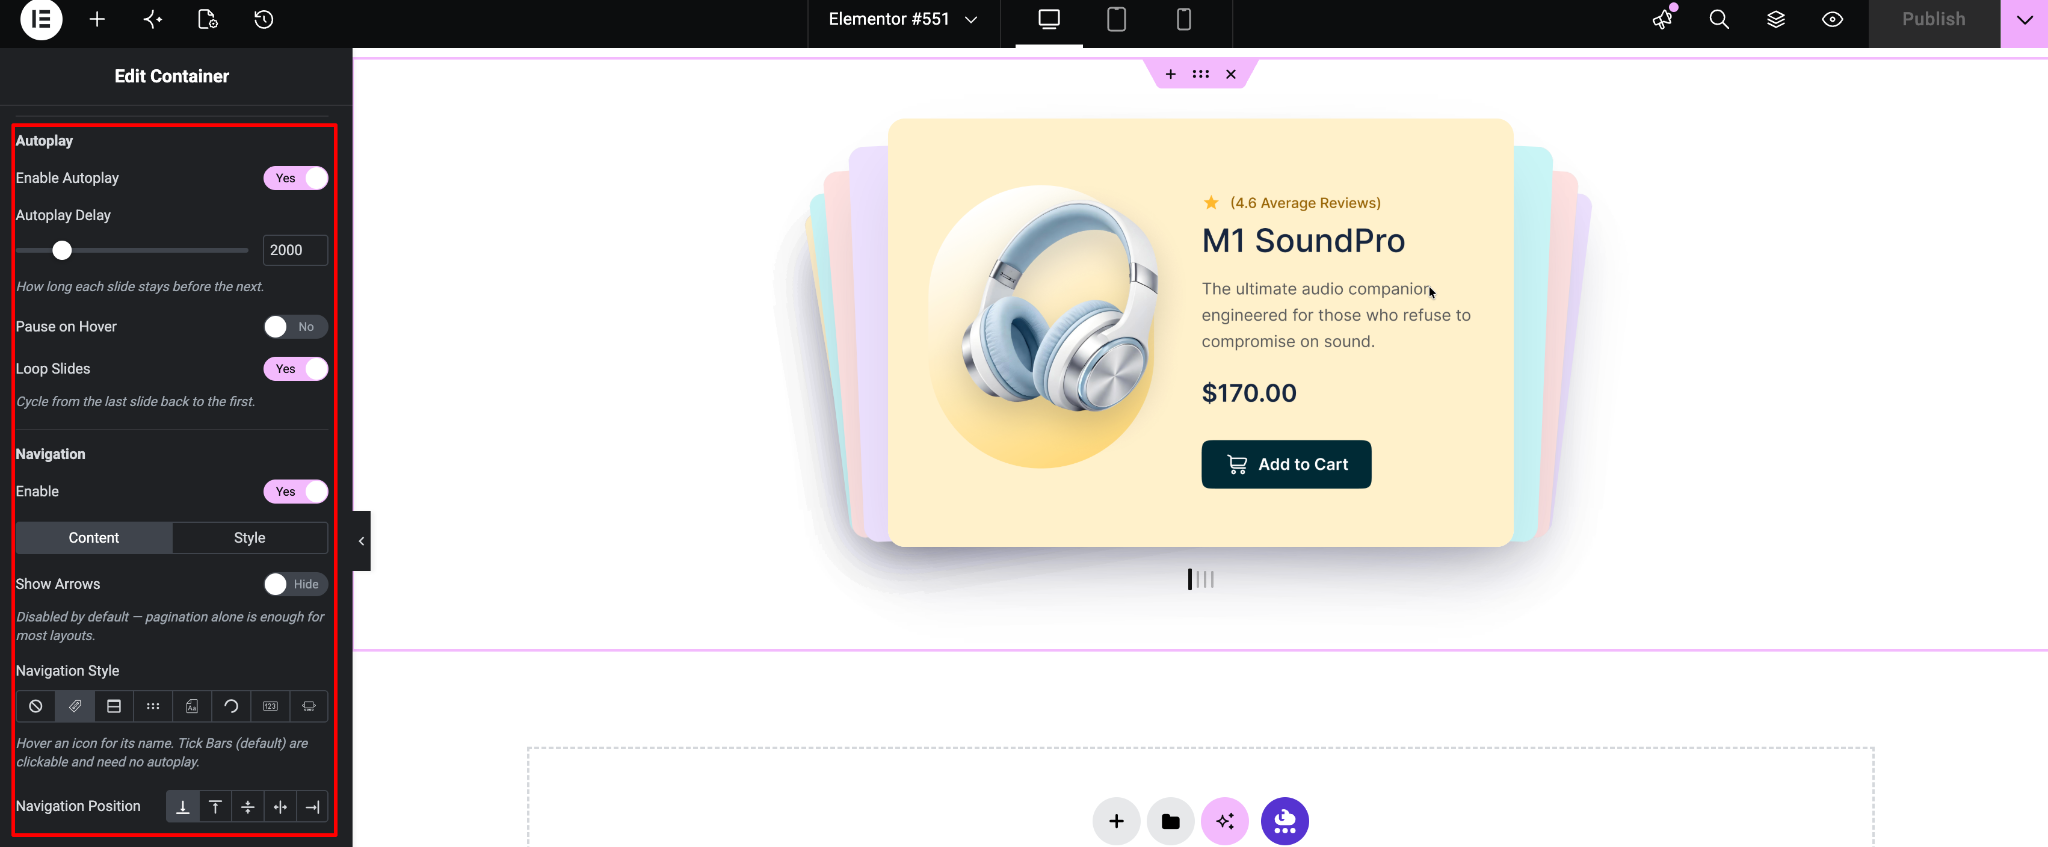
Turn on Autoplay with a delay you choose, switch on Pause on Hover so the slider stops fighting a visitor who is trying to read, and use Loop Slides for a continuous carousel.
For navigation, pick from dots, bars, numbers or thumbnails, and place them where they fit the layout.
Real World Use Cases of Advanced Slider
Here are practical setups you can build today, with the settings that tend to work.
1. A Feature Tour on a SaaS Landing Page
You have five product features. Each one deserves a screenshot, a heading, two lines of copy and a link.
Build five child containers, one per feature. Effect: Cards. Items Per Slide: 1. Autoplay: off, because a visitor reading feature copy should not be interrupted. Navigation: numbers, so people can see how many features there are and jump between them.
Result: a section that used to take five full screens of scrolling now takes one, and visitors control the pace.
2. A Case Study Carousel for An Agency Site
Each slide holds a client logo, a project image, three metric counters and a read more button.
Effect: Coverflow. Items Per Slide: 3 on desktop, 1 on mobile. Navigation: thumbnails, using the project images. Add a background overlay on inactive slides so the center project stands out.
3. Rich Testimonials That a Testimonial Widget Can Not Hold
If your testimonials are simple, use the EA Testimonial Slider. But if each testimonial needs a company logo, a star rating widget, a video embed and a case study link, build it as containers instead.
Effect: Slide. Items Per Slide: 2. Autoplay: on with a five second delay. Pause on Hover: on. Loop: on.
4. A Step-by-Step Process or Onboarding Flow
Four steps, each with a number, an illustration and a short instruction.
Effect: Slide. Items Per Slide: 1. Loop: off, because steps have an order and looping from step four back to step one is confusing. Navigation: bars, which double as a progress indicator.
5. Pricing Plan Comparison on Narrow Screens
Pricing tables side by side work on desktop and break down on mobile. Instead of shrinking three tables into an unreadable row, put each pricing table in its own child container.
It could be:
Items Per Slide: 3 on desktop, 1 on mobile. Effect: Slide. Navigation: dots.
Nothing changes for desktop visitors. Mobile visitors get one clear plan at a time.
6. A Team or Speaker Lineup for an Event Page
Twelve speakers is a very long page. Twelve speakers in a carousel is one tidy section.
Items Per Slide: 4. Effect: Slide. Autoplay: on, slow delay. Navigation: dots.
How to Get Started with Advanced Slider: Two Simple Steps
Getting Advanced Slider up and running takes less than a minute, no complex setup, no extra plugins. Just enable the feature and turn any container into a slider right from Elementor’s Advanced tab. Here’s how:
Step 1. In your WordPress dashboard, go to Essential Addons → Extensions and enable Advanced Slider.
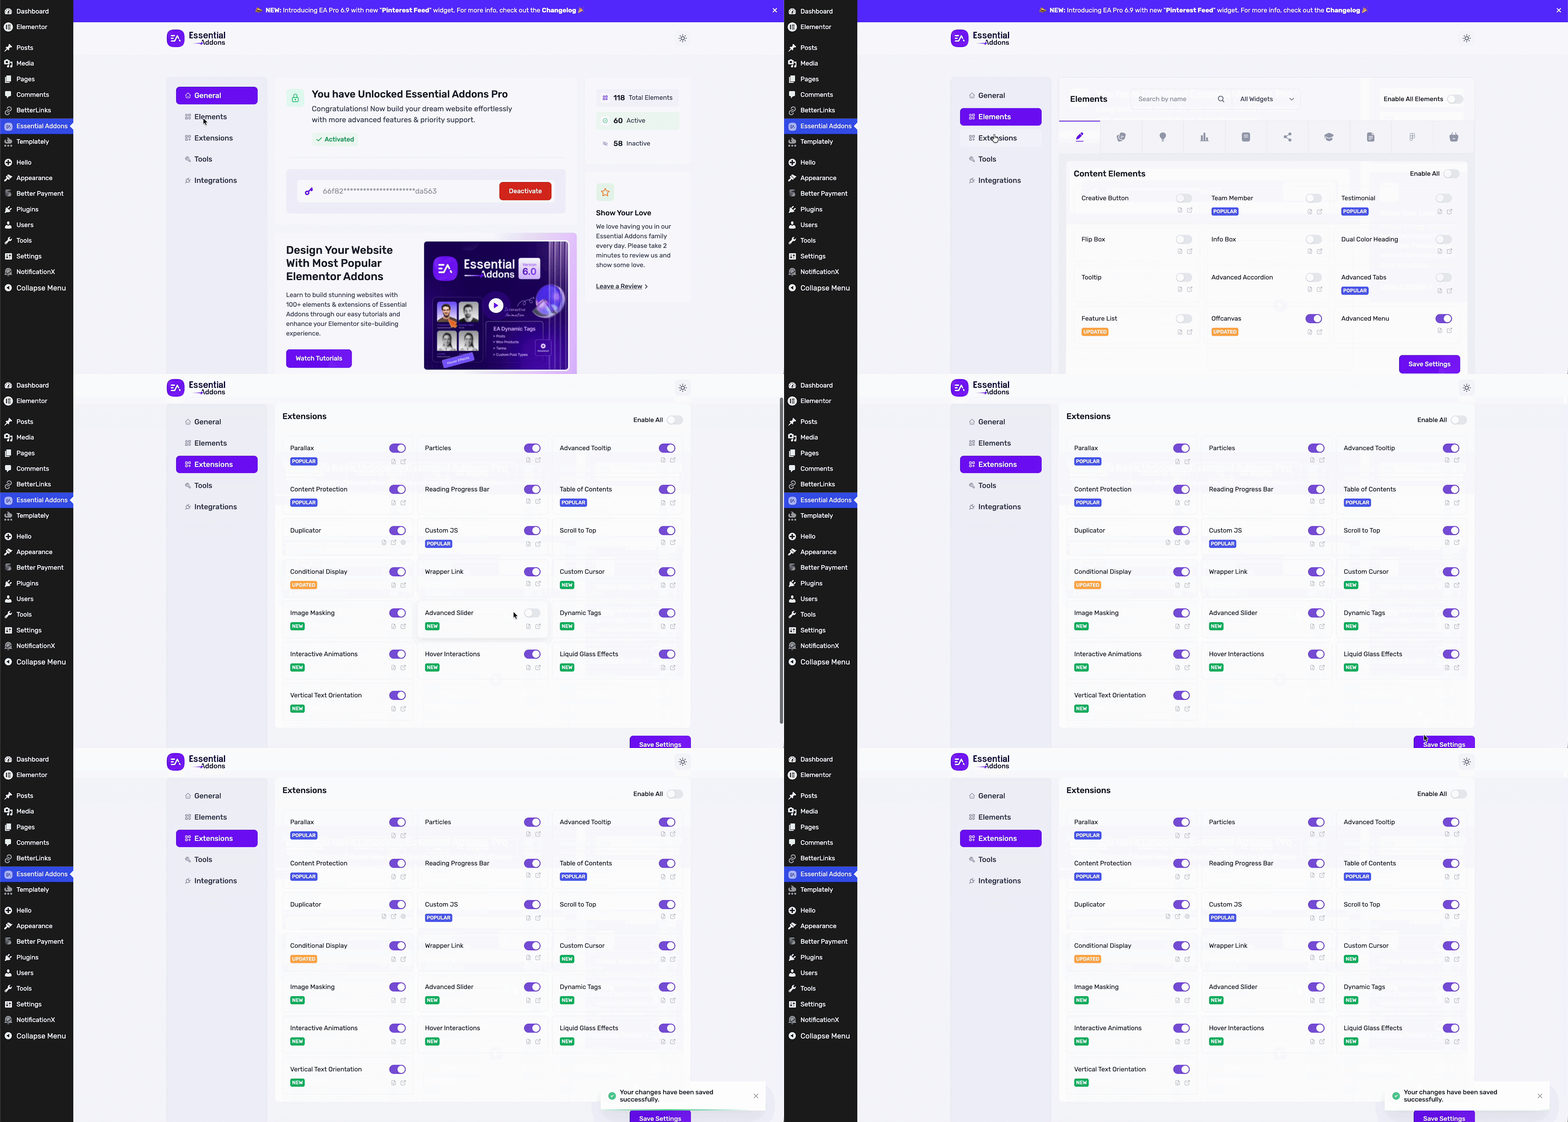
Step 2. Open the page in Elementor, select the parent container you want to convert, open the Advanced tab, and toggle Advanced Slider on.
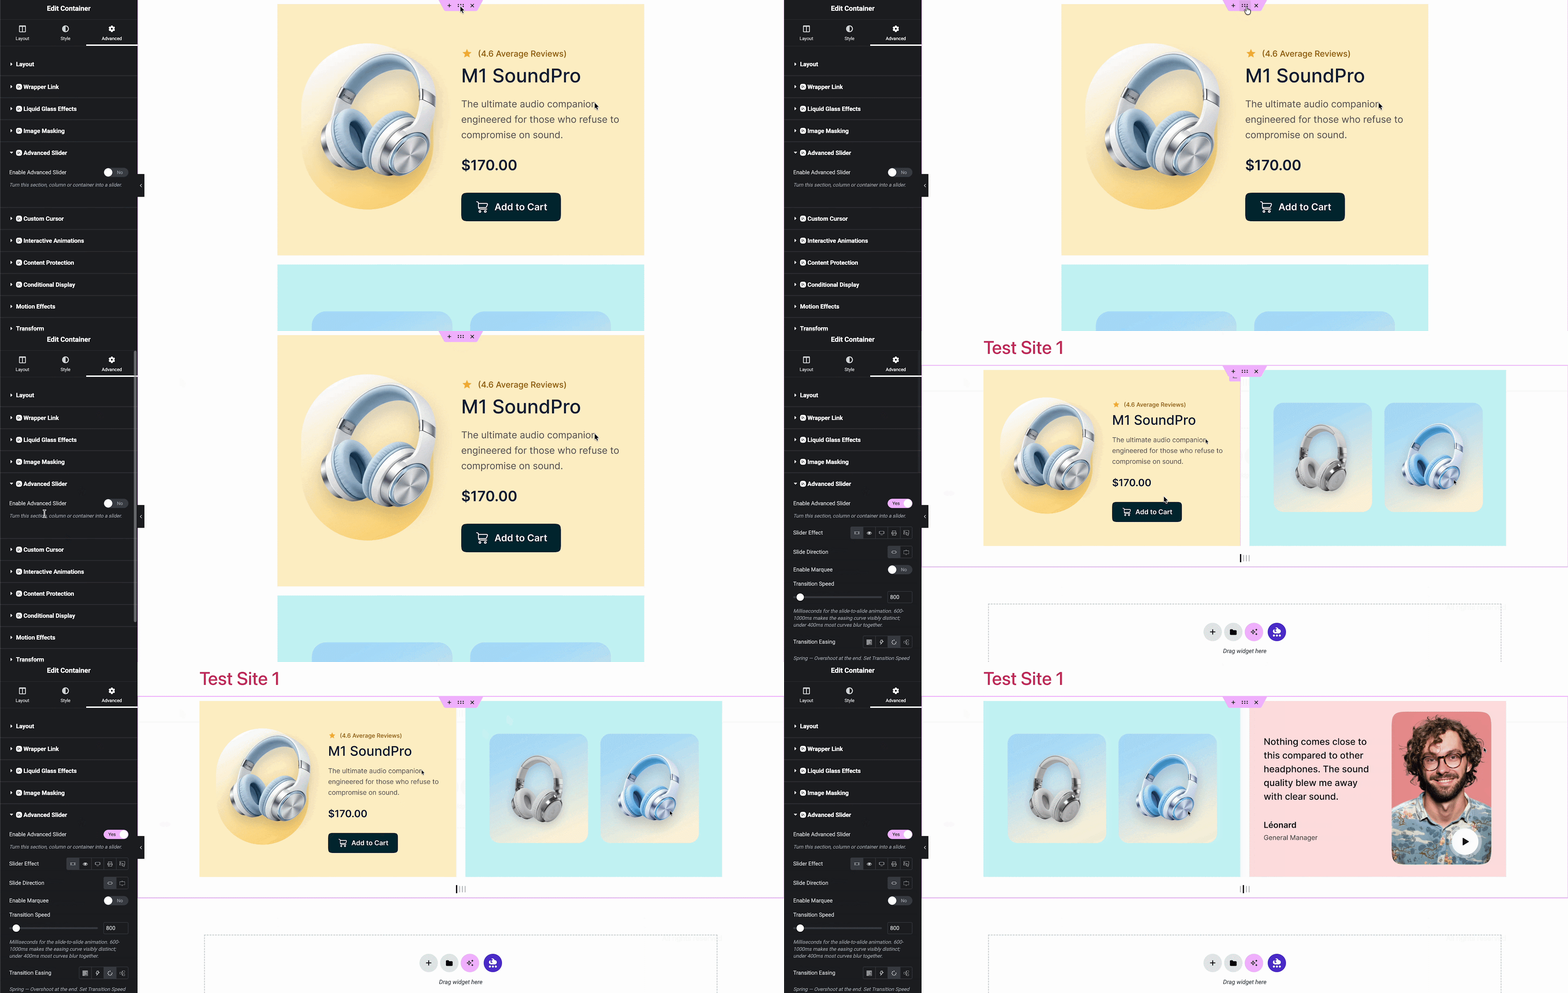
That is it. From there, pick your effect, set Items Per Slide, adjust the transition, style the overlay and switch on autoplay if you want it. Every change previews live in the editor.
If you are starting from scratch instead of converting an existing section, build the parent container first, add your child containers inside it, finish the design of one child, then duplicate it for the rest. Duplicating a finished slide is much faster than styling each one separately.
👉 Learn more: How to Configure EA Advanced Slider
A Few Things Worth Keeping in Mind
- Do not autoplay long text. If a slide takes more than a few seconds to read, autoplay works against you. Save autoplay for logos, images and short quotes.
- Match your slide count to the screen. Four items per slide on desktop and four on mobile is not the same experience. Set the responsive values for Items Per Slide before you publish.
- Keep important content out of hidden slides where you can. Anything a visitor must see, such as your primary call to action, deserves its own place on the page rather than slide number five.
- Do not put too many slides into one carousel. If visitors have to swipe through dozens of slides to find what they need, consider grouping the content or using a filterable layout instead.
- Test the swipe. Open the page on a real phone and swipe through it. Editor previews rarely tell you how the gap and stretch settings feel under a thumb.
Turn Elementor Sections into A Slider Effortlessly
Long vertical pages are not a design choice most people make on purpose. They are what happens when the tools available do not offer anything better for a specific piece of content.
Advanced Slider removes that limitation in the simplest way possible. Instead of asking you to fit your content into a slider, it takes the section you already designed and gives it the ability to move. One toggle, five effects and a set of controls that live in the same Advanced tab you already use.
Advanced Slider is available now in Essential Addons for Elementor PRO. If you want to follow what comes next, or you have a feature you would like to see, join the Essential Addons community and tell us what you are building.