If you are wondering how you can use Elementor to create your own eCommerce site, then you are in the right place. This comprehensive Elementor WooCommerce tutorial will help you learn everything you need to know about creating a fully functional eCommerce website.
From creating your WooCommerce shop pages, product pages, cart pages and checkout pages with Elemetor, we’re going to give you a detailed, step-by-step guide on how you can create an entire WooCommerce site with Elementor.
Table of Contents
Using WordPress As An eCommerce Solution
WordPress is one of the best platforms to create any and all kinds of websites and can be easily used to quickly set up an eCommerce store. In fact, with WordPress, you can set up an online store to sell anything–from digital products to physical goods and even services.
There are tons of people who are using WordPress as an eCommerce platform with the help of eCommerce plugins like Easy Digital Downloads, Freemius, Zapier, and WooCommerce. This tutorial will only focus on WooCommerce, which has over 5 million active users and is one of the most recommended solutions for running an eCommerce business.
WooCommerce: One Of The Most Popular eCommerce Solutions For WordPress
Wondering why you should choose WooCommerce to start your eCommerce business? Well, there are several reasons why WooCommerce is one of the most popular eCommerce solutions for WordPress.
👉 Easy To Set Up Your eCommerce Shop On WordPress
Setting up your online business on WordPress with WooCommerce is very easy and can be done in only a matter of minutes. Furthermore, WooCommerce is free to use, and only some functionalities require you to get the premium version. However, if you are just getting started, then you can easily and quickly set up your eCommerce shop on WordPress for free with WooCommerce.
👉 Tons Of Useful Features To Sell Digital & Physical Products
Another great thing about WooCommerce is its flexibility. WooCommerce isn’t just for physical products, you can offer digital products, affiliate products, and services too. To facilitate this, WooCommerce comes with tons of useful features that let you create an outstanding store for all kinds of businesses.
👉 A Secure Solution For Running Your Online Shop On WordPress
Security is definitely one of the main and most important concerns for anyone who wants to start an eCommerce business. With WooCommerce, you can rest easy knowing that your online shop is secured as it has its own API system and regularly receives security audits to ensure safety.
👉 Seamless Integrations With A Huge Number Of Plugins
WooCommerce can be easily integrated with a huge number of WordPress plugins, allowing you to truly expand its functionality and enjoy more versatility. For instance, WooCommerce can be integrated with social proof marketing solutions like NotificationX to help you increase your sales. We will discuss this in more detail later in this post, so keep reading to find out more.
Why You Should Use Elementor For WooCommerce Sites
You may already be aware that Elementor is one of the best drag and drop’ page builders that let you create websites instantly without coding, and it has amazing integrations with WooCommerce.
However, what you might not know is that you can design a complete and fully functional WooCommerce website that has all the essential pages like Cart Pages, Checkout Pages, and even more with Elementor.
That’s right! With the help of Elementor WooCommerce Builder and Essential Addons, the most popular elements library for Elementor, you can design a whole WooCommerce website in Elementor. Essential Addons has over 1 Million active users who are using its 70+ advanced elements to design stunning websites without any coding.
With elements like Woo Product Grid, Woo Product Collections, and Woo Checkout, you can create an amazing website for your online store, which we will show you how to do in this Elementor WooCommerce tutorial. To get some ideas for some of the best WooCommerce websites, check out these sites below.
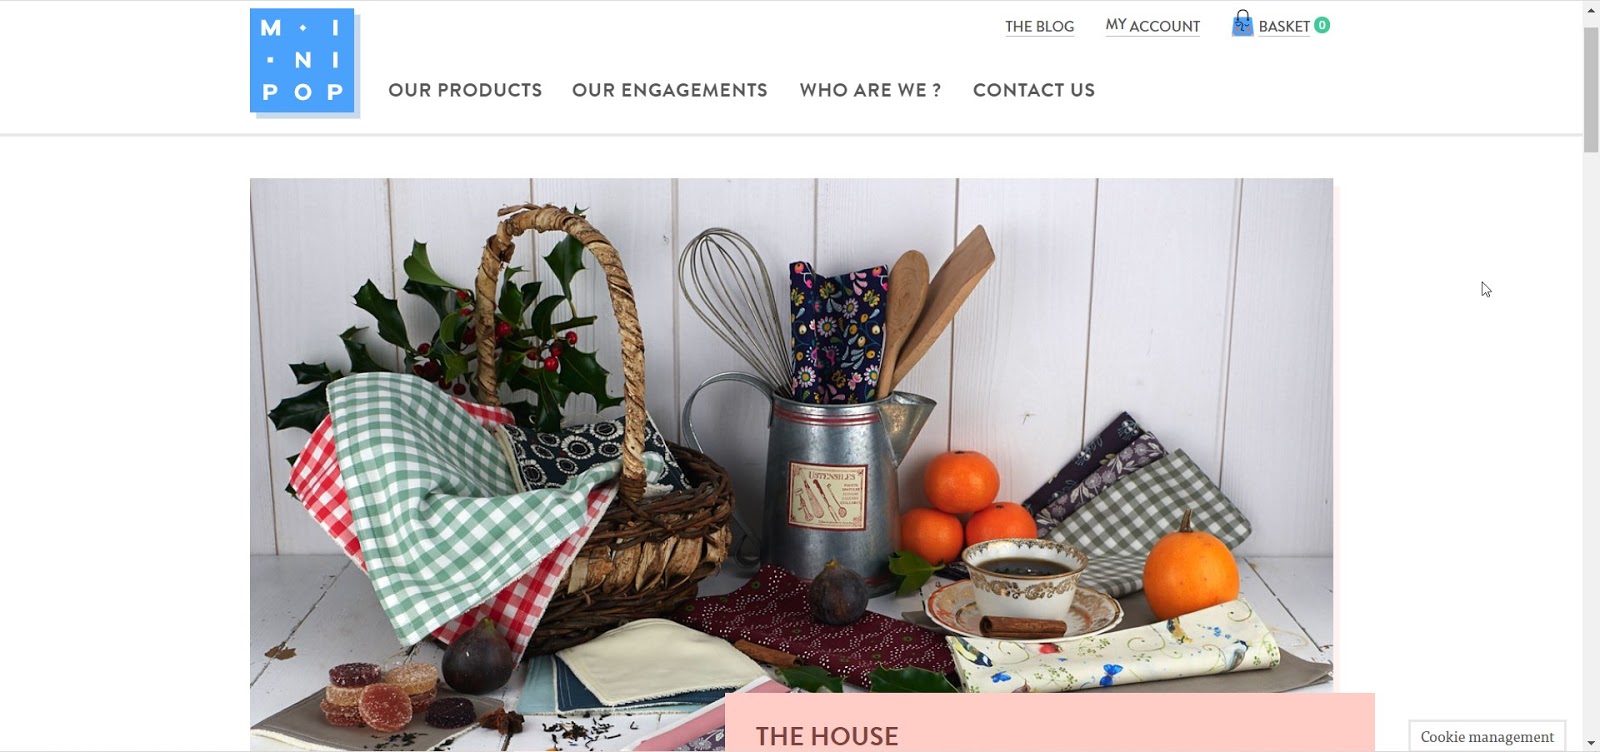

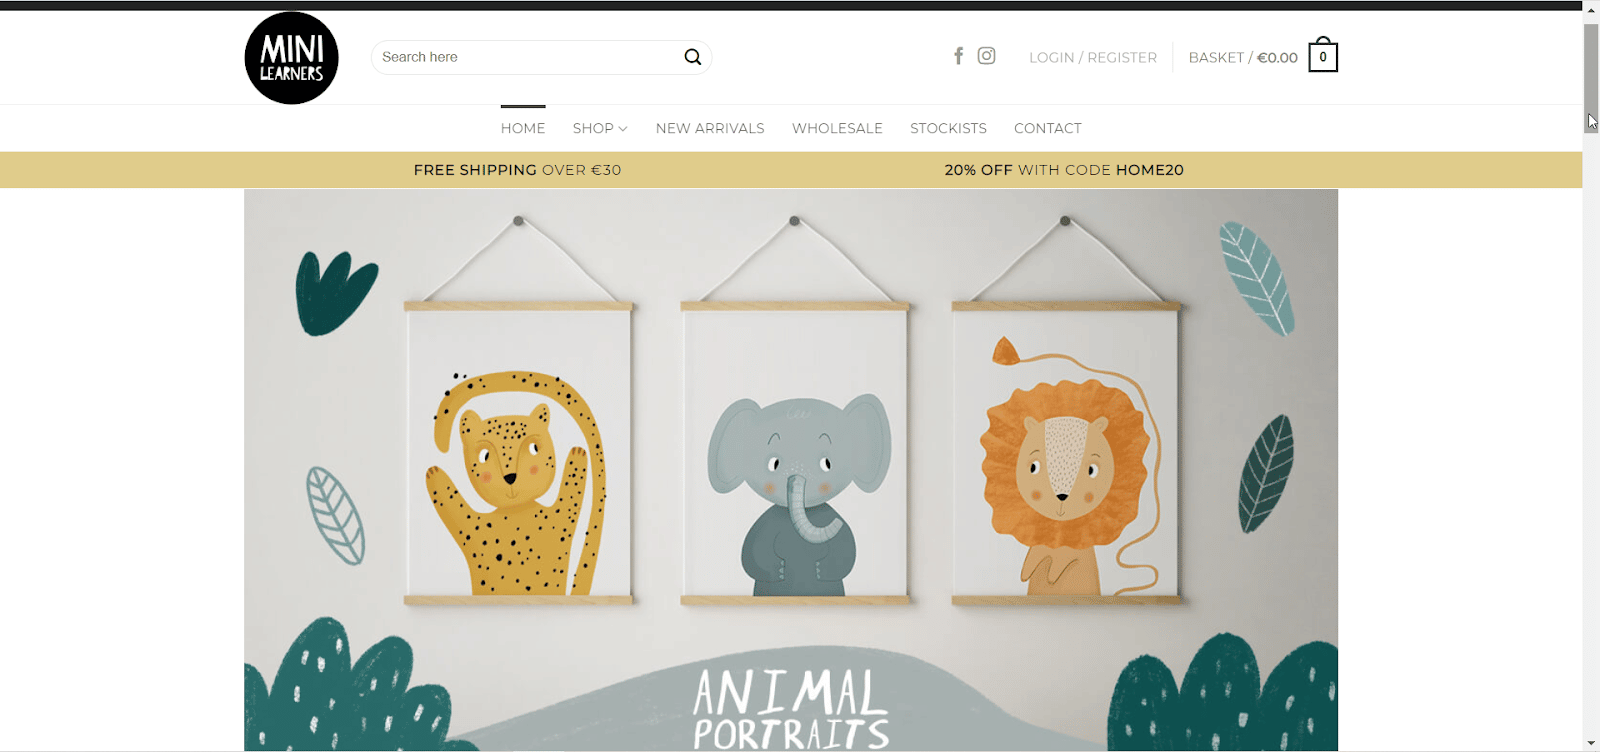
Elementor WooCommerce Tutorial: How To Get Started With Your Online Store
Now that you know why WooCommerce is so popular, let’s get started with our Elmentor WooCommerce tutorial. Before creating your WooCommerce site using Elementor, you have to first set up your WooCommerce store.
To do this, you first need to sign up for a WordPress account and get your own domain if you don’t have one already. These are actually the first basic steps for creating any kind of website on WordPress.
Once you have your own domain, follow these step- guidelines given in this Elementor WooCommerce tutorial.
Step 1: Choose The Right WordPress Theme For WooCommerce
Once you have your own domain, the first thing you will need to do is choose the right WordPress theme for your WooCommerce site. There are several options, but the best ones are listed below:
Hello: This is a lightweight theme with a minimalist design, and is brought to you by the team behind Elementor. Hello theme works well with popular plugins and extensions including WooCommerce, and its minimalist design means you can be very creative when designing your eCommerce website.

Flexia: What makes Flexia stand out is the huge number of things you can do with it. It has very few restrictions when it comes to customizing when compared to other WordPress themes. It loads very quickly, and also supports popular plugins like WooCommerce, so it is perfect for your eCommerce business.

Step 2: Set Up Your WooCommerce Store On WordPress
After you are done choosing a theme for your eCommerce website on WordPress, the next step in our Elementor WooCommerce tutorial involves setting up your WooCommerce store.
To do this, first install and activate the WooCommerce plugin by navigating to Plugins→ Add New from your WordPress dashboard. Search for the keyword ‘WooCommerce’. Once you find it, install and activate the plugin.
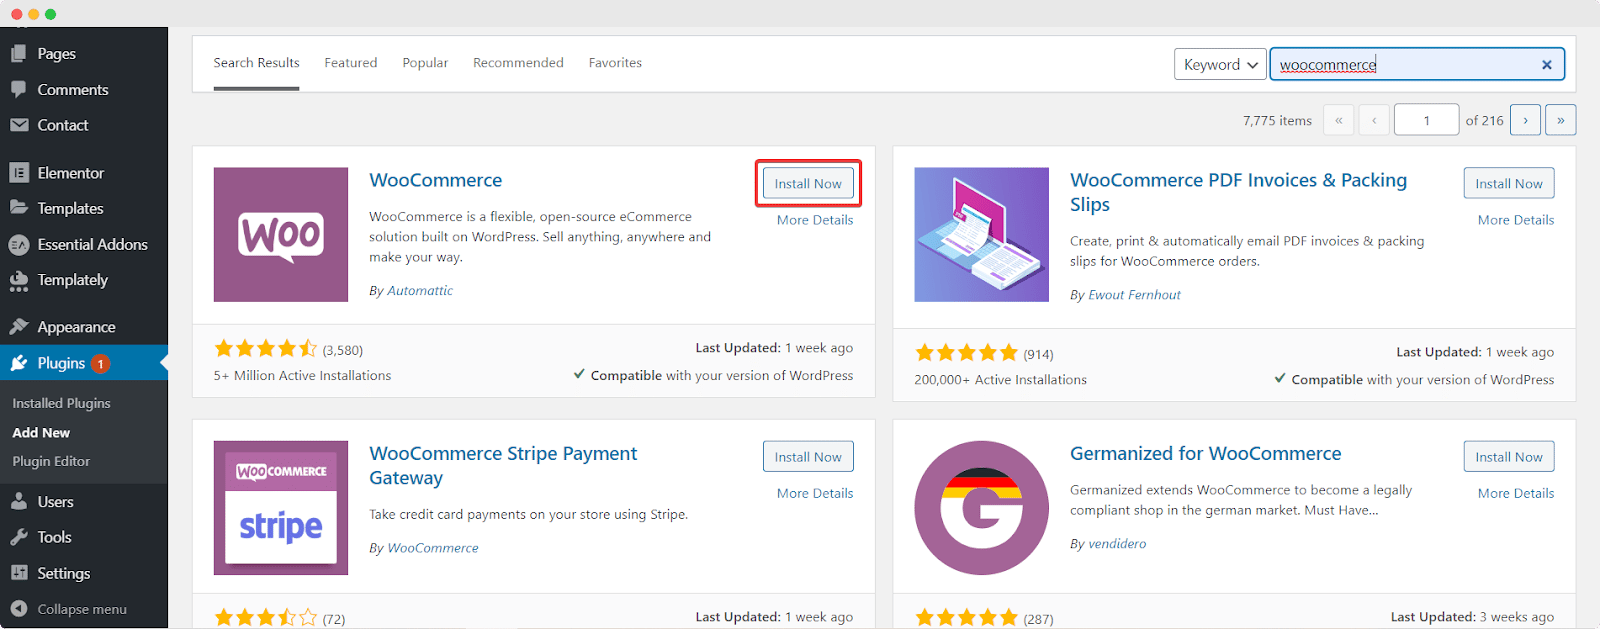
After the WooCommerce plugin is installed and activated on your WordPress website, simply follow the on-screen instructions to set up your WooCommerce store. You’ll have to include information about your business such as your location, contact information, payment and shipping details, type of products, and more.
Step 3: Add Your WooCommerce Products And Set Tags & Categories
When you are done setting up your online shop with the WooCommerce SetUp Wizard, you can add your by simply navigating to WooCommerce→ Product→ Add New Product.
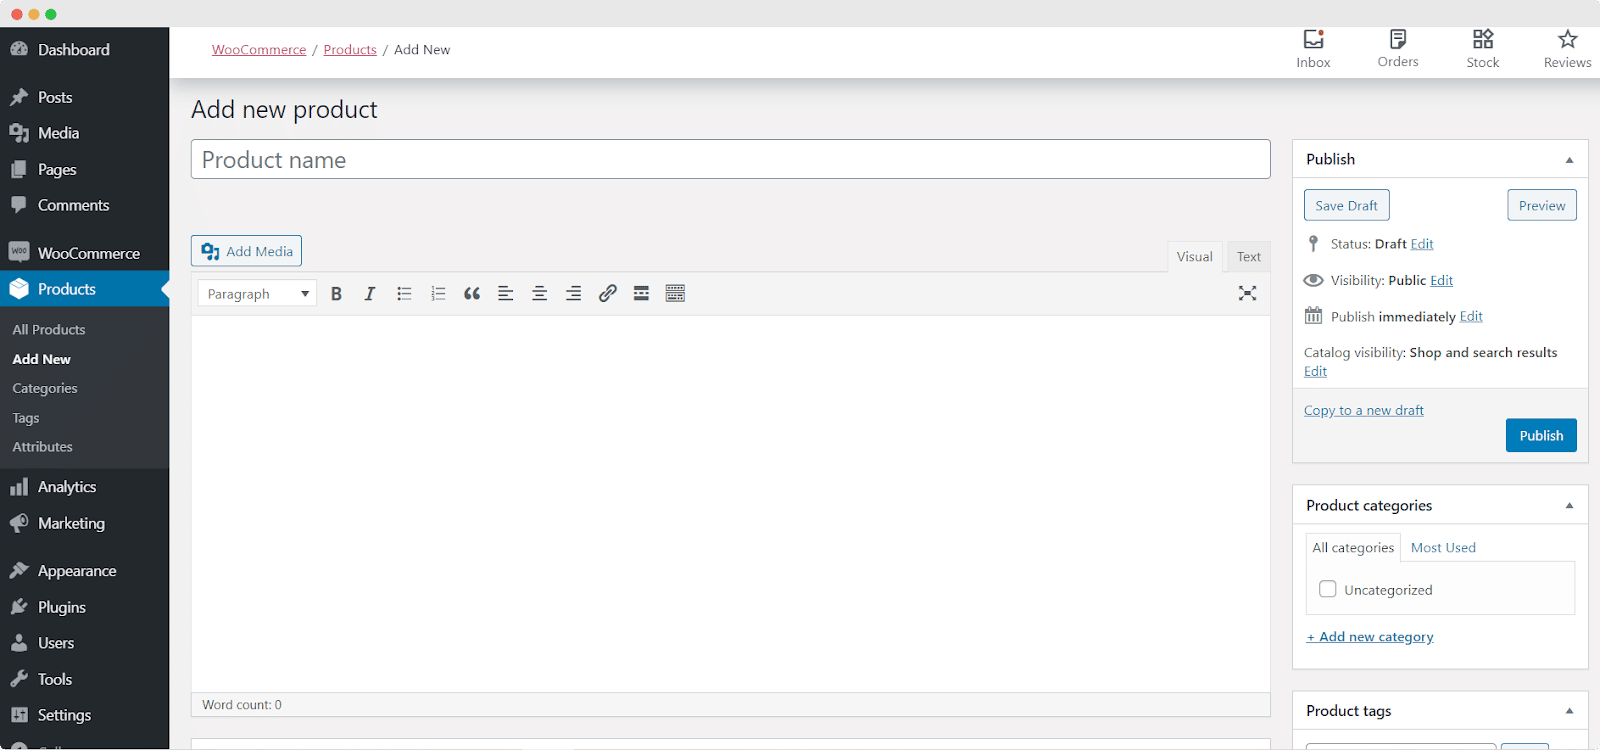
Here you can add names for each product, and also set your product tags and categories. If you scroll further down you will also be able to add more details such as Product Data and set your Product Short Description, Product Image, and more.
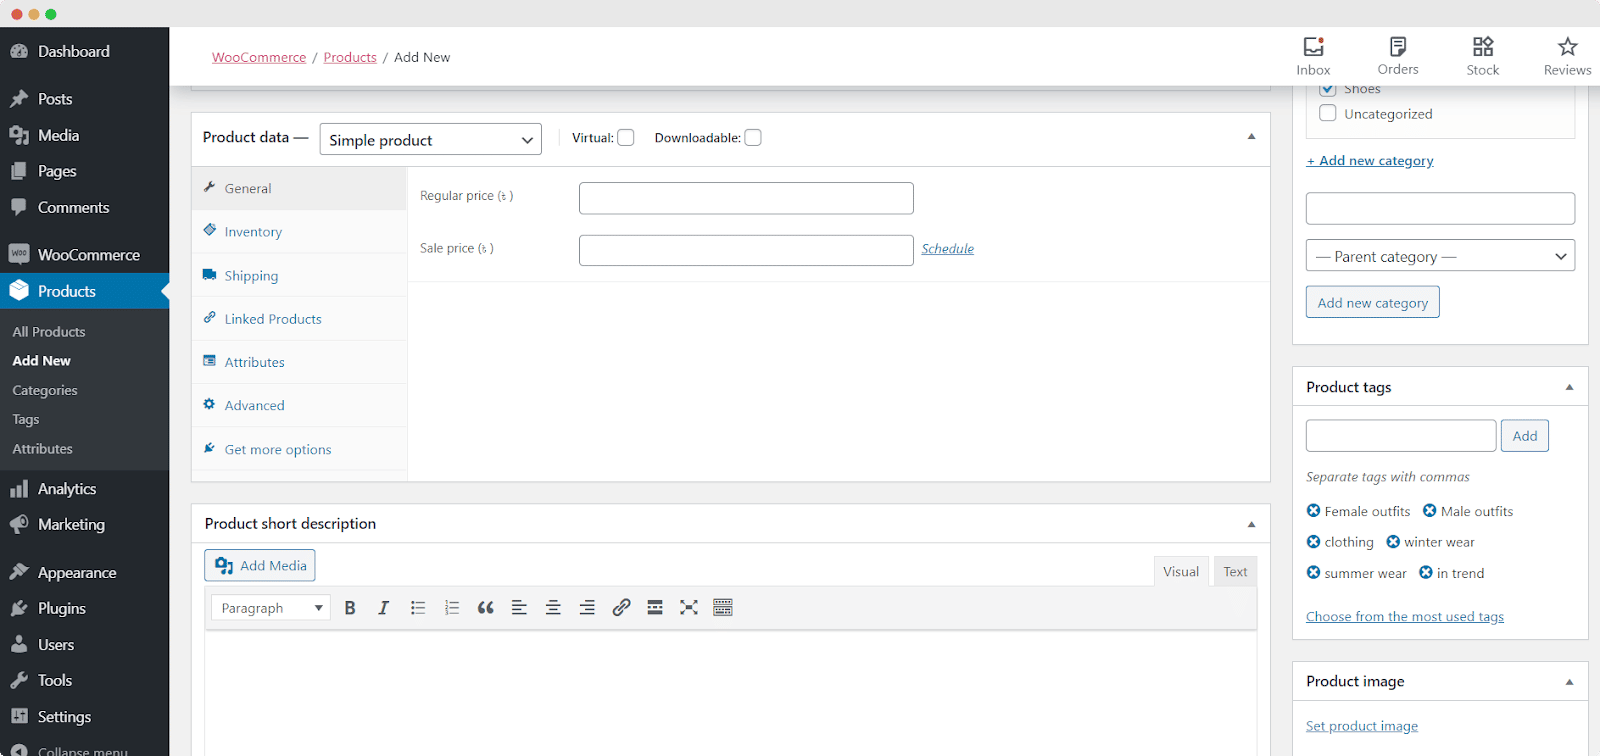
If you are done with this step, then congratulations! You have set up your WooCommerce store and added your products to your eCommerce site. Next, we need to design and style the pages of your WooCommerce website in Elementor.
How To Design Your WooCommerce Shop Page Using Elementor [No Coding Required]
Now that we are done with the basic set up for your eCommerce store, let’s move on to one of the most important part of this Elementor WooCommerce tutorial. In this section, we are going to show you how to create your WooCommerce shop page.
To do this, you need to first install both Elementor and Elementor Pro as the widgets that you get with Elementor WooCommerce Builder are premium widgets.
Then, create a new page for your WooCommerce site by navigating to Pages→ Add New from your WordPress Dashboard. Click on the blue ‘Edit With Elementor’ button to open up the Elementor Editor.
Once the Elementor Editor is done loading, you can drag and drop the WooCommerce elements to design your store’s home page from scratch.
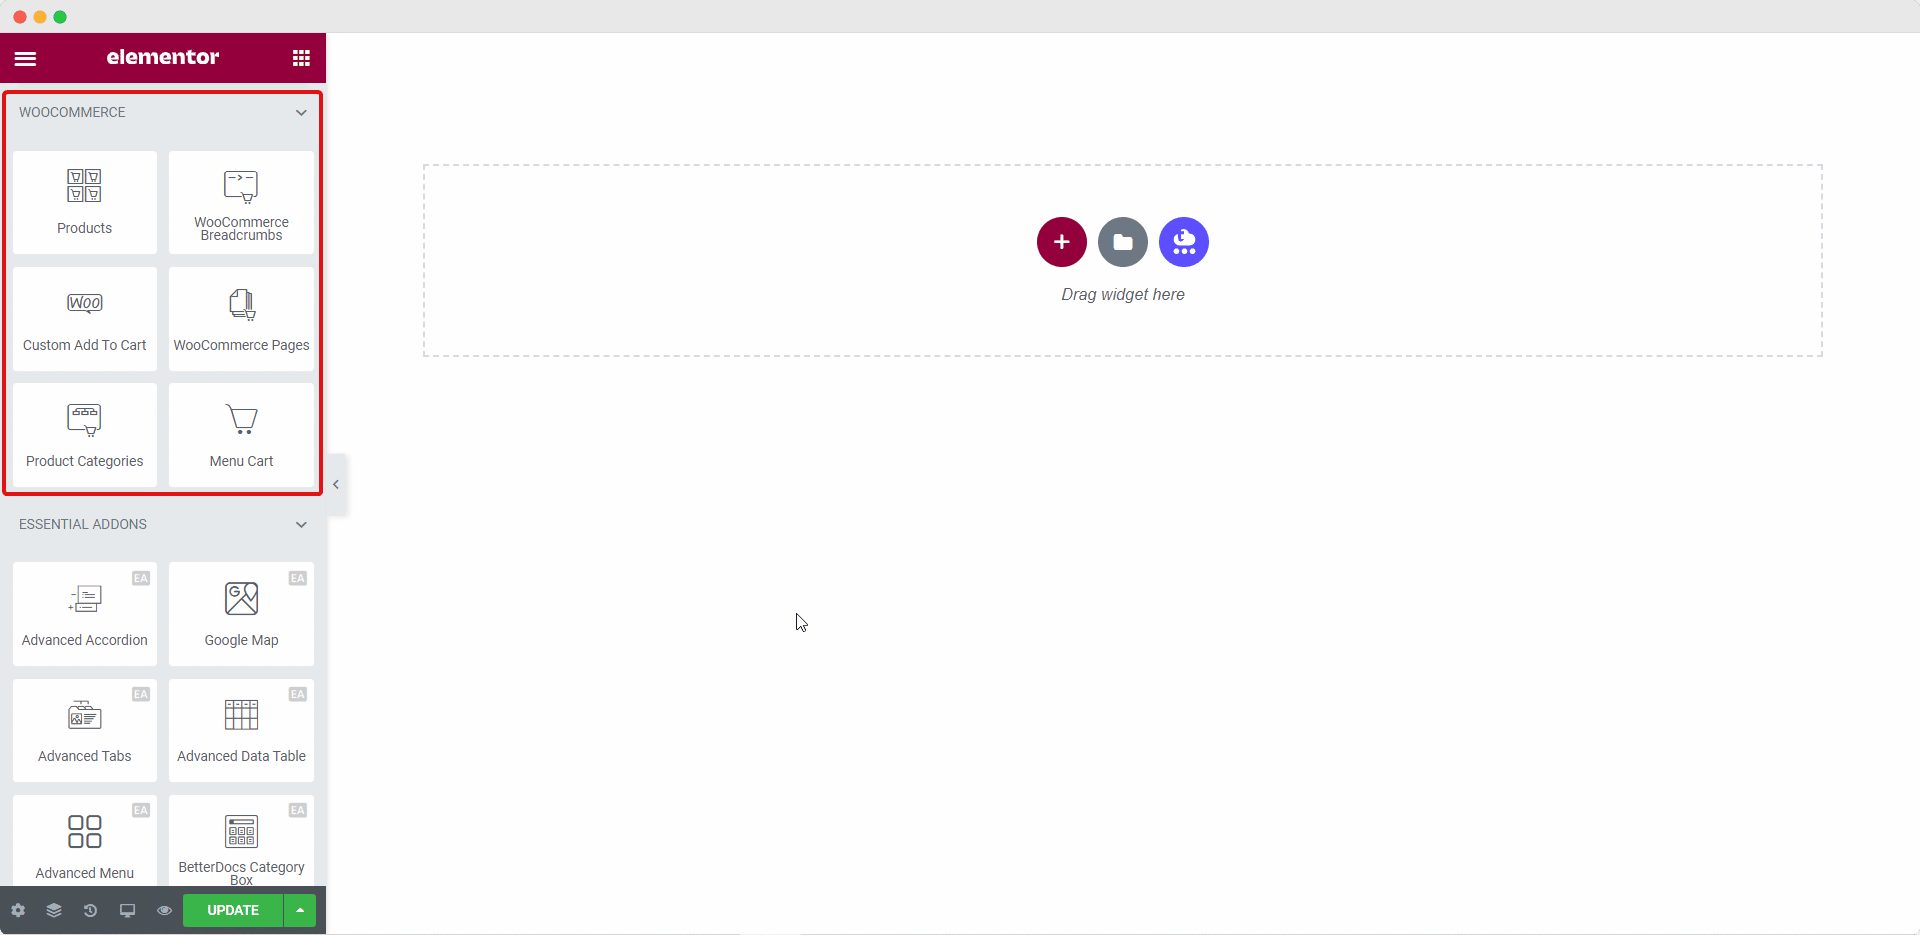
Play around with these elements to create your eCommerce website’s home page. If you want to showcase your store products more creatively, then move on to the next step of this Elementor WooCommerce tutorial.
How To Showcase Your WooCommerce Product Collections Beautifully Using Elementor
While you can definitely use the elements available with Elementor WooCommerce builder to create pages for your online store, you can go a step further and truly captivate your customers with Essential Addons for Elementor. Here’s how you can do this.
You can display your WooCommerce Product Collections in an amazing layout complete with hover animation with Elementor by using the EA Woo Product Collections element. This cool element lets you display your product collections beautifully based on categories, attributes, and tags.
Step 1: Activate The EA Woo Product Collections Element
You can activate the EA Woo Product Collections Element by searching for it under the ELEMENTS tab of your Elementor editor. Once you find it, simply drag and drop the element anywhere on your page.
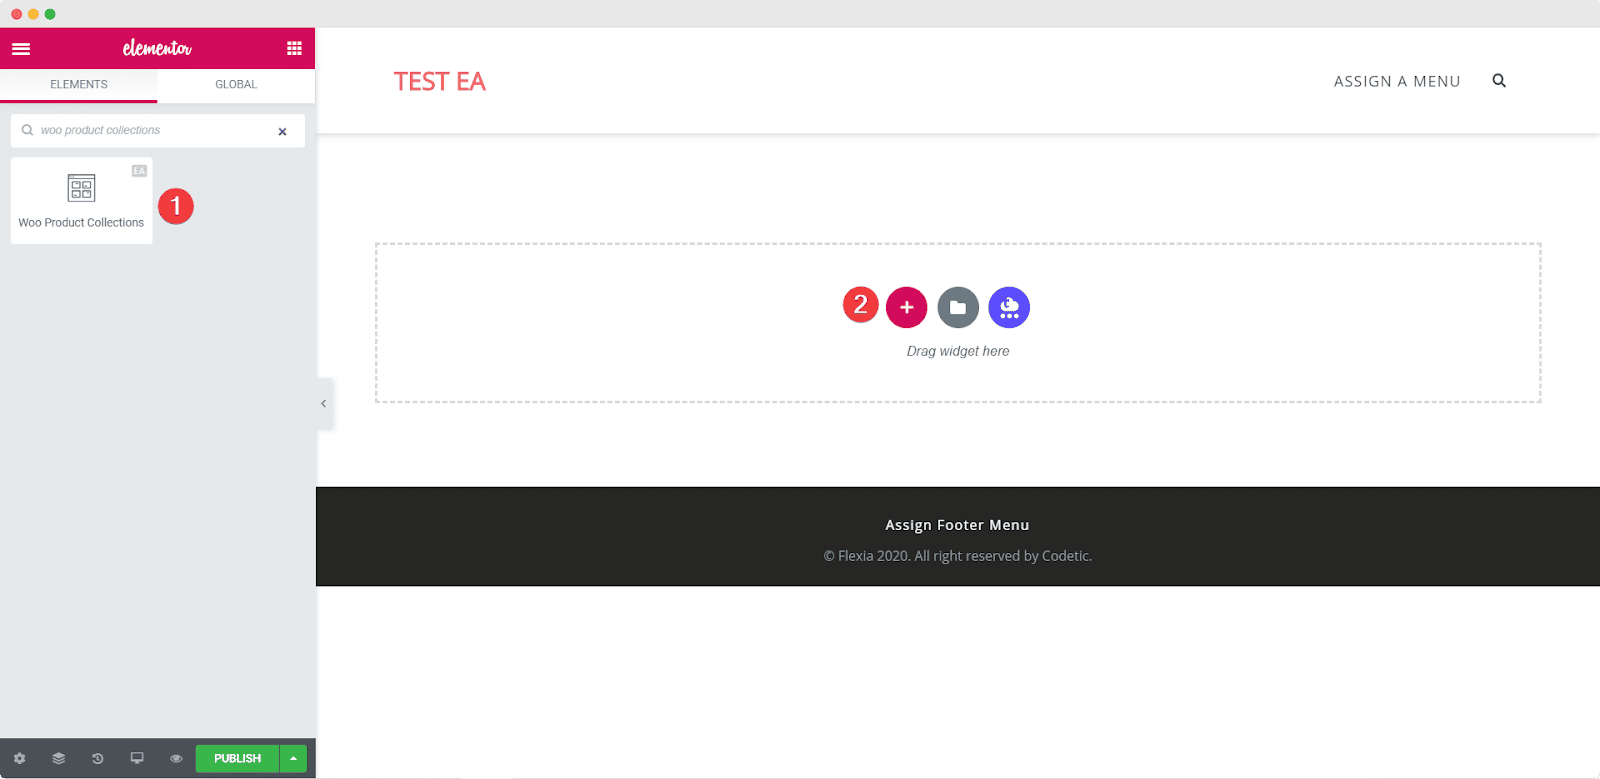
Once you drag and drop the element into any section of your page, this is the default layout you will see.
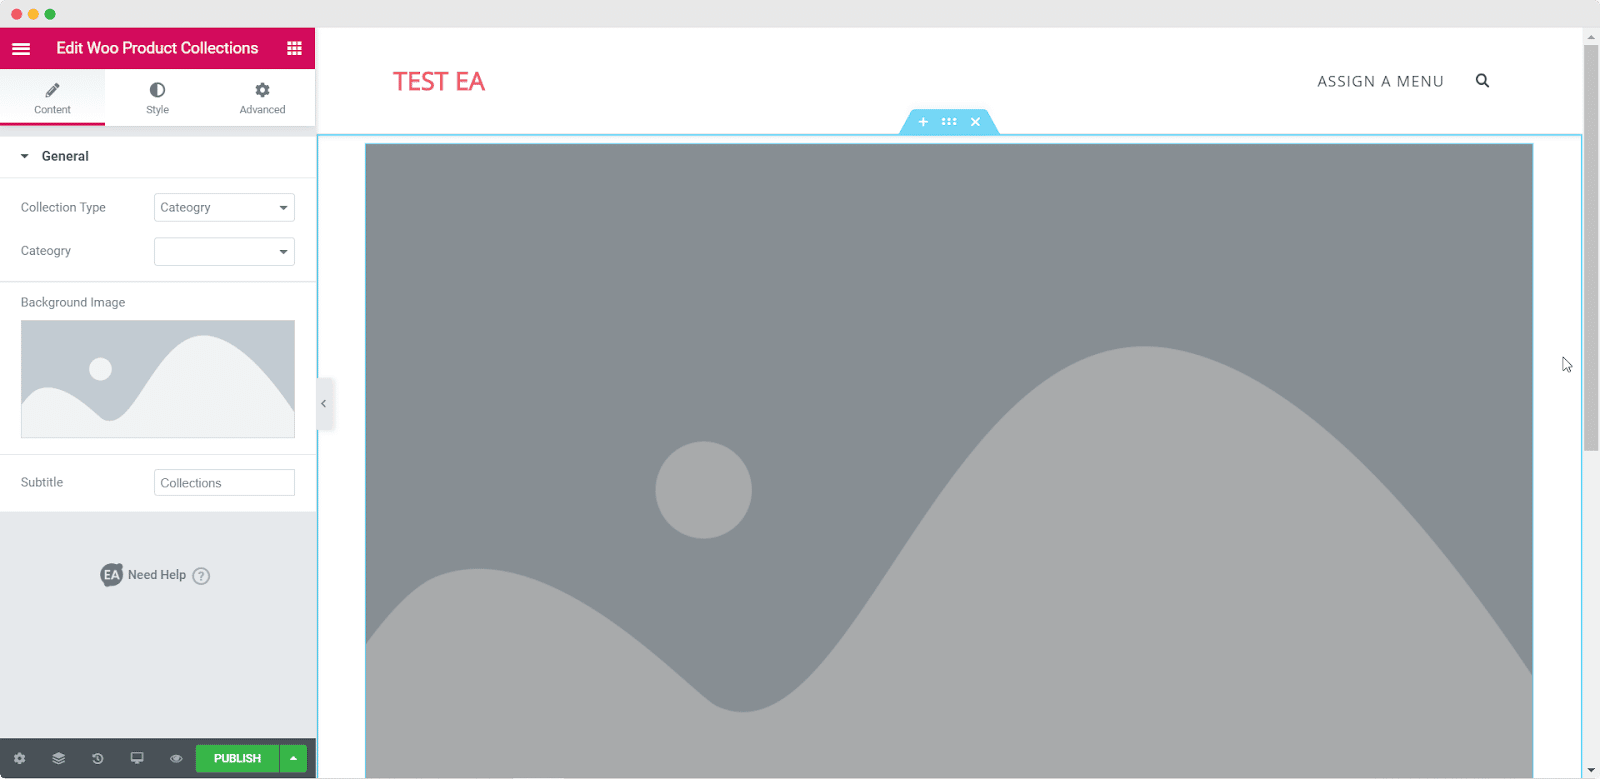
Step 2: Edit The Content Settings
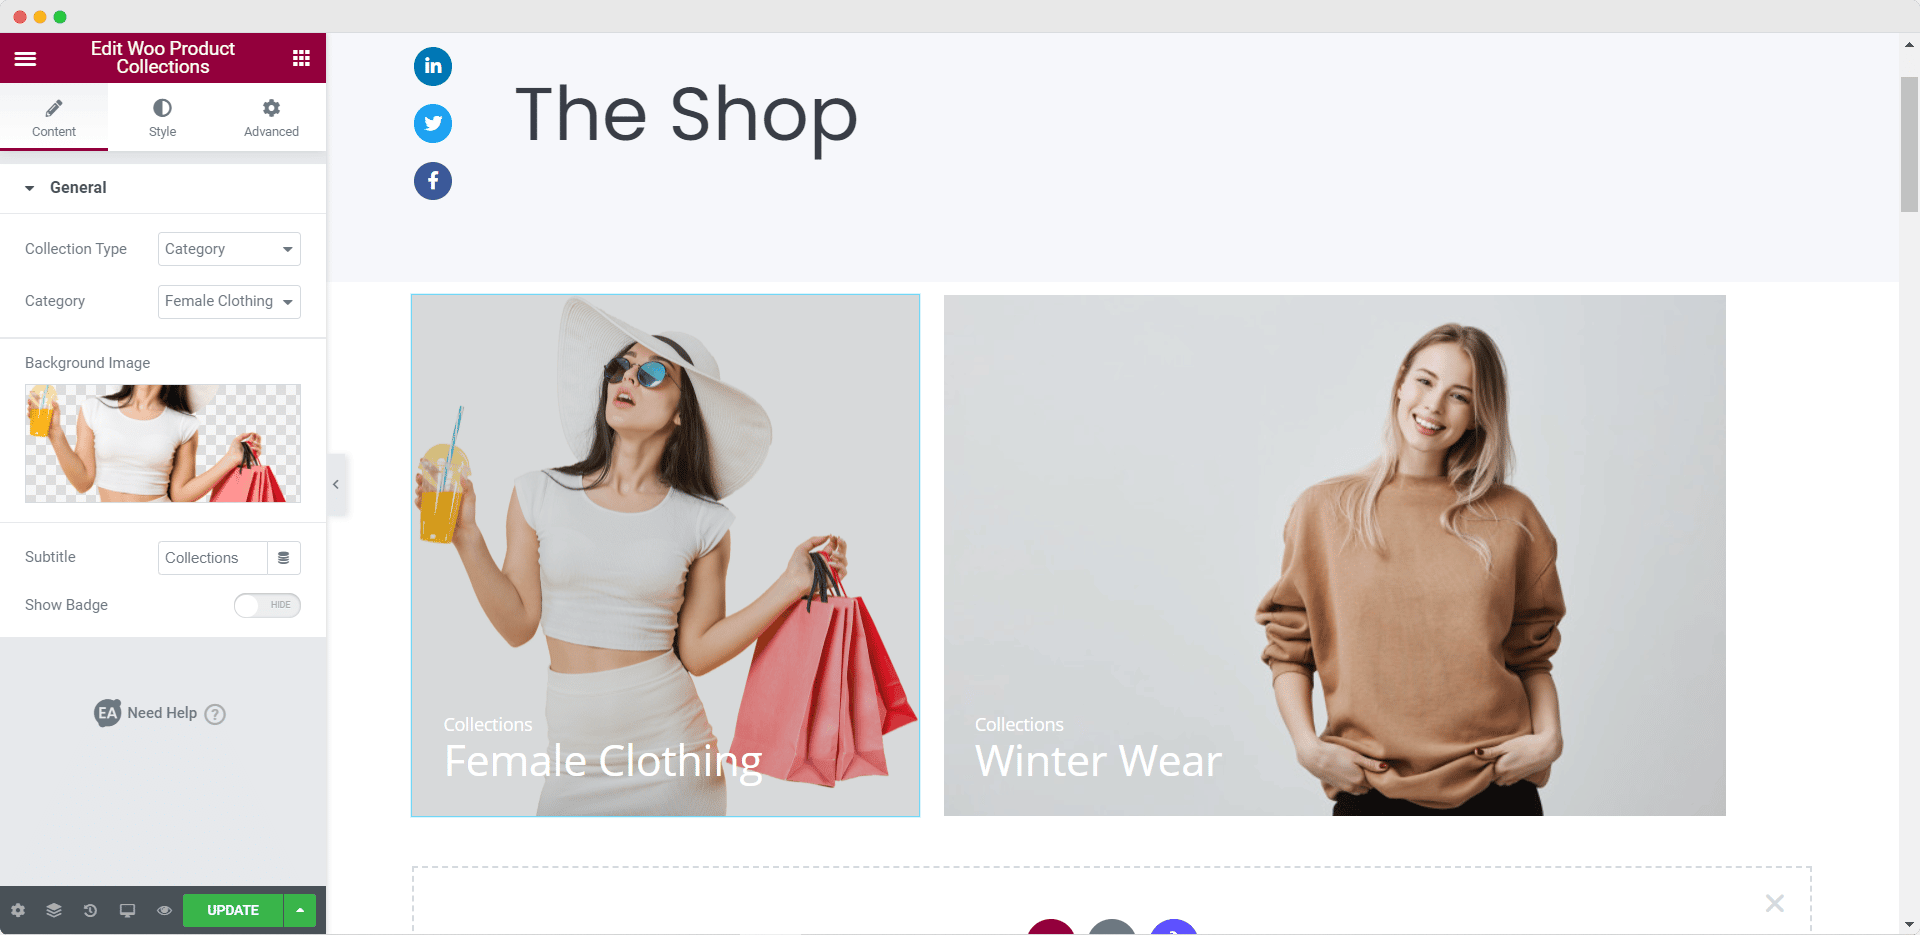
After you have successfully activated the EA Woo Product Collections element, you can start editing the content to add your product collections on the basis of tags, categories, or product attributes.
Under the ‘Content’ tab you will see an option called ‘General Settings’. From here you can choose the Collection Type and Category. You can also change the Subtitle for your WooCommerce Product Collections.
Step 3: Style Your Woo Product Collection
Next, you have to style your WooCommerce Product Collection by heading over to the Style tab. There you will see options like ‘General’, ‘Thumbnail Style’ and ‘Typography’. From the ‘General’ settings you can adjust the overlay color, hover animation, alignment, and more. From the ‘Typography’ settings you have the freedom to change the font color and size.
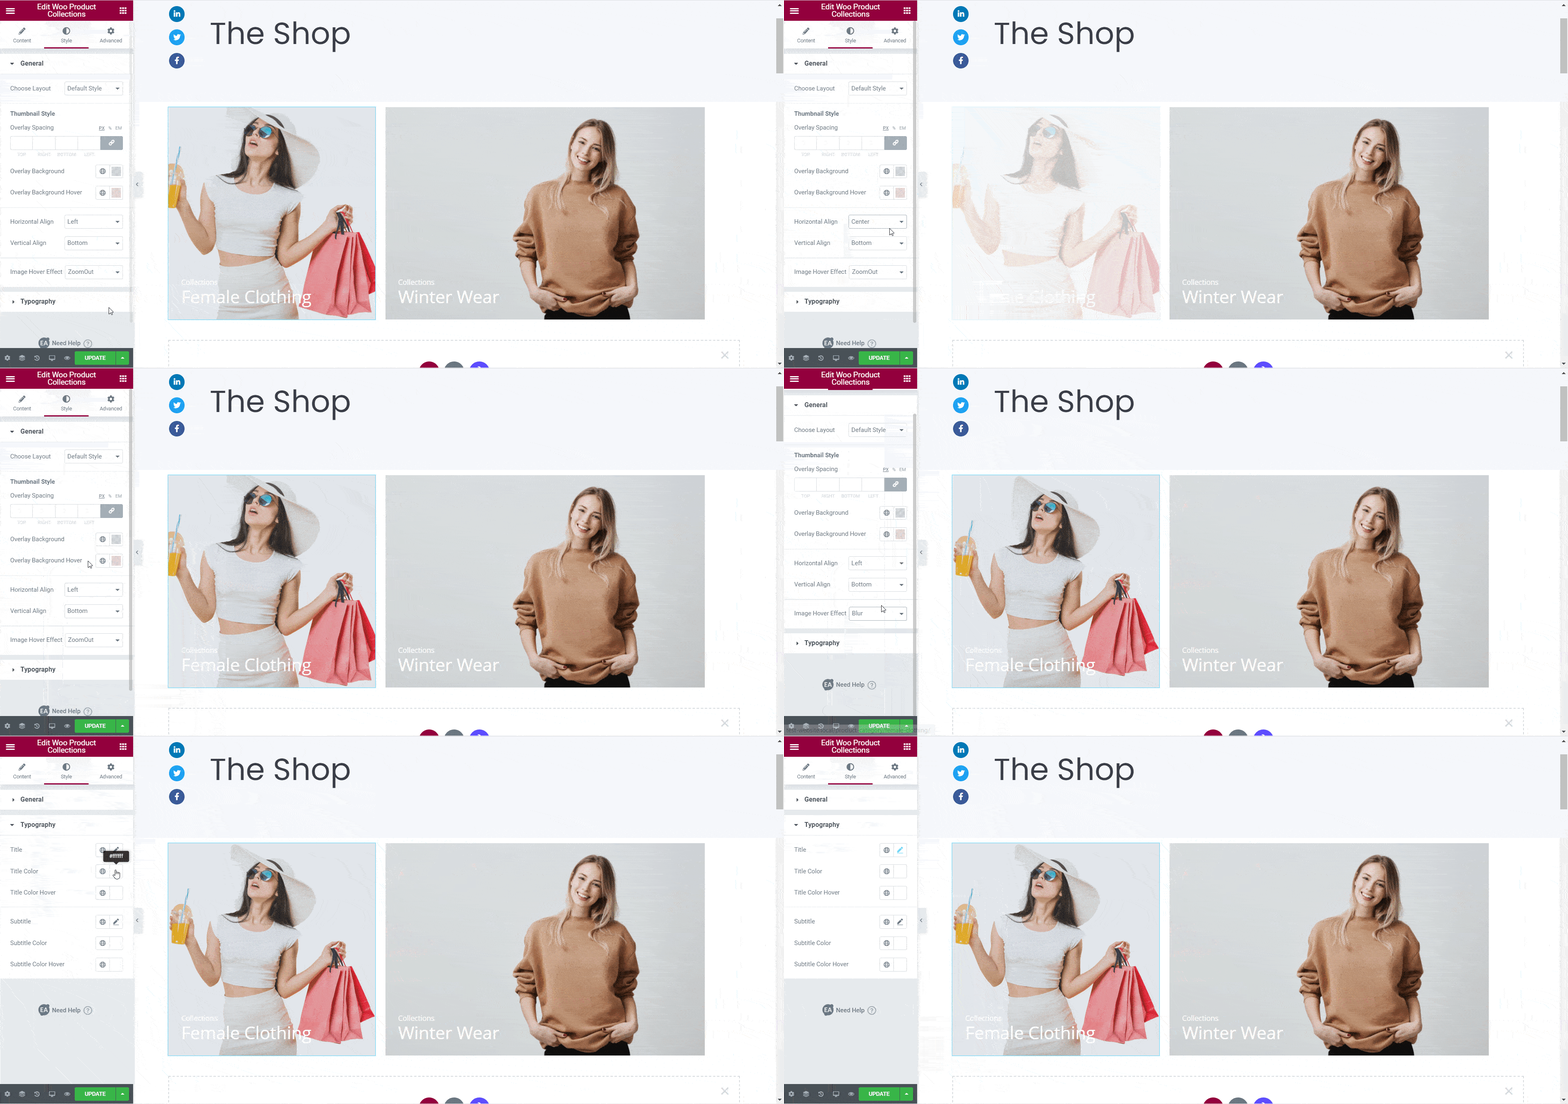
When you are done customizing the EA Woo Product Collection you should have something like this.

How To Showcase Your WooCommerce Products In Grid Layout Using Elementor
With the EA Woo Product Grid element, you can display your product in a beautiful grid layout, by following these simple steps below.
Step 1: Activate The EA Woo Product Grid Element
First, you need to activate the EA Woo Product Grid Element by searching for it under the ELEMENTS tab of your Elementor editor. Once you find it, simply drag and drop the element anywhere on your page.
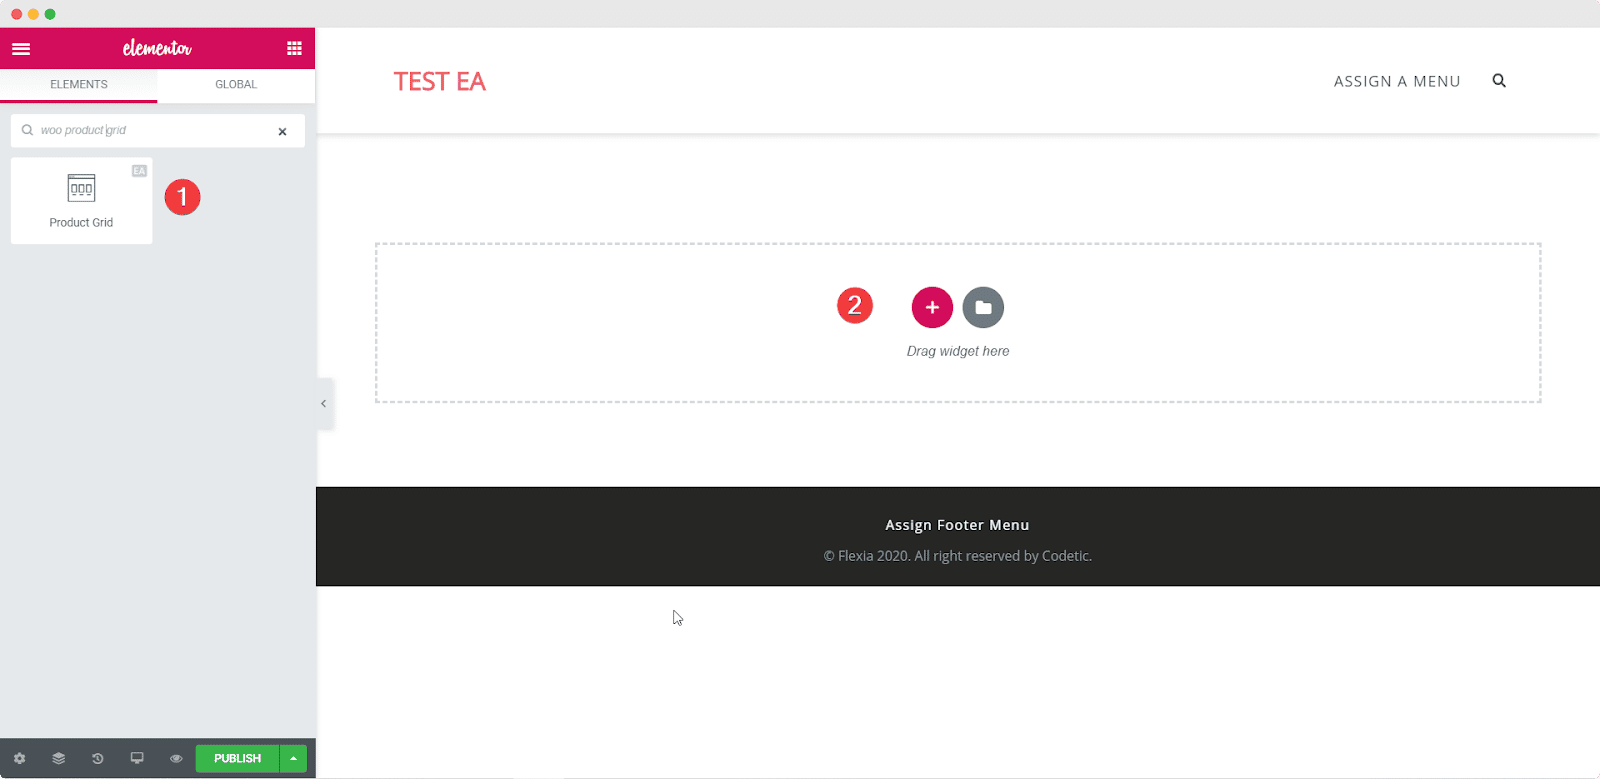
Once you drag and drop the element into any section of your page, this is the default layout you will see.
Step 2: Edit The Content Settings For Your Woo Product Grid
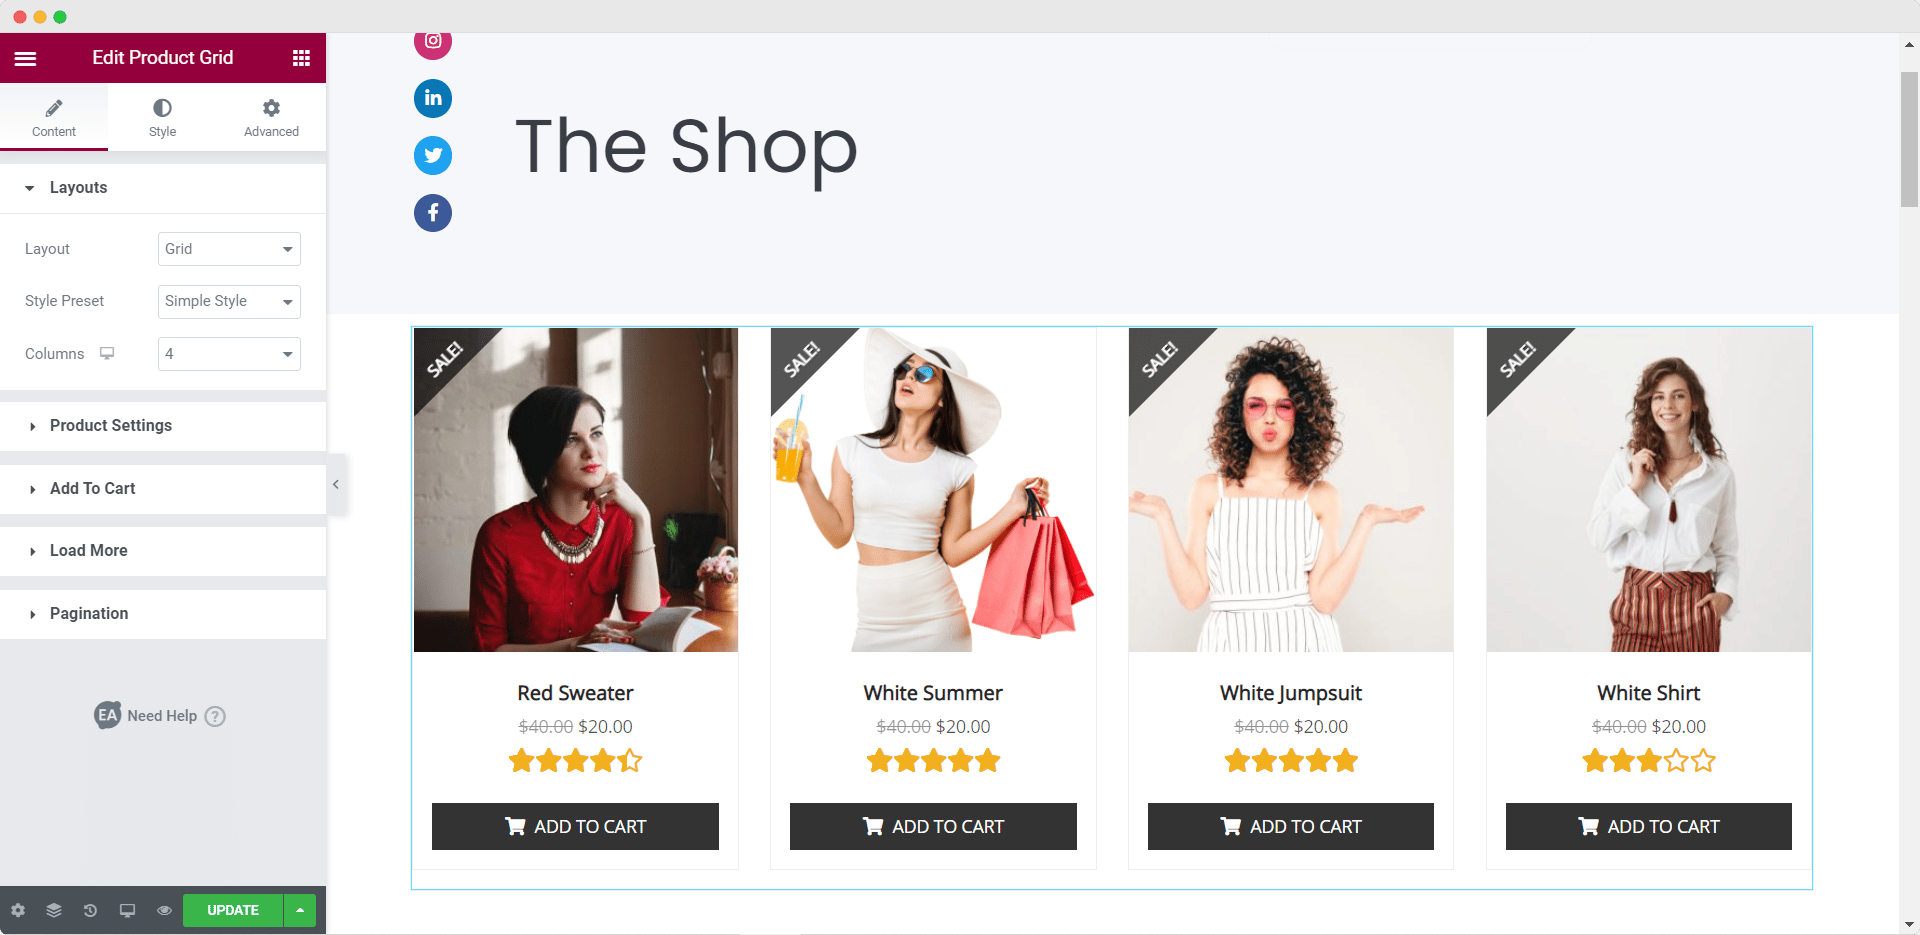
When you have activated the EA Woo Product Grid element, you need to edit the content settings to properly display your WooCommerce products in the grid layout.
Under the ‘Content’ tab you will see many options such as ‘Product Settings’ and ‘Load More’. From the ‘Product Settings’ option, you can filter your products by recent products, featured products, and more. You can also choose the number of columns to be displayed, the Product Count, and much more.
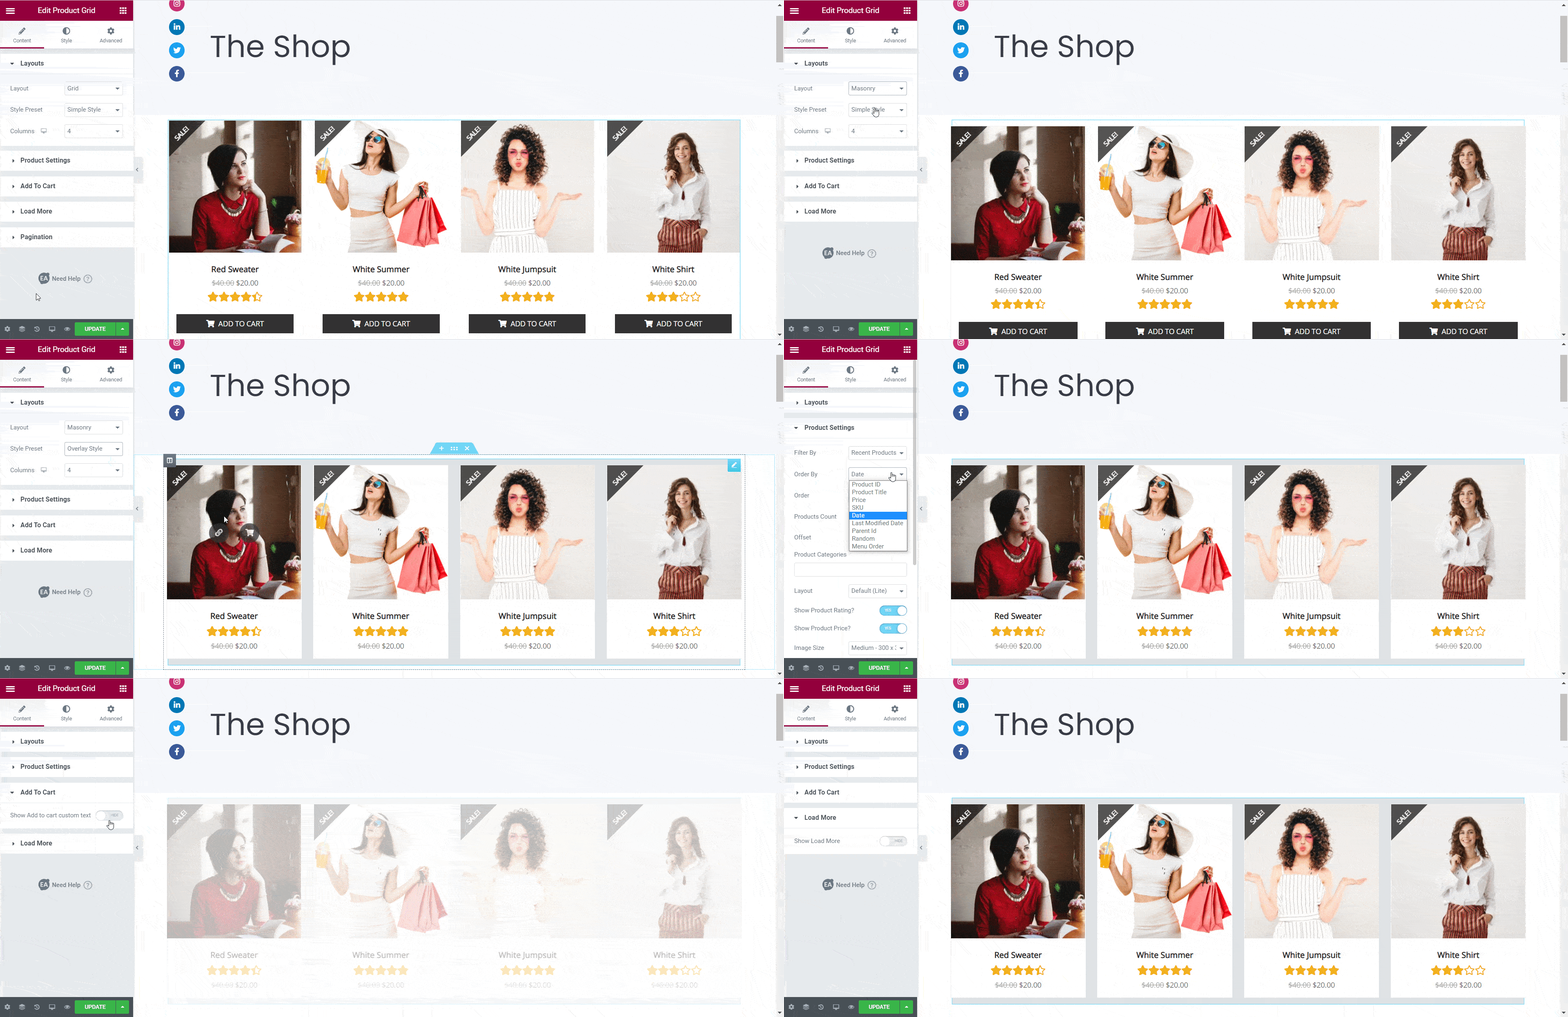
Besides this, you can also set the Style Presets. You can choose from Default, Simple Style, Reveal Style, and Overlay Style. Moreover, you have the freedom to show product ratings if you want to.
Step 3: Style Your Woo Product Grid
Next, you have to style your WooCommerce Product Grid by heading over to the Style tab. There you will see several options. From each of these settings you can change the content background color, border type, change the ‘Color & Typography’ and even your ‘Add To Cart’ Button styles.
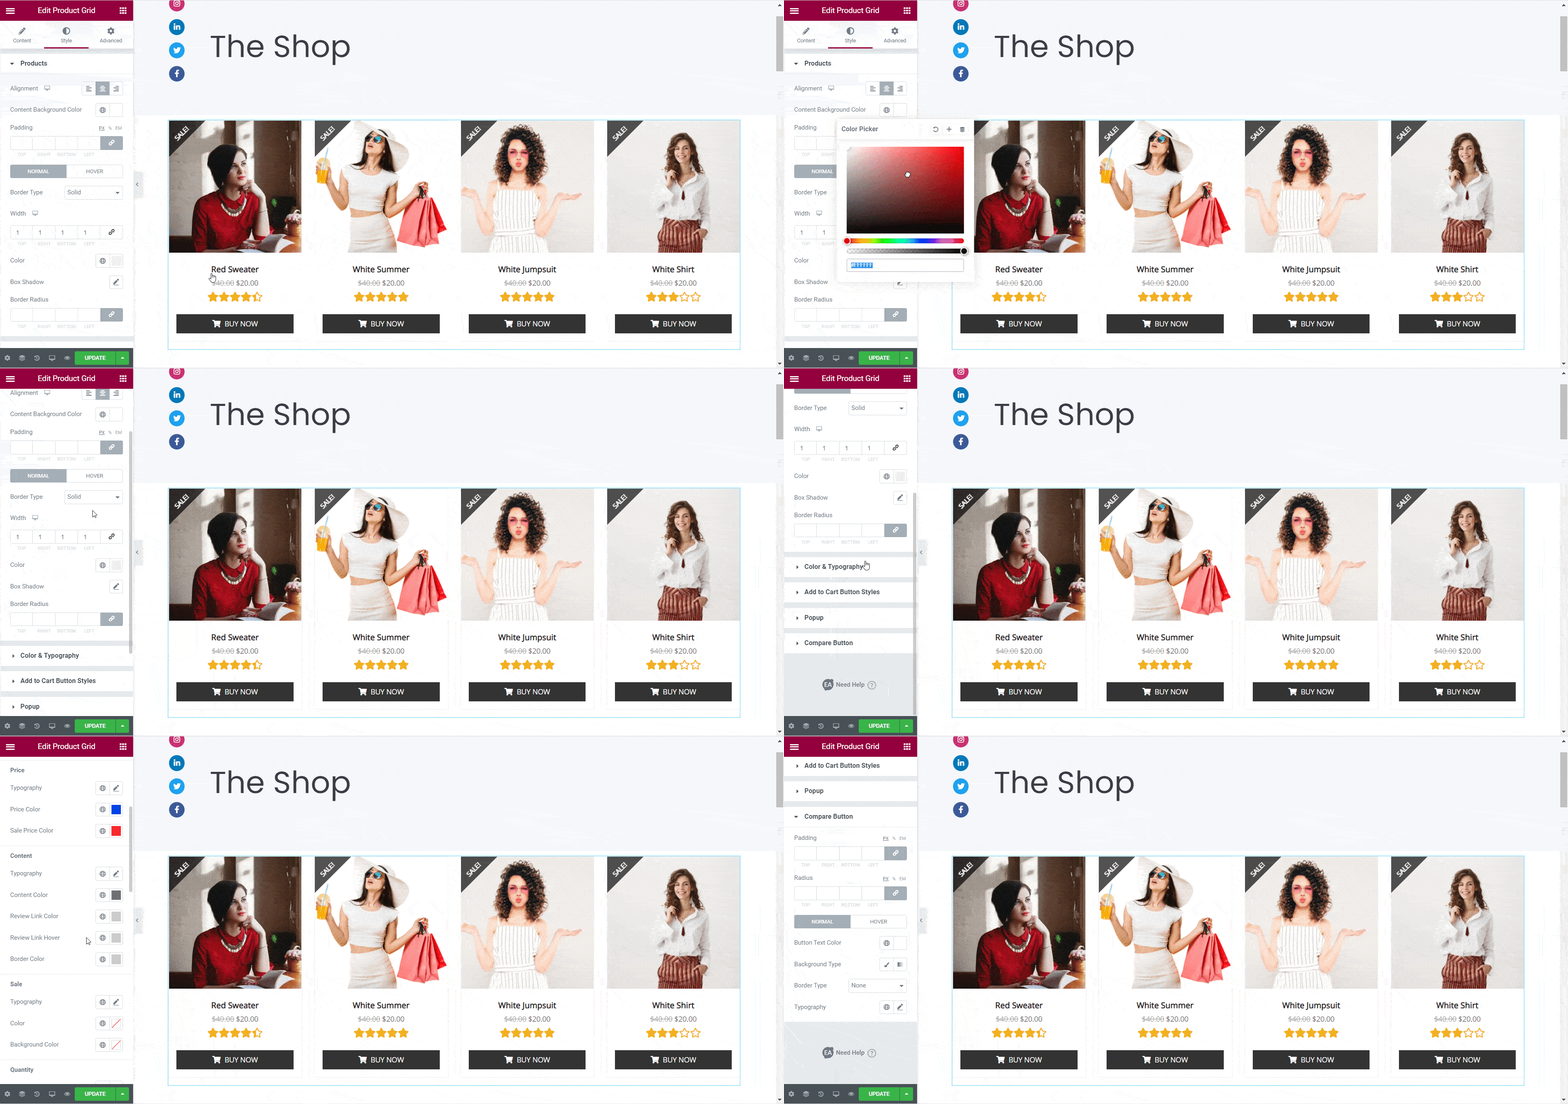
Play around with these settings until you are happy with how your EA Woo Product Grid looks.

By following these simple steps you should be able to showcase your products in an attractive grid layout on your Elementor WooCommerce site.
How To Create A Checkout Page For Your WooCommerce Site In Elementor
A Checkout Page is essential for any WooCommerce site, and you can easily create one in Elementor using the EA Woo Checkout element from Essential Addons. With this element, you can create an attractive and fully functional WooCommerce Checkout Page in Elementor. You will even have the option to choose between three different layouts for your Woo Checkout Page.
Just follow these step-by-step instructions given in this quick video tutorial below to create a Checkout Page for your WooCommerce site in Elementor.
Or, you can read our full, detailed blog post on how to create a WooCommerce Checkout Page in Elementor.
Besides these, you can also add a product comparison table to your Elementor WooCommerce website. This will allow customers to compare similar products on your store and make a purchase decision more quickly.
You can do this easily with the EA Woo Product Compare widget. Check out our blog post here to learn more in details.
How To Instantly Create A WooCommerce Site With Ready Elementor Templates
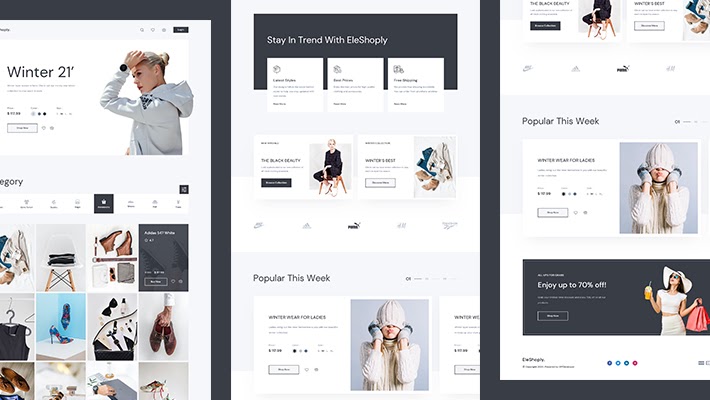
Want to know an easy trick to create your eCommerce website even faster? You can use ready Elementor WooCommerce templates to build your online store with a few clicks. And, one of the best Elementor WooCommerce templates that you can use to do this is the EleShoply template pack from Templately.
With more than 1000 ready Elementor templates, Templately has a huge collection of some of the best Elementor WooCommerce templates with which you can create any kind of eCommerce website instantly. You don’t have to bother building your page layout; with these Elementor WooCommerce template packs from Templately everything comes ready-to-use.
As for EleShoply, well, this is a stunning template pack designed with Elementor, and it comes with several beautiful ready to use pages, including:
- Home Page
- Product Collection Page
- Single Product Page
- Shopping Cart Page
- Account Page
- Checkout Page
- About Us Page
- Contact Us Page
You can instantly create a stunning WooCommerce website using this ready Elementor template in two easy steps.
Step 1: Insert The EleShoply Template Pack From Templately
First, sign up for an account on Templately and install the Templately plugin for WordPress. Afterward insert any of the premade EleShoply page templates into your website by clicking on the blue Templately button.
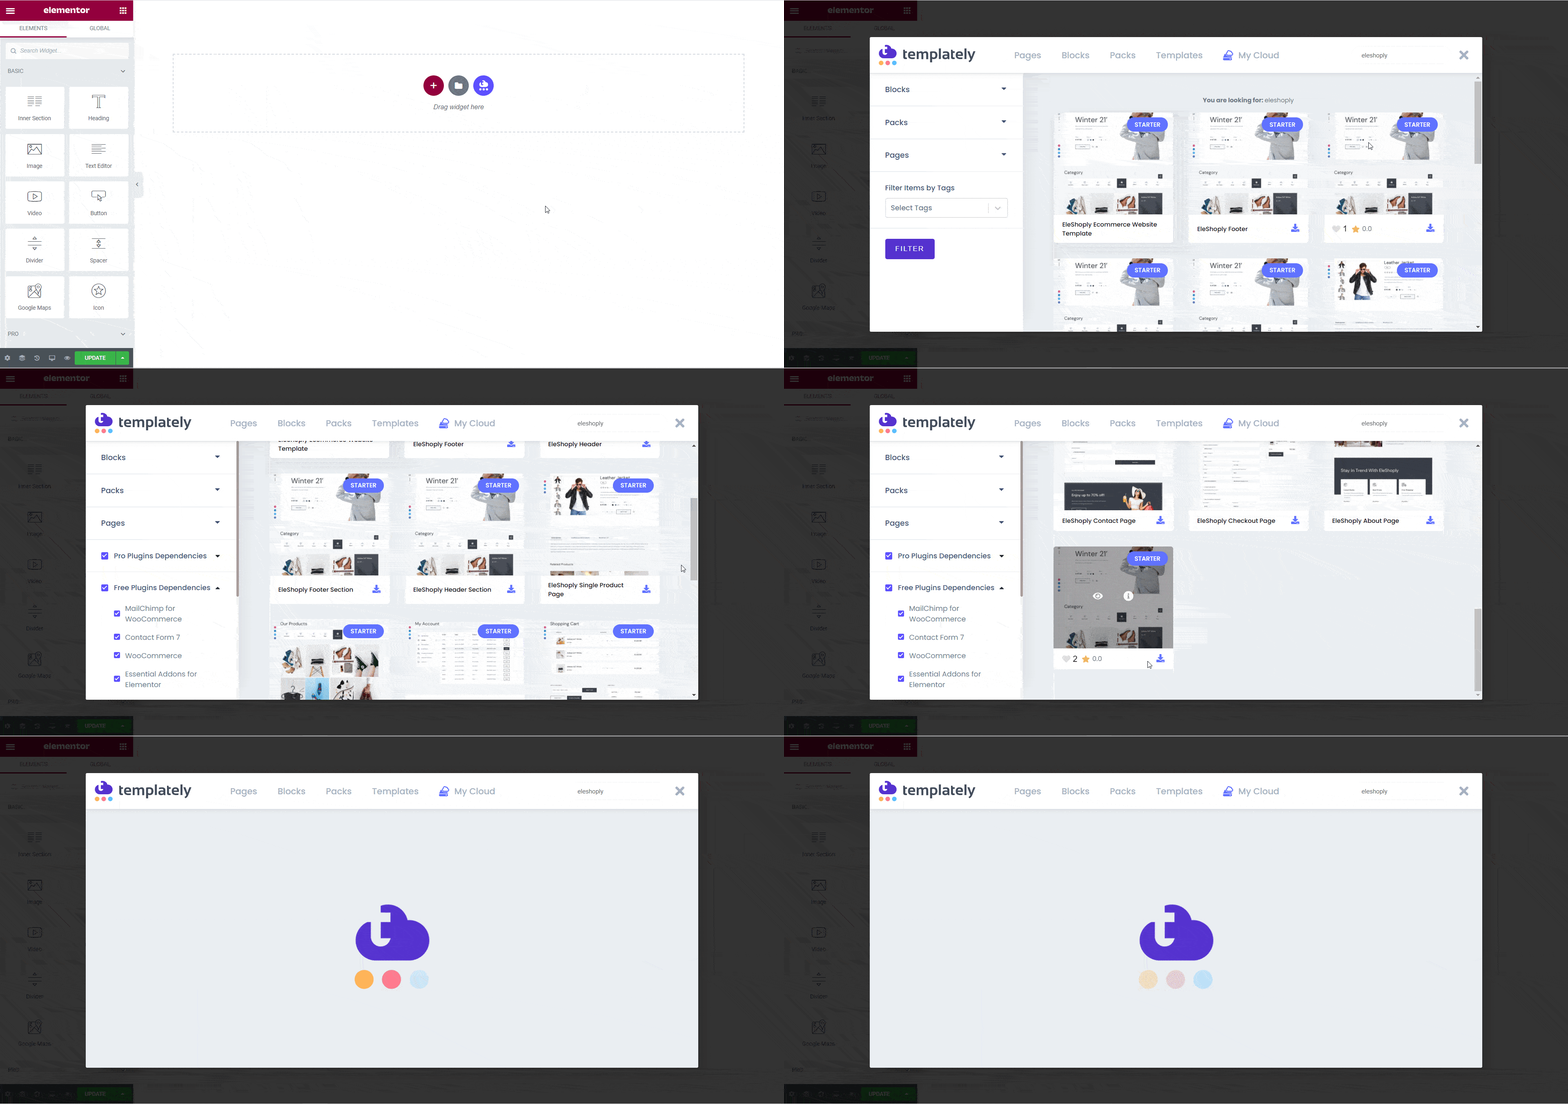
Step 2: Customize The Pages To Suit Your Style
Now, you can customize your pages to add your personal style to it. Change the colors, fonts, typography and add your own content to the ready template.
When you are done, simply save your changes and publish it for the world to see.
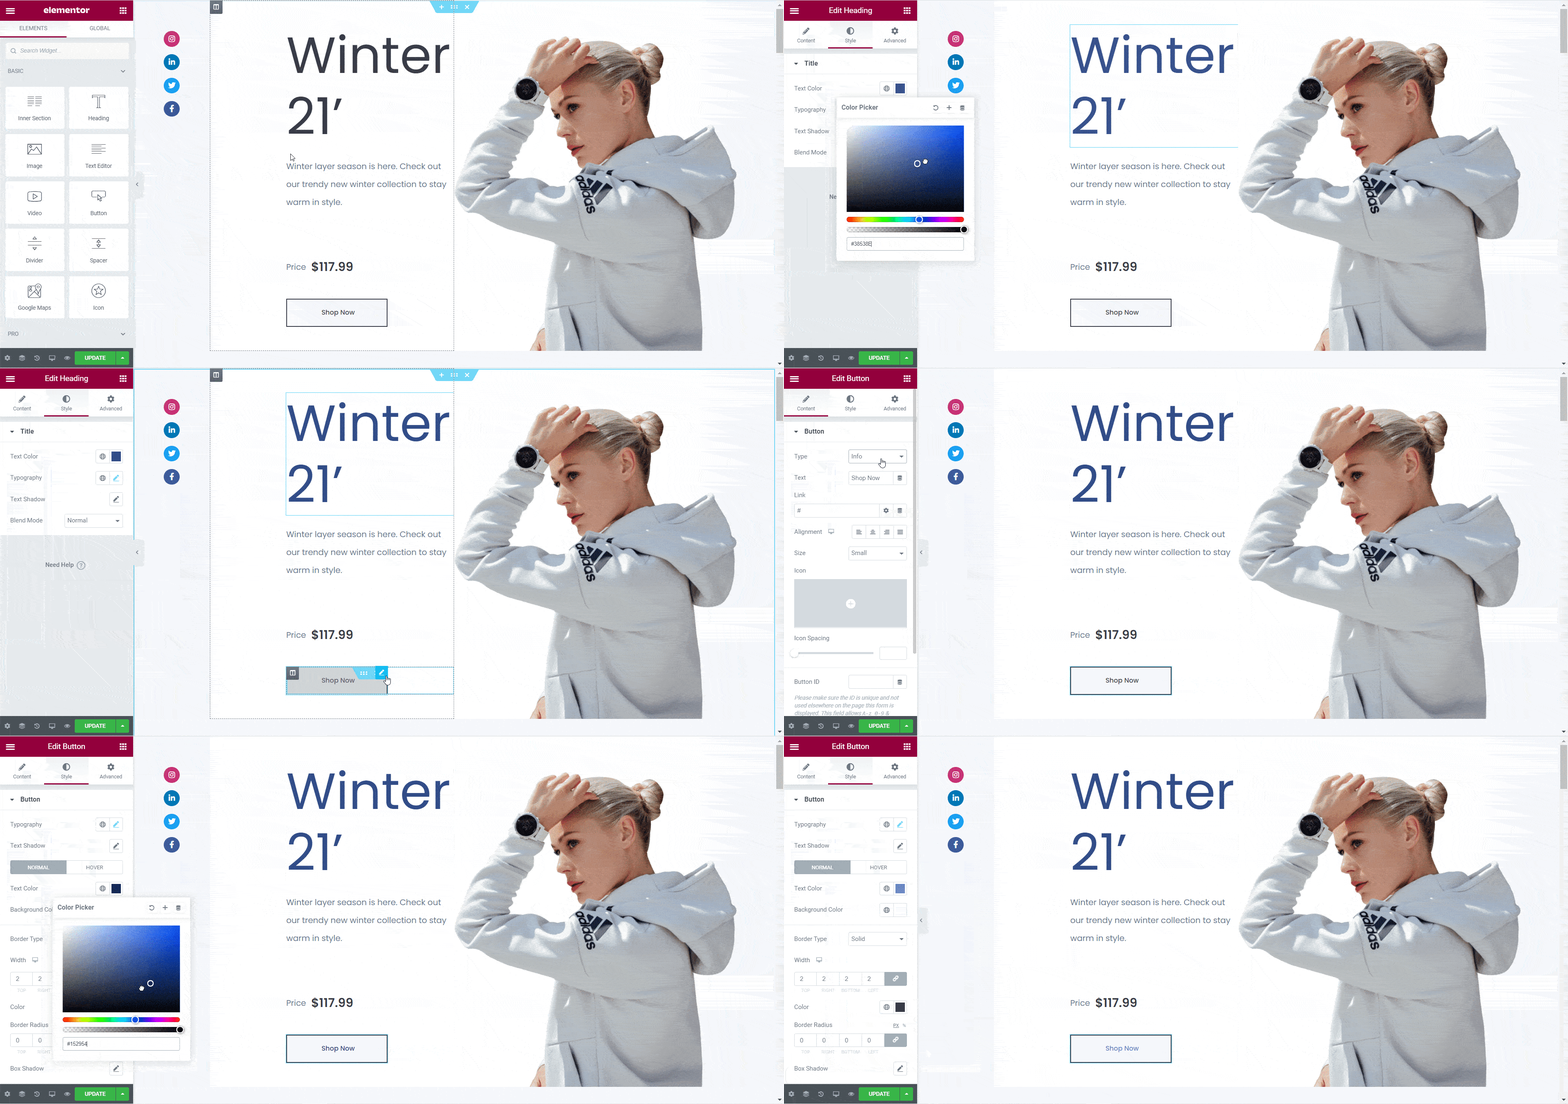
Just like that, you have designed your own eCommerce website instantly with ready Elementor WooCommerce templates from Templately.

Bonus: Use Growth Hacks To Boost Sales On Your WooCommerce Site
If you want, you can increase sales on your WooCommerce site by using FOMO and social proof marketing. The best way to do this is with NotificationX, which helps you boost sales on your WooCommerce site by adding more credibility.
With NotificationX, you can create stunning notification alerts every time someone makes a purchase, or views your products, or leaves a review, and more.
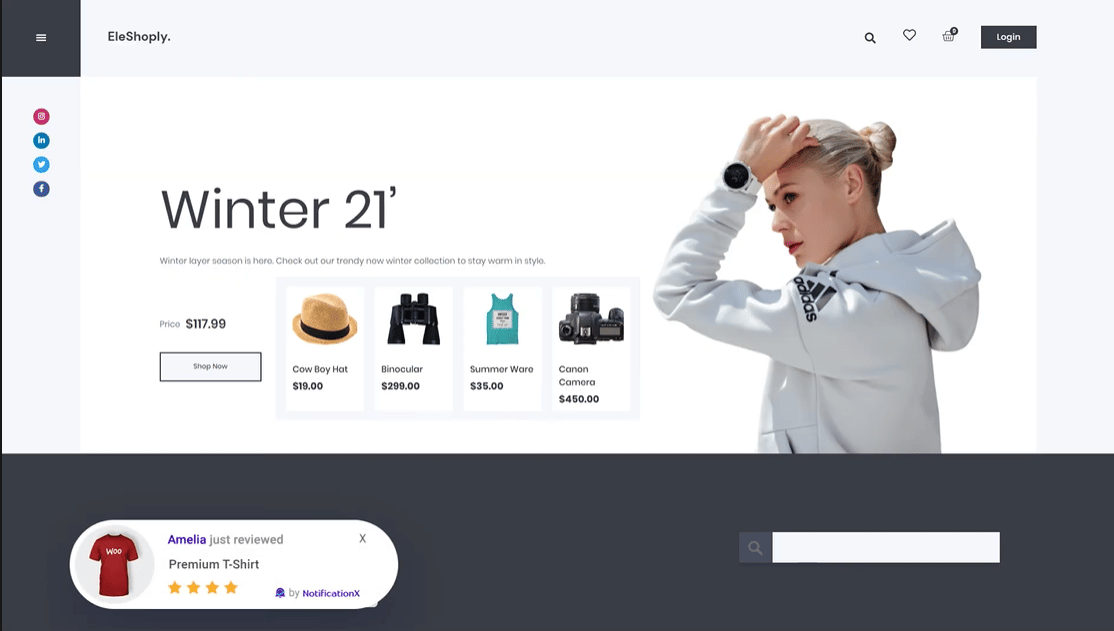
What’s more, NotificationX comes with seamless integration with Elementor, and lets you create stunning WordPress notification bars in Elementor to help you boost your engagement rates.

As you can see, creating your Elementor WooCommerce website can be easier and faster than you think, especially if you are using Essential Addons for Elementor and Templately. With just a few steps, you can create a stunning eCommerce website without any coding.
That brings us to the conclusion of our Elementor WooCommerce guide. We hope you find this blog post useful and would love to hear your feedback. If you face any difficulties, or have some feature requests for Essential Addons, feel free to contact us.


